Converting DOCX Form Fields to Smart HTML Forms
TX Text Control provides a sophisticated way to create and deploy forms using the online editor and document viewer. This article shows how to convert forms to pure HTML forms to collect data in web and mobile applications.

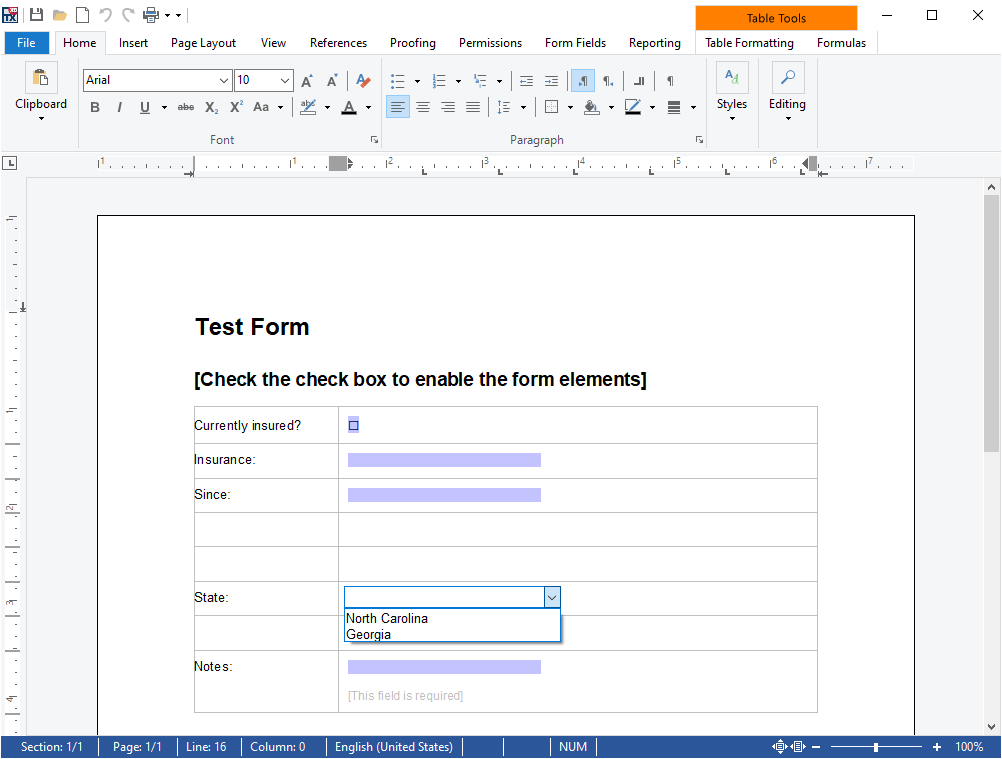
TX Text Control provides a sophisticated way to create and deploy forms using the online editor and document viewer. Existing forms with form text fields, checkboxes, drop-downs and date picker fields can be imported from MS Word or created using TX Text Control:

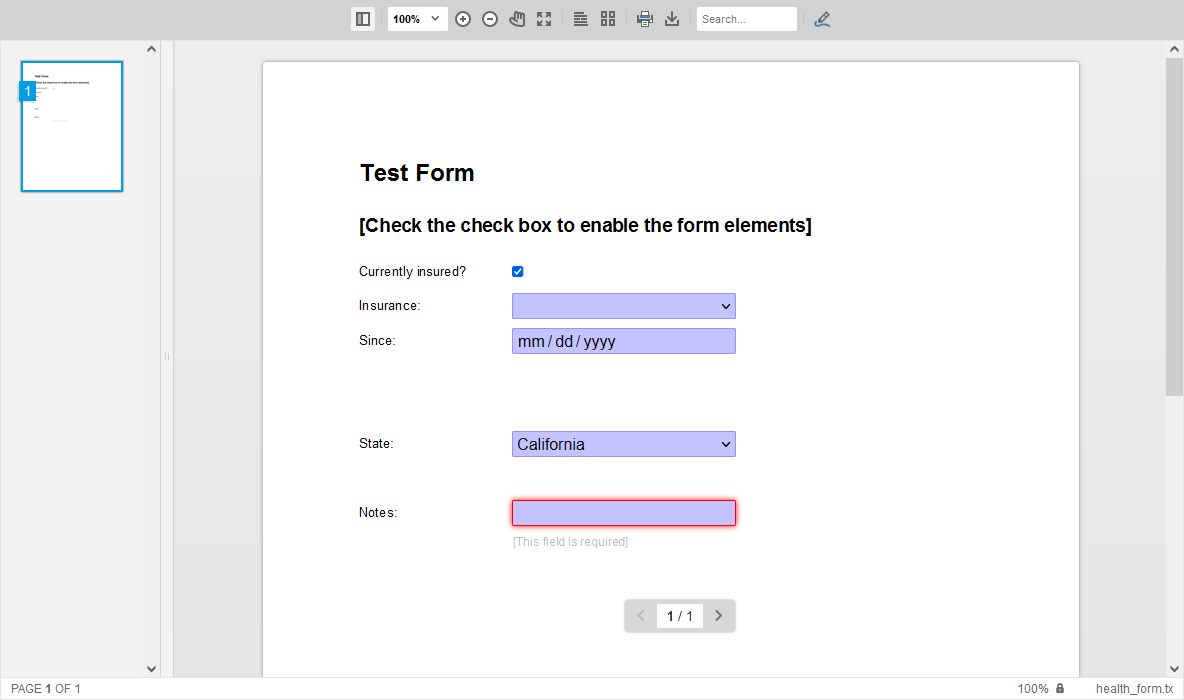
This form can be deployed using the TX Text Control DocumentViewer that shows the form fields automatically including conditional instructions:

Convert to HTML Forms
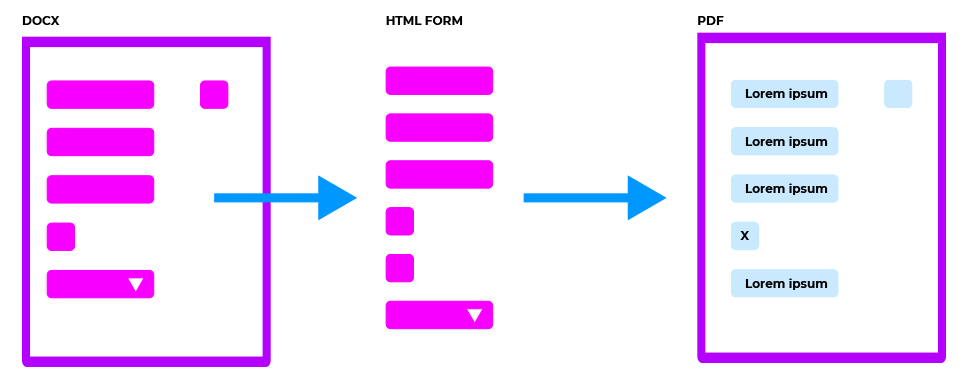
The DocumentViewer is responsive and supports mobile devices as well, but sometimes a pure HTML form is the better option to request data from users. Specifically, if the completed data should be collected on mobile devices. The advantage of TX Text Control is the integration into a complete workflow:
- Maintain one master form template
- Extract form fields
- Merge data into master template
- Create final PDF from merged data and the template
The following illustration shows this workflow in detail:

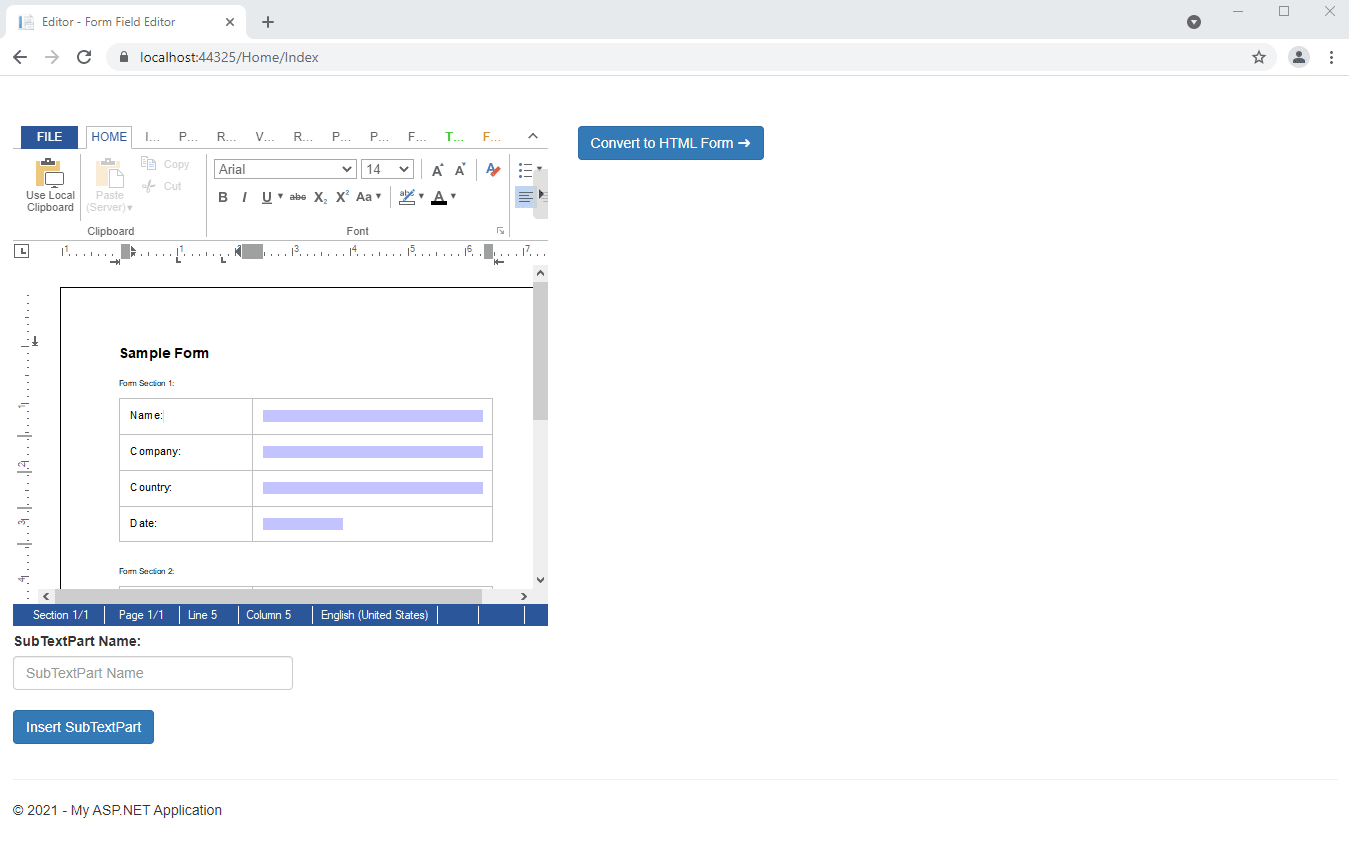
In this sample, all form fields are converted into HTML form elements. A Sub

Creating Form Groups
The name of the SubTextPart is then used to generate a group of form fields. The following JavaScript function shows how to convert the current selection into a SubTextPart in the document:
async function addSubTextPart() {
    var range = await getSelectionRange();

    var name = document.getElementById("subTextPartName").value;
    TXTextControl.subTextParts.add(name, 0, range.start, range.length);
    TXTextControl.focus();
}

function getSelectionRange() {
    return new Promise(resolve => {
        TXTextControl.selection.getStart(function (curSelStart) {
            TXTextControl.selection.getLength(function (curSelLength) {

                var range = {
                    start: curSelStart + 1,
                    length: curSelLength,
                };

                resolve(range);
            });
        });
    });
}
On clicking Convert to HTML Form, the document is being saved and sent to the Controller method CreateForm:
var bDocument;
var serviceURL = "@Url.Action("CreateForm", "Home")";

// save document
TXTextControl.saveDocument(TXTextControl.StreamType.InternalUnicodeFormat, function (e) {
    bDocument = e.data;
    // send document to controller
    $.ajax({
        type: "POST",
        url: serviceURL,
        data: {
            document: e.data
        },
        success: successFunc,
        error: errorFunc
    });
});
The Controller method loads the document into a Server
[HttpPost]
public JsonResult CreateForm(string document) {
  using (TXTextControl.ServerTextControl tx = new TXTextControl.ServerTextControl()) {
    tx.Create();

    tx.Load(Convert.FromBase64String(document),
      TXTextControl.BinaryStreamType.InternalUnicodeFormat);

    List<FormSection> formSections = new List<FormSection>();

    foreach (TXTextControl.SubTextPart section in tx.SubTextParts) {

      byte[] data;

      section.Save(out data, BinaryStreamType.InternalUnicodeFormat);

      var fields = GetFormFields(data);

      formSections.Add(new FormSection() {
        Name = section.Name,
        FormFields = fields
      });
    }

    return Json(formSections, JsonRequestBehavior.AllowGet);

  }

}
Each section (SubTextPart) is saved and processed individually to extract the form fields:
private List<SmartFormField> GetFormFields(byte[] data) {
  using (TXTextControl.ServerTextControl tx = new TXTextControl.ServerTextControl()) {
    tx.Create();
    tx.Load(data, BinaryStreamType.InternalUnicodeFormat);

    List<SmartFormField> smartFormFields = new List<SmartFormField>();

    foreach (FormField field in tx.FormFields) {

      switch (field.GetType().Name) {
        case "TextFormField":
          smartFormFields.Add(new SmartTextFormField() {
            Name = field.Name,
            Text = field.Text
          });
          break;
        case "CheckFormField":
          smartFormFields.Add(new SmartCheckboxField() {
            Name = field.Name,
            Text = field.Text,
            Checked = ((CheckFormField)field).Checked
          });
          break;
        case "SelectionFormField":
          smartFormFields.Add(new SmartDropdownField() {
            Name = field.Name,
            Text = field.Text,
            Items = ((SelectionFormField)field).Items
          });
          break;
        case "DateFormField":

          SmartDateField smartDateField = new SmartDateField() {
            Name = field.Name,
            Text = field.Text,
            Date = ""
          };

          if (((DateFormField)field).Date != null)
              smartDateField.Date = ((DateFormField)field).Date.Value.ToString("yyyy-MM-dd");

          smartFormFields.Add(smartDateField);
          break;
      }

    }

    return smartFormFields;
  }
}
Create HTML Form Fields Client-Side
Finally, a list of SmartFormField objects is returned. These objects contain the required information to create the HTML form client-side:
public class FormSection {
  public string Name { get; set; }
  public List<SmartFormField> FormFields { get; set; }
}

public class SmartFormField {
  public string Name { get; set; }
  public string Text { get; set; }
}

public class SmartTextFormField : SmartFormField {
  public string TypeName { get; set; } = "SmartTextFormField";
}

public class SmartCheckboxField : SmartFormField {
  public bool Checked { get; set; }
  public string TypeName { get; set; } = "SmartCheckboxField";
}

public class SmartDropdownField : SmartFormField {
  public string[] Items { get; set; }
  public string TypeName { get; set; } = "SmartDropdownField";
}

public class SmartDateField : SmartFormField {
  public string Date { get; set; }
  public string TypeName { get; set; } = "SmartDateField";
}
In the client-side JavaScript, these SmartFormField objects are converted to HTML forms and are added dynamically to the DOM:
function successFunc(data, status) {

    $("#smartForm").empty();

    data.forEach(section => {
        var fieldset = $("<form><fieldset><legend>" + section.Name + "</legend></fieldset></form>").appendTo("#smartForm");

        section.FormFields.forEach(formField => {

            switch (formField.TypeName) {

                case "SmartTextFormField":
                    fieldset.append($("<div class='form-group'><label for='" + formField.Name + "'>" + formField.Name.toUpperCase() + "</label><input placeholder='Type in " + formField.Name + "' class='form-control' name='" + formField.Name + "' id='" + formField.Name + "' type='text' value='" + formField.Text + "' /></div>"));
                    break;

                case "SmartCheckboxField":

                    var checked = "";

                    if (formField.Checked === true)
                        checked = "checked";

                    fieldset.append($("<div class='form-check'><input " + checked + " class='form-check-input' name='" + formField.Name + "' id='" + formField.Name + "' type='checkbox' /><label class='form-check-label' for='" + formField.Name + "'>" + formField.Name.toUpperCase() + "</label></div>"));
                    break;

                case "SmartDateField":
                    fieldset.append($("<div class='form-group'><label for='" + formField.Name + "'>" + formField.Name.toUpperCase() + "</label><input class='form-control' name='" + formField.Name + "' id='" + formField.Name + "' type='date' value='" + formField.Date + "' /></div>"));
                    break;

                case "SmartDropdownField":

                    var items;

                    formField.Items.forEach(item => {

                        if (item === formField.Text)
                            items += "<option selected>" + item + "</option>"
                        else
                            items += "<option>" + item + "</option>"
                    });

                    fieldset.append($("<div class='form-group'><label for='" + formField.Name + "'>" + formField.Name.toUpperCase() + "</label><select class='form-control' name='" + formField.Name + "' id='" + formField.Name + "'>" + items + "</div></div>"));
                    break;

            }

        });

    });
}
You can download the full sample from our GitHub repository to test this on your own.
![]()
Download and Fork This Sample on GitHub
We proudly host our sample code on github.com/TextControl.
Please fork and contribute.
Requirements for this sample
- TX Text Control .NET Server X19 (29.0)
- Visual Studio 2019
Angular
Integrate document processing, editing, sharing, collaboration, creation, electronic signatures, and PDF generation into your Angular Web applications.
Related Posts
Form Field Compatibility: Work with AcroForms, Legacy MS Word Forms, and…
This article shows how to work with form fields in TX Text Control and how they are compatible with other industry standards. It explains how to load and save AcroForms, legacy MS Word forms and…
DocumentViewer: Deploying Forms
This sample shows how to deploy a form with form fields using the DocumentViewer in order to collect the completed data.
AngularASP.NETDocument Workflow
Creating Pre-Completed Forms Automatically
This article shows how to pre-complete form templates with known form field values automatically.
How to Import and Read Form Fields from DOCX Documents in .NET on Linux
Learn how to import and read form fields from DOCX documents in .NET on Linux using TX Text Control. This article provides a step-by-step guide to help you get started with form fields in TX Text…
Building an ASP.NET Core Backend (Linux and Windows) for the Document Editor…
This article shows how to create a backend for the Document Editor and Viewer using ASP.NET Core. The backend can be hosted on Windows and Linux and can be used in Blazor, Angular, JavaScript, and…

