Auto-Generate HTML Forms from PDF AcroForms in C#
TX Text Control enables the automatic generation of HTML forms based on AcroForms in PDF documents. This sample shows how to utilize the PDF namespace of the DocumentServer to access form fields in PDF documents.

Interactive forms in the Adobe PDF format are also known as AcroForm, the de-facto standard for PDF forms processing. Those forms can be created and exported using TX Text Control, so that end-users can fill-out these form fields in Acrobat Reader or other applications.
Create and Deploy Forms
Forms handling is fully supported by the TX Text Control DocumentEditor and the DocumentViewer that allows you to create sophisticated forms and to deploy forms to collect user data.
Learn More
TX Text Control can be used to create sophisticated, smart forms to collect data from users in different ways. This article gives an overview of various ways to deploy forms using TX Text Control.
Creating HTML Forms
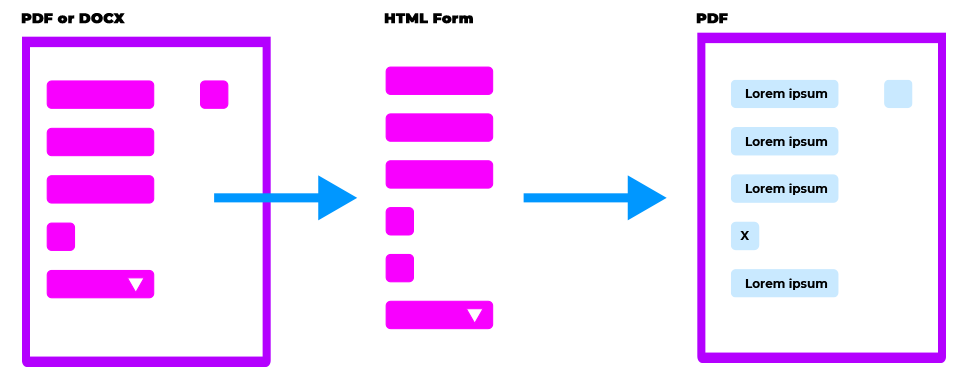
The DocumentViewer is responsive and supports mobile devices as well, but sometimes a pure HTML form is the better option to request data from users. Specifically, if the completed data should be collected inside of typical web based workflows. The advantage of TX Text Control is the integration into a complete workflow:
- Maintain one master form template
- Extract form fields
- Merge data into master template
- Create final PDF from merged data and the template

The Sample Project
The ASP.NET Core MVC sample project shows how to convert a PDF form into HTML form elements by utilizing the TXText
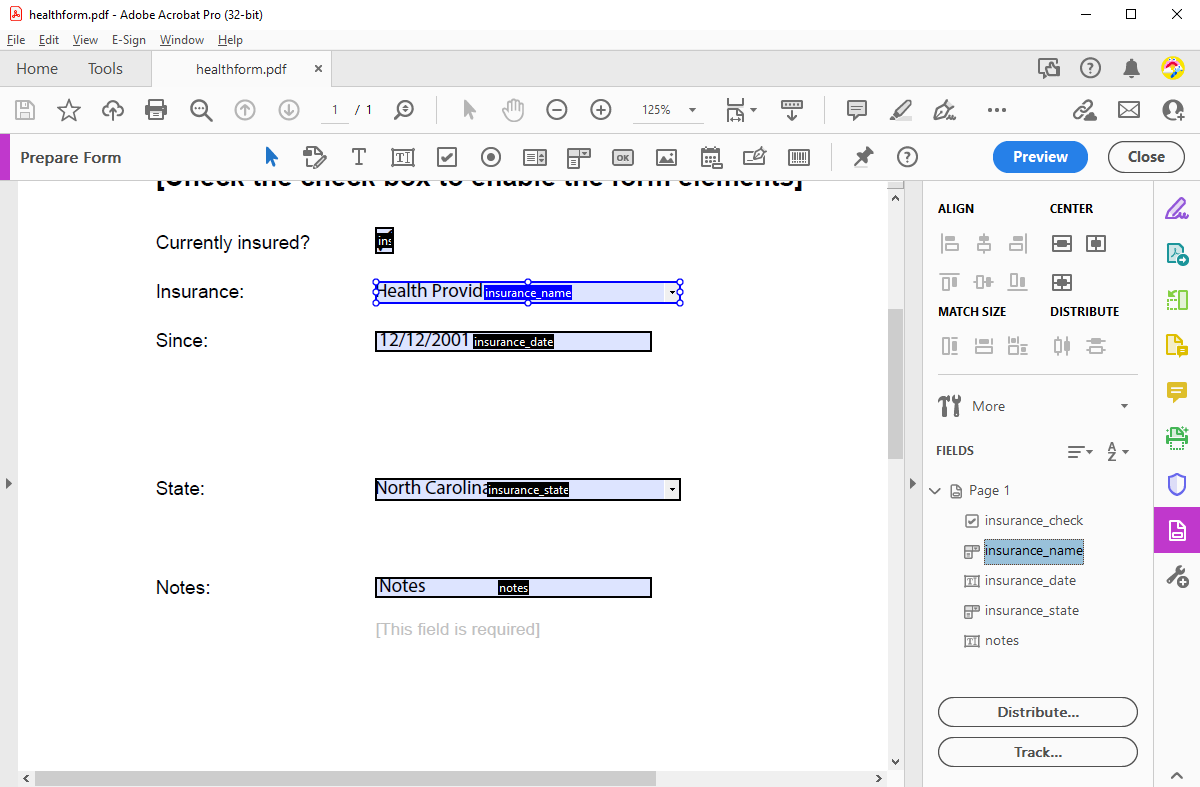
In the sample, the following sample PDF form document is used:

The following HttpGet method uses the Get
[HttpGet]
public List<SmartFormField> GetFormFields(string filename) {

   // read all acroform fields from PDF document
   TXTextControl.DocumentServer.PDF.AcroForms.FormField[] formFields =
      TXTextControl.DocumentServer.PDF.Forms.GetAcroFormFields("App_Data/" + filename);

   List<SmartFormField> smartFormFields = new List<SmartFormField>();

   // loop through all fields and convert them to "SmartFormField" objects
   foreach (TXTextControl.DocumentServer.PDF.AcroForms.FormField field in formFields) {

      switch (field) {
         case FormTextField textField:
            smartFormFields.Add(new SmartTextFormField() {
               Name = textField.FieldName,
               Text = textField.Value,
               DisplayName = textField.AlternateFieldName
            });
            break;
         case TXTextControl.DocumentServer.PDF.AcroForms.FormCheckBox checkBoxField:
            smartFormFields.Add(new SmartCheckboxField() {
               Name = checkBoxField.FieldName,
               Checked = checkBoxField.IsChecked,
               DisplayName = checkBoxField.AlternateFieldName
            });
            break;
         case FormComboBox comboBoxField:
            SmartDropdownField sddf = new SmartDropdownField() {
               Name = comboBoxField.FieldName,
               Text = comboBoxField.Value,
               DisplayName = comboBoxField.AlternateFieldName
            };

            foreach (var item in comboBoxField.Options) {
               sddf.Items.Add(item);
            }

            smartFormFields.Add(sddf);

            break;
      }

   }

   // return fields
   return smartFormFields;
}
The proxy classes implement the required properties to generate the appropriate HTML forms:
public class SmartFormField {
  public string Name { get; set; }
  public string Text { get; set; }
  public string DisplayName { get; set; }
}

public class SmartTextFormField : SmartFormField {
  public string TypeName { get; set; } = "SmartTextFormField";
}

public class SmartCheckboxField : SmartFormField {
  public bool Checked { get; set; }
  public string TypeName { get; set; } = "SmartCheckboxField";
}

public class SmartDropdownField : SmartFormField {
  public List<string> Items { get; set; } = new List<string>();
  public string TypeName { get; set; } = "SmartDropdownField";
}

public class SmartDateField : SmartFormField {
  public string Date { get; set; }
  public string TypeName { get; set; } = "SmartDateField";
}
Client-side, the returned form elements are used to generate the HTML form fields using JavaScript:
function createHtmlForm(filename) {

    var bDocument;
    var serviceURL = "@Url.Action("GetFormFields", "Home")";

    $.ajax({
        type: "GET",
        url: serviceURL + "?filename=" + filename,
        success: successFunc,
        error: errorFunc
    });

    function successFunc(data, status) {

        $("#smartForm").empty();

        var fieldset = $("<form><fieldset><legend>Form</legend></fieldset></form>").appendTo("#smartForm");

        // loop through all fields and add input elements to dynamicly created form
        data.forEach(formField => {

            switch (formField.typeName) {

                case "SmartTextFormField":
                    fieldset.append($("<div class='form-group'><label for='" + formField.name + "'>" + formField.displayName.toUpperCase() + "</label><input placeholder='Type in " + formField.name + "' class='form-control' name='" + formField.name + "' id='" + formField.name + "' type='text' value='" + formField.text + "' /></div>"));
                    break;

                case "SmartCheckboxField":

                    var checked = "";

                    if (formField.Checked === true)
                        checked = "checked";

                    fieldset.append($("<div class='form-check'><input " + checked + " class='form-check-input' name='" + formField.name + "' id='" + formField.name + "' type='checkbox' /><label class='form-check-label' for='" + formField.name + "'>" + formField.displayName.toUpperCase() + "</label></div>"));
                    break;

                case "SmartDateField":
                    fieldset.append($("<div class='form-group'><label for='" + formField.name + "'>" + formField.displayName.toUpperCase() + "</label><input class='form-control' name='" + formField.name + "' id='" + formField.name + "' type='date' value='" + formField.date + "' /></div>"));
                    break;

                case "SmartDropdownField":

                    console.log("drop down");

                    var items;

                    formField.items.forEach(item => {

                        if (item === formField.text)
                            items += "<option selected>" + item + "</option>"
                        else
                            items += "<option>" + item + "</option>"
                    });

                    fieldset.append($("<div class='form-group'><label for='" + formField.name + "'>" + formField.displayName.toUpperCase() + "</label><select class='form-control' name='" + formField.name + "' id='" + formField.name + "'>" + items + "</div></div>"));
                    break;

            }

        });
    }

    function errorFunc() {
        alert("Error");
    }

}
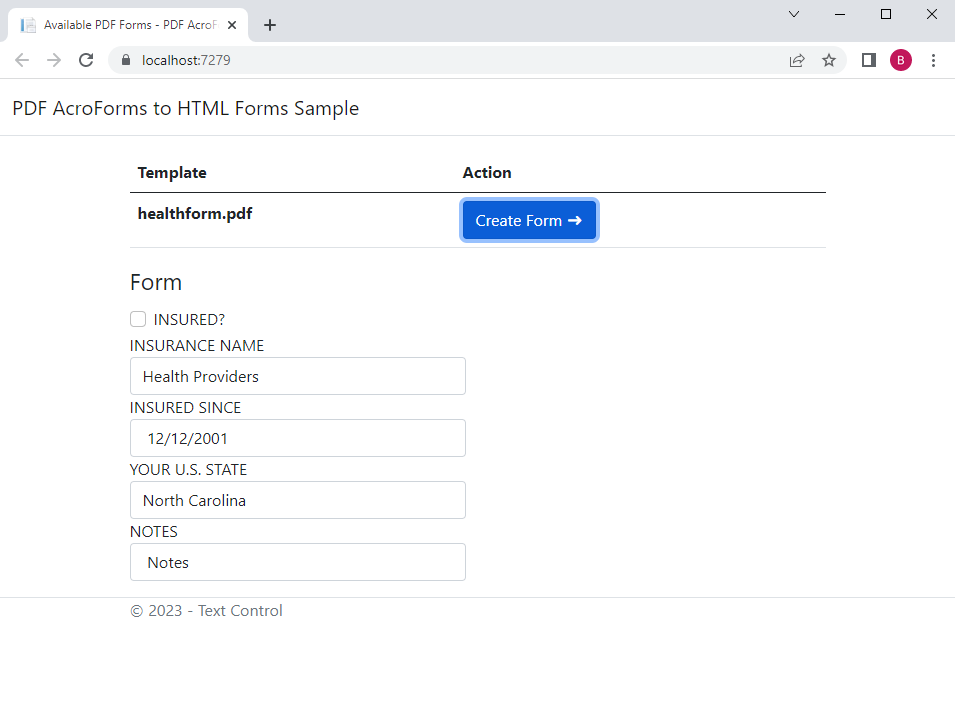
As seen in the screenshot below, the HTML form fields are created with a form group label based on the tooltip property in Adobe Acrobat. In the TX Text Control FormField class, this value is available in the Alternate

You can download and test this sample from our GitHub repository.
![]()
Download and Fork This Sample on GitHub
We proudly host our sample code on github.com/TextControl.
Please fork and contribute.
Requirements for this sample
- TX Text Control .NET Server 31.0
- Visual Studio 2022
ASP.NET
Integrate document processing into your applications to create documents such as PDFs and MS Word documents, including client-side document editing, viewing, and electronic signatures.
- Angular
- Blazor
- React
- JavaScript
- ASP.NET MVC, ASP.NET Core, and WebForms
Related Posts
How to Load and View PDF Documents in ASP.NET Core C#
A very typical task in business applications is to view PDF documents in web applications. This article describes how to use the TX Text Control Document Viewer to display PDF documents in ASP.NET…
How to Create and Deploy PDF Forms in ASP.NET Core C#
TX Text Control can be used for the creation and editing of form fields in PDF documents. This article explains how to create a PDF form from scratch and how to deploy the form using the Document…
Healthcare Use Case: Digital Forms Workflow with Electronic Signatures
Forms play an important role in healthcare processes and offer a huge potential for automation and digital forms processing. This article and sample show how to use TX Text Control to streamline…
Importing Form Data from PDF Documents Exported from Chrome
Google Chrome 85 supports the completion and export of PDF documents with AcroForm form fields. When data is typed into these fields, the completed document can be exported.
Creating Adobe PDF Forms in C#
Interactive forms in an Adobe PDF document can be used to gather information from end-users. This article shows how to create those forms using TX Text Control in .NET applications using C#.


