









React DOCX Editor: Add Word-Like Editing to Your Web App

This tutorial shows how to add a React DOCX editor to your web application with TX Text Control .NET Server. It covers setting up the backend, adding the Document Editor component, and loading and editing a DOCX document, with no Microsoft Word dependency.

A React DOCX editor lets users edit Word documents directly in your React application. TX Text Control offers this through a DOCX Editor SDK with its own word processing engine and a Document Editor that is available as a React component on npm.
For React developers, this means adding one component instead of building word processing features themselves. The editor offers a true WYSIWYG experience: what users see while editing matches the generated PDF and printed output. The engine behind the editor also handles server-side document processing.
The following steps show how to set up the backend, add the React DOCX editor, and load and edit DOCX documents, all without needing Microsoft Word.
How the React DOCX Editor Works
The application in this tutorial has two parts:
- React frontend: The @txtextcontrol/tx-react-document-editor package renders the editor with its Word-like ribbon interface in your React application.
- ASP.NET Core backend: The TX Text Control backend synchronizes and renders documents for the editor. The React component connects to it over a WebSocket connection.
Want to try the editor without setting up a backend?
Create a free trial access token, valid for 30 days, to connect the editor to a backend hosted by TX Text Control. Then create the React application as shown below, and when you add the editor, use this
webSocketURLwith your token:
wss://backend.textcontrol.com/api/TXWebSocket?access-token=your_trial_tokenThe editor opens with a blank document that you can edit right away. The tutorial below shows how to load DOCX files from your own ASP.NET Core backend.
Prerequisites
- Visual Studio 2026 with the .NET 10 SDK.
- Node.js and npm: download the current LTS version of Node.js, which includes npm.
- TX Text Control .NET Server trial: download and install the trial version. The setup installs the backend files and the offline NuGet packages used in this tutorial.
Already have a TX Text Control license?
You can install all packages from the Text Control private NuGet feed. The TXTextControl.Web.DocumentEditor.Backend package includes a ready-made hosted service that starts the backend, so you can skip step 2 and register that service in step 4 instead. For the full setup, read ASP.NET Core Document Editor with Backend via the Text Control Private NuGet Feed.
Step 1: Create the ASP.NET Core Backend Project
- In Visual Studio 2026, choose Create a new project.
- Select ASP.NET Core Web API and confirm with Next.
- Enter a project name and confirm with Next.
- Set the framework to .NET 10.0 (Long Term Support), check Use controllers, and confirm with Create.
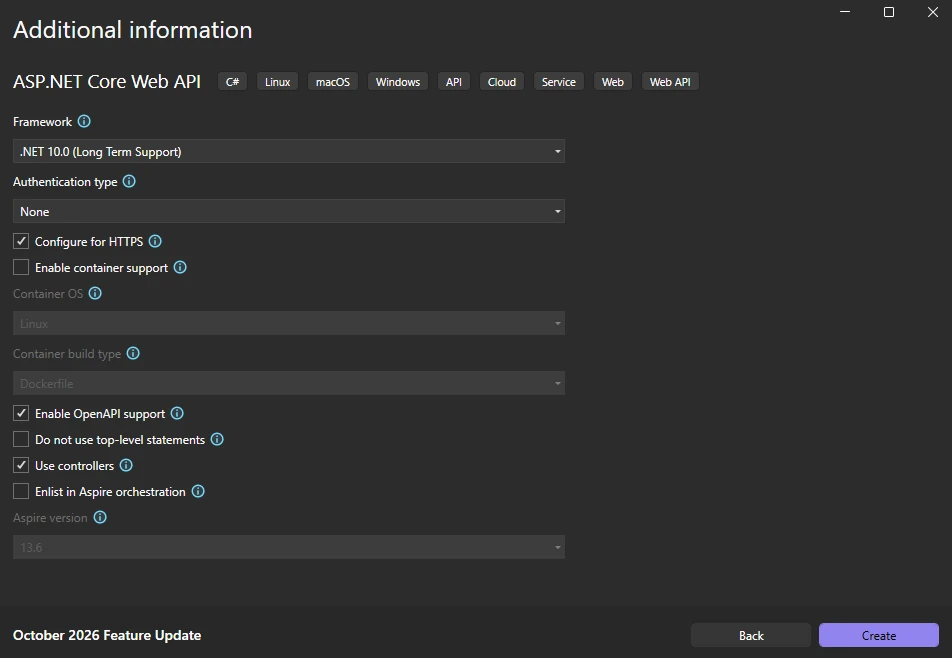
This tutorial runs the backend directly on Windows, but the TX Text Control backend also runs on Linux and in Docker containers.
Step 2: Add the Document Editor Backend
The TXWebServerProcess class is an ASP.NET Core hosted service that launches the TX Text Control backend together with your application.
Right-click the project in Solution Explorer, choose Add -> Class..., and add a new class named TXWebServerProcess.cs. Replace its content with the following code:
using System.Diagnostics;
using System.Reflection;

public class TXWebServerProcess : IHostedService
{
    private readonly ILogger<TXWebServerProcess> _logger;

    public TXWebServerProcess(ILogger<TXWebServerProcess> logger) => _logger = logger;

    public Task StartAsync(CancellationToken cancellationToken)
    {
        try
        {
            string? path = Path.GetDirectoryName(Assembly.GetExecutingAssembly().Location);
            string dllPath = Path.Combine(path ?? "", "TXTextControl.Web.Server.Core.dll");

            if (string.IsNullOrEmpty(path) || !File.Exists(dllPath))
                _logger.LogWarning("TX Web Server process could not be started.");
            else
            {
                Process.Start(new ProcessStartInfo("dotnet", $"\"{dllPath}\" &") { UseShellExecute = true, WorkingDirectory = path });
                _logger.LogInformation("TX Web Server process started.");
            }
        }
        catch (Exception ex) { _logger.LogError(ex, "Error starting TX Web Server."); }

        return Task.CompletedTask;
    }

    public Task StopAsync(CancellationToken cancellationToken)
    {
        _logger.LogInformation("Stopping TX Web Server process...");
        return Task.CompletedTask;
    }
}
Then add the backend files to the project. Right-click the project in Solution Explorer, choose Add -> Existing Item..., and browse to the installation folder:
C:\Program Files\Text Control GmbH\TX Text Control 34.0.NET Server for ASP.NET\Assembly\net8.0
Set the file filter to All Files (*.*) and add these files:
- TXTextControl.Web.Server.Core.deps.json
- TXTextControl.Web.Server.Core.dll
- TXTextControl.Web.Server.Core.Process.deps.json
- TXTextControl.Web.Server.Core.Process.dll
- TXTextControl.Web.Server.Core.Process.runtimeconfig.json
- TXTextControl.Web.Server.Core.runtimeconfig.json
- TXTextControl.Web.Server.Core.config.json
Confirm with Add. Select the added files in Solution Explorer and set Copy to Output Directory to Copy always.
Step 3: Add the TX Text Control NuGet Packages
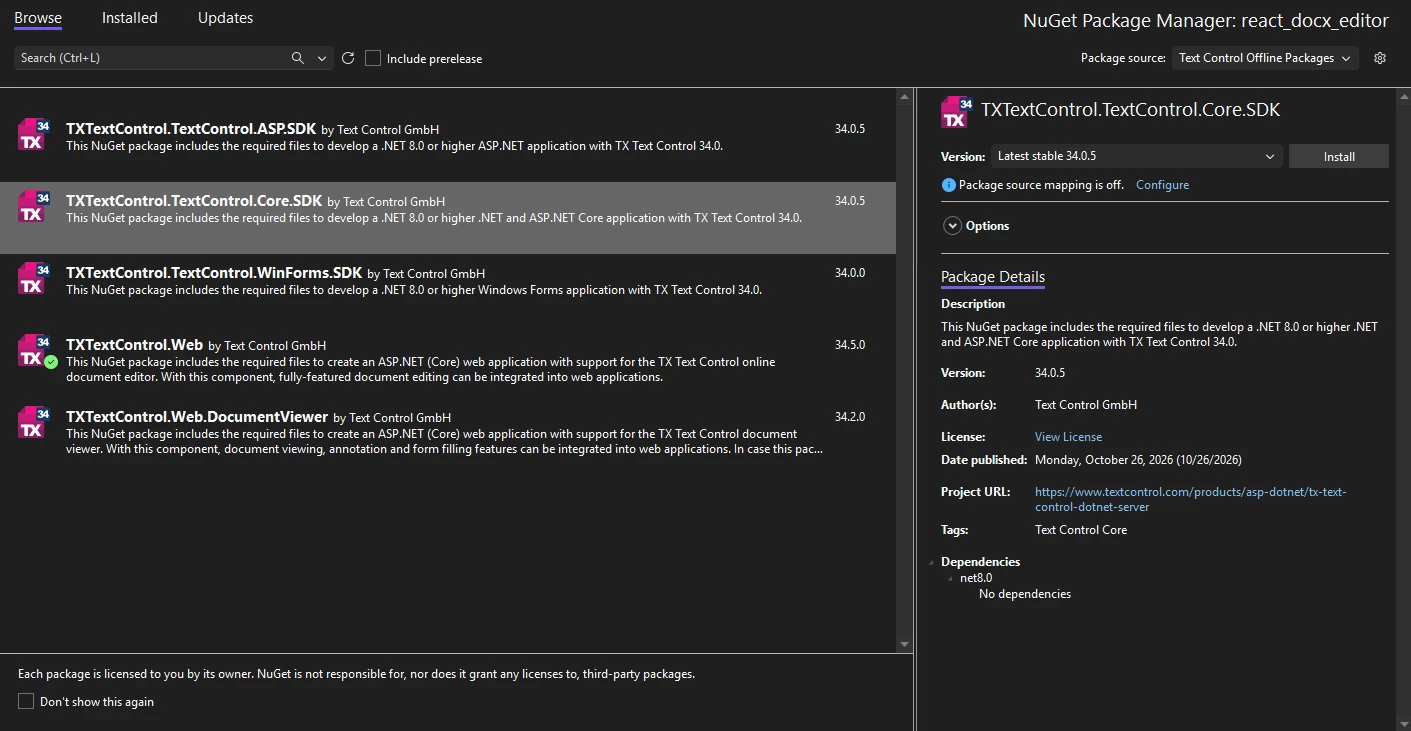
Open Manage NuGet Packages... from the Project menu, select Text Control Offline Packages as the package source, and install:
- TXTextControl.Web
- TXTextControl.TextControl.Core.SDK
Step 4: Configure Program.cs
Open Program.cs and replace its content with the following code. It starts the backend, enables the WebSocket connection for the editor, and allows the React development server to call the API:
using TXTextControl.Web;

var builder = WebApplication.CreateBuilder(args);

builder.Services.AddControllers();
builder.Services.AddHostedService<TXWebServerProcess>();

// allow the React development server to call the API
builder.Services.AddCors(options => options.AddPolicy("ReactApp", policy =>
    policy.WithOrigins("http://localhost:5173").AllowAnyMethod().AllowAnyHeader()));

var app = builder.Build();

app.UseHttpsRedirection();

// enable WebSockets
app.UseWebSockets();

// attach the TX Text Control WebSocketHandler middleware
app.UseTXWebSocketMiddleware();

app.UseCors("ReactApp");
app.UseAuthorization();
app.MapControllers();

app.Run();
Step 5: Add an Endpoint That Returns the DOCX Document
In production applications, documents typically come from a database, blob storage, or the file system. In this example, the backend reads a DOCX file and returns it to the React application as a Base64 string.
Create a folder named App_Data in the project and add a DOCX file named sample.docx. You can use your own document or download the sample document used in this tutorial. Set its Copy to Output Directory property to Copy always.
Right-click the Controllers folder, choose Add -> Class..., and name it DocumentController.cs. Replace its content with the following API controller code:
using Microsoft.AspNetCore.Mvc;

[ApiController]
[Route("api/[controller]")]
public class DocumentController : ControllerBase
{
    [HttpGet("load")]
    public IActionResult Load()
    {
        byte[] data = System.IO.File.ReadAllBytes("App_Data/sample.docx");
        return Content(Convert.ToBase64String(data));
    }
}
Start the backend by pressing F5 or choosing Debug -> Start Debugging from the main menu.
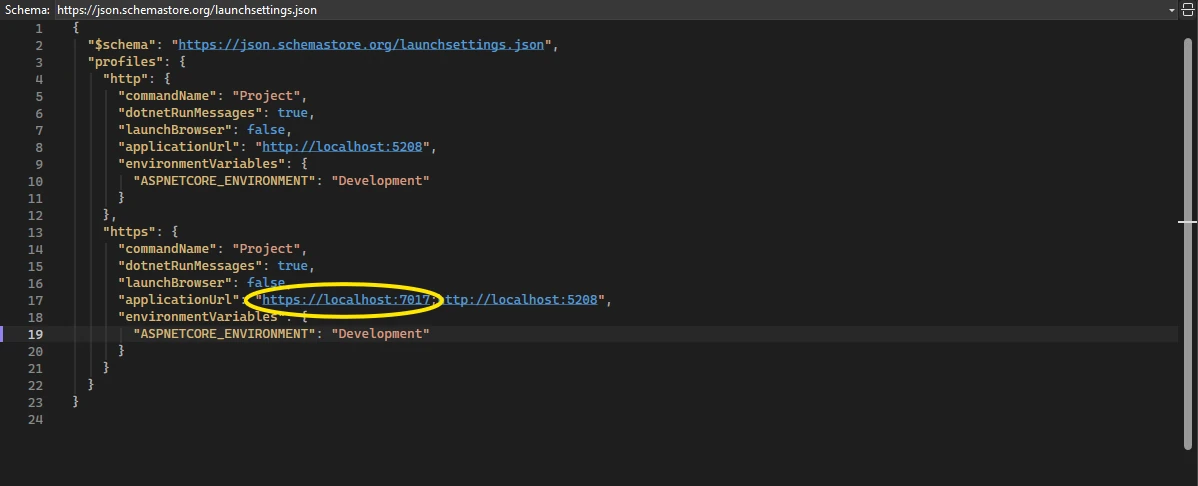
You will need the backend's HTTPS port in the next steps. To find it, open Properties/launchSettings.json in Solution Explorer and look for the applicationUrl in the https profile, for example https://localhost:7017.
Step 6: Create the React Application
Open a Command Prompt and create a new React application with Vite:
npm create vite@latest docx-editor-react -- --template reactThe command asks a few questions. Answer them as follows:
- Ok to proceed? Type y to install create-vite.
- Linter: Press Enter to accept the default. The linter does not affect this tutorial.
- Install with npm and start now? Choose No. The next commands install the dependencies, and you start the application in Step 7.
Then change into the project folder and install the dependencies:
cd docx-editor-react
npm install
Then install the TX Text Control Document Editor package for React:
npm install @txtextcontrol/tx-react-document-editorTo edit the files in the next steps, open the project in Visual Studio Code:
code .Step 7: Add the React DOCX Editor
Open src/App.jsx and replace its content with the following code. Replace 7017 with your backend's HTTPS port from Step 5. If you use a trial access token instead, replace the whole webSocketURL value with the URL shown at the beginning of this tutorial:
import DocumentEditorModule from '@txtextcontrol/tx-react-document-editor';
import './App.css';

// in Vite projects, the component is wrapped in .default
const DocumentEditor = DocumentEditorModule.default ?? DocumentEditorModule;

function App() {
  return (
    <DocumentEditor
      webSocketURL="wss://localhost:7017/api/TXWebSocket"
      editMode="Edit">
    </DocumentEditor>
  );
}

export default App;
The webSocketURL starts with wss://, the secure WebSocket protocol, because the backend runs on HTTPS.
Start the React application:
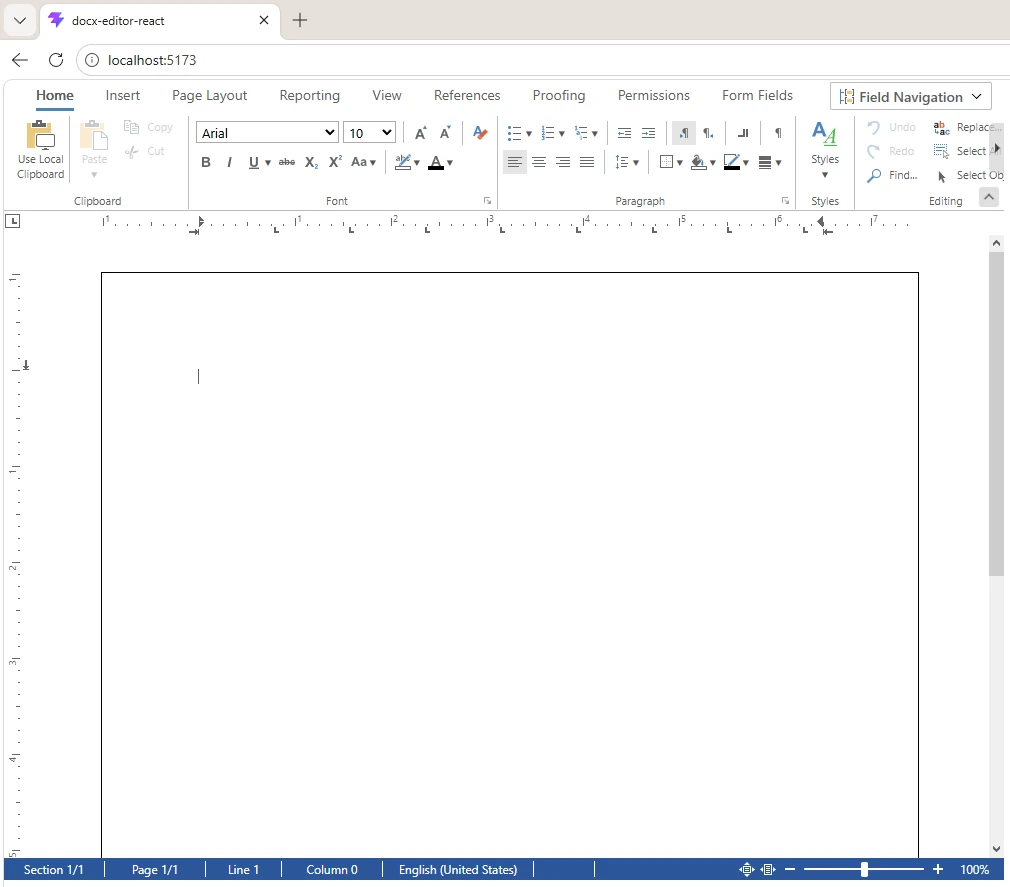
npm run devOpen http://localhost:5173 in your browser. The DOCX editor opens, ready for editing. Vite's default styles place the editor in a narrow, centered column. For a full-width editor, adjust the styles in src/App.css and src/index.css.
Step 8: Load a DOCX Document
To load the DOCX file from the backend, update src/App.jsx as follows. The code waits until the editor is ready, requests the document from the endpoint in step 5, and loads it with the load
import { useEffect } from 'react';
import DocumentEditorModule from '@txtextcontrol/tx-react-document-editor';
import './App.css';

// in Vite projects, the component is wrapped in .default
const DocumentEditor = DocumentEditorModule.default ?? DocumentEditorModule;

const BACKEND_URL = 'https://localhost:7017';

function App() {
  useEffect(() => {
    const loadDocument = async () => {
      const response = await fetch(`${BACKEND_URL}/api/document/load`);
      const base64 = await response.text();

      window.TXTextControl.loadDocument(
        window.TXTextControl.StreamType.WordprocessingML, base64);
    };

    // wait until the editor script has created the global TXTextControl object
    const timer = setInterval(() => {
      if (window.TXTextControl) {
        clearInterval(timer);
        window.TXTextControl.addEventListener('textControlLoaded', loadDocument);
      }
    }, 100);

    return () => clearInterval(timer);
  }, []);

  return (
    <DocumentEditor
      webSocketURL="wss://localhost:7017/api/TXWebSocket"
      editMode="Edit">
    </DocumentEditor>
  );
}

export default App;
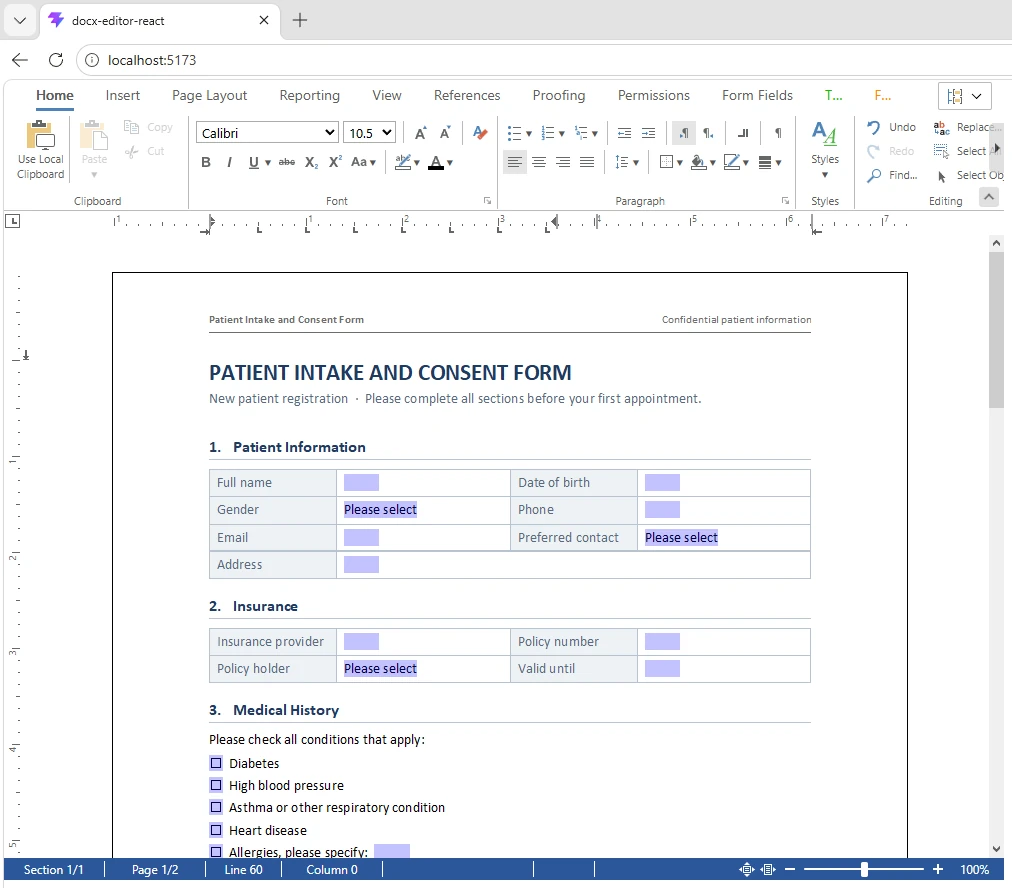
WordprocessingML is the stream type for DOCX. The document is now loaded and shown in the React DOCX editor.
Step 9: Edit the Document
Once the document is loaded, users can edit it directly in your React application.
The built-in ribbon has a familiar, Microsoft Word-like interface that requires little or no training. Its features include:
- Format text: fonts, paragraph formatting, styles, and lists
- Structure documents: tables, images, sections, and headers and footers
- Build templates: merge fields for document generation
- Create forms: checkboxes, drop-downs, and date pickers
- Review documents: tracked changes and comments
You can also control the editor programmatically with the TX Text Control Java
Learn More
Your React application now includes a DOCX editor that loads and edits Word documents. The following resources provide more information on related topics:
- Protect the backend: Adding a Security Middleware to ASP.NET Core Web Applications
- Restrict editing: Document Protection in ASP.NET with TX Text Control: Healthcare Use Cases
- Add review workflows: Building a Modern Track Changes Review Workflow in ASP.NET Core C#
- Use the editor in ASP.NET Core: How to Embed a DOCX Editor in a Web Application (ASP.NET Core)
- Choose the right SDK: DOCX Editor SDK: A Complete Evaluation Guide and Checklist
Frequently Asked Questions
A React DOCX editor is a component that adds Microsoft Word-like editing of DOCX documents to a React application. TX Text Control is a DOCX Editor SDK that provides its Document Editor as a React component in the @txtextcontrol/tx-react-document-editor npm package.
Install the @txtextcontrol/tx-react-document-editor package, add the Document Editor component to your React application, and set its webSocketURL to an ASP.NET Core backend that runs the TX Text Control middleware. DOCX files are then loaded with the JavaScript loadDocument method.
Yes. The React DOCX editor offers true WYSIWYG editing: what users see while editing matches the generated PDF and printed output. The component connects to a backend that runs the TX Text Control word processing engine, which renders the documents for the editor.
Yes. You can download the TX Text Control .NET Server trial to run your own backend, as shown in this tutorial, or create a free trial access token, valid for 30 days, to connect the React DOCX editor to a backend hosted by TX Text Control.
Yes. Existing Word documents in DOCX format can be opened in the React DOCX editor, edited, and saved back for use in Microsoft Word. The editor supports Word features such as sections, headers and footers, form fields, tracked changes, and comments.
Yes. With TX Text Control, call the saveDocument method of the JavaScript API in your React application to export the edited document as a PDF. The same method also saves documents as DOCX, HTML, or RTF.
Related Posts
JavaScriptASP.NET CoreDOCX Editor
How to Embed a DOCX Editor in a Web Application (ASP.NET Core)
This tutorial shows how to embed a DOCX editor in an ASP.NET Core web application with TX Text Control. It covers setting up the editor, loading a DOCX document, and editing it with true WYSIWYG…
DOCX Editor SDK: A Complete Evaluation Guide and Checklist
The right DOCX Editor SDK brings Microsoft Word-like editing into your web application and fits your technical and business requirements. This guide covers the capabilities and business…
Building an ASP.NET Core Backend Application to Host the Document Editor and…
This article explains how to create an ASP.NET Core backend application to host the Document Editor and Document Viewer. This backend application is required to provide the required functionality…
JavaScriptASP.NET CoreDocument Viewer
Getting Started: Document Viewer with JavaScript
This article shows how to use the TX Text Control document viewer in a pure HTML and JavaScript environment.
JavaScriptASP.NET CoreDocument Editor
Getting Started: Document Editor with JavaScript
This article shows how to use the TX Text Control document editor in a pure HTML and JavaScript environment.