Generating invoices in business applications is a very typical scenario for digital document processing. In this tutorial, the required steps of generating an invoice in a C# ASP.NET Core application is shown:
- Template creation
- Data merging
- PDF generation
Resulting Template
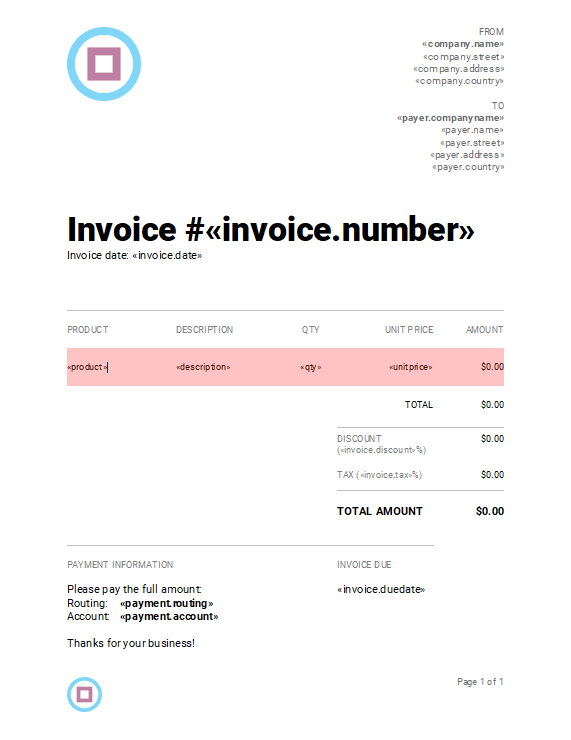
First, let's have a look at a typical invoice template (later, we will create a more simplistic version of it). The following animation is alternating between the template with placeholders and with merged data:
Download Template
This template is discussed in another blog post that also provides links to download the template and JSON data.
JSON Data
JSON data is used as the data source that is merged into the template. This JSON data string is also beginning of the template creation process. The JSON file is loaded into the DocumentEditor to provide the user ("template designer") the available merge field names.
The following JSON data contains the typical elements that should be included on an invoice including invoice meta data, information about the payer, the sold products and payment information. In this sample, the total amount, tax and discount values are calculated using formulas in the template itself.
| [ | |
| { | |
| "invoice" : { | |
| "number" : "R2019041151", | |
| "date" : "4/15/2019", | |
| "duedate" : "5/15/2019", | |
| "discount" : 15, | |
| "tax": 7.5 | |
| }, | |
| "company" : { | |
| "name" : "Text Control, LLC", | |
| "street" : "6676 Text Control Rd", | |
| "address" : "28210 Charlotte, NC", | |
| "country" : "United States" | |
| }, | |
| "payer" : { | |
| "companyname" : "Payer Corporation", | |
| "name" : "Peter Jackson", | |
| "street" : "2212 Payer Dr", | |
| "address" : "28210 PayCity, NC", | |
| "country" : "United States" | |
| }, | |
| "payment" : { | |
| "routing" : "7783478", | |
| "account" : "877874627654" | |
| }, | |
| "items" : [ | |
| { | |
| "product" : "Product 1", | |
| "description" : "Description Product 1", | |
| "qty" : 2, | |
| "unitprice": 6762 | |
| }, | |
| { | |
| "product" : "Product 2", | |
| "description" : "Description Product 2", | |
| "qty" : 1, | |
| "unitprice": 222 | |
| }, | |
| { | |
| "product" : "Product 3", | |
| "description" : "Longer Description Product 3 with more text than product 1 and 2", | |
| "qty" : 6, | |
| "unitprice": 122.88 | |
| } | |
| ] | |
| } | |
| ] |
Creating the Template
Assuming that you created an ASP.NET Core web application according to our getting started tutorial, the following steps describe how to load the JSON data into the document editor to insert available merge fields.
-
In the Solution Explorer, select your project and insert a new folder by clicking Project -> New Folder from the main menu. Name this folder App_Data.
-
Create a new JSON file in that folder and name it data.json. Copy and paste the content of the JSON file above into the newly created file.
-
Find the Index.cshtml file in the Views -> Home folder. Replace the complete content with the following code to add the document editor to the view:
This file contains bidirectional Unicode text that may be interpreted or compiled differently than what appears below. To review, open the file in an editor that reveals hidden Unicode characters. Learn more about bidirectional Unicode characters@using TXTextControl.Web.MVC @{ var jsonData = File.ReadAllText("App_Data/data.json"); } @Html.TXTextControl().TextControl().LoadDataFromJson(jsonData).Render()
After the document editor is initialized, all available merge fields and merge blocks are listed in the drop-down lists in the Reporting tab:
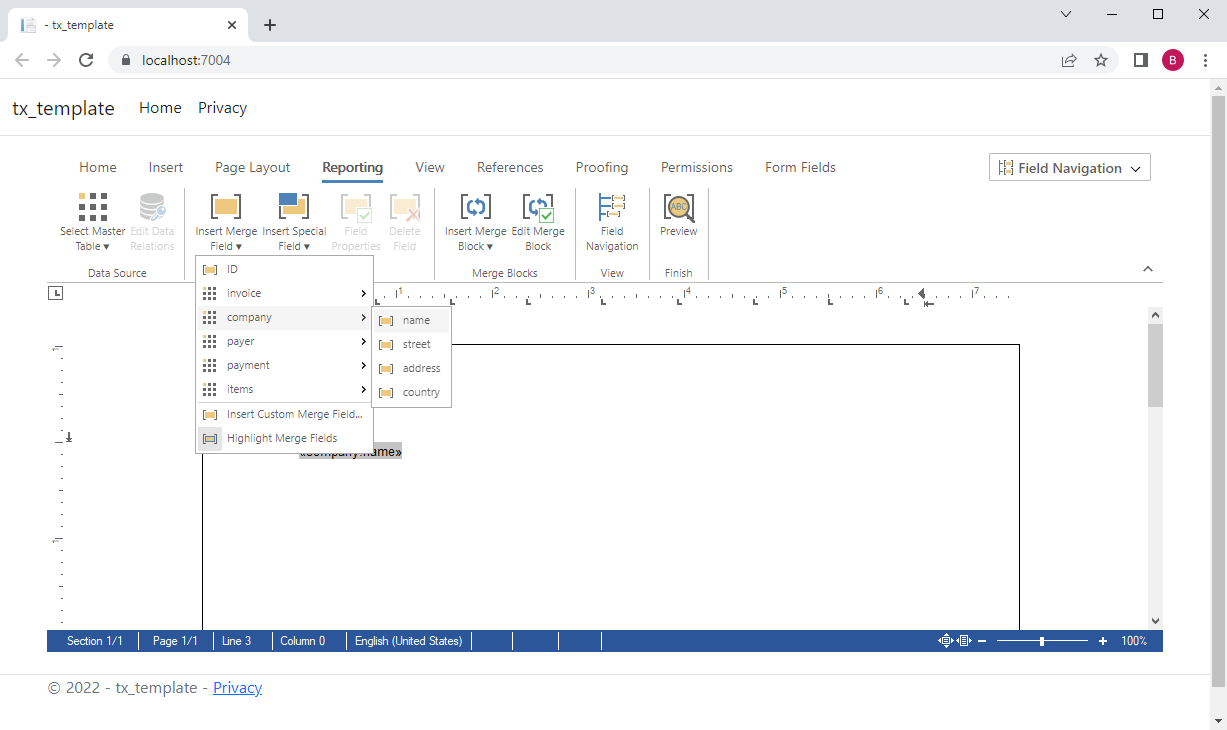
This way, users can focus on creating and designing the template and don't have to care about proper merge field names that can be added to a template. Let's start to design the template by adding merge fields.
-
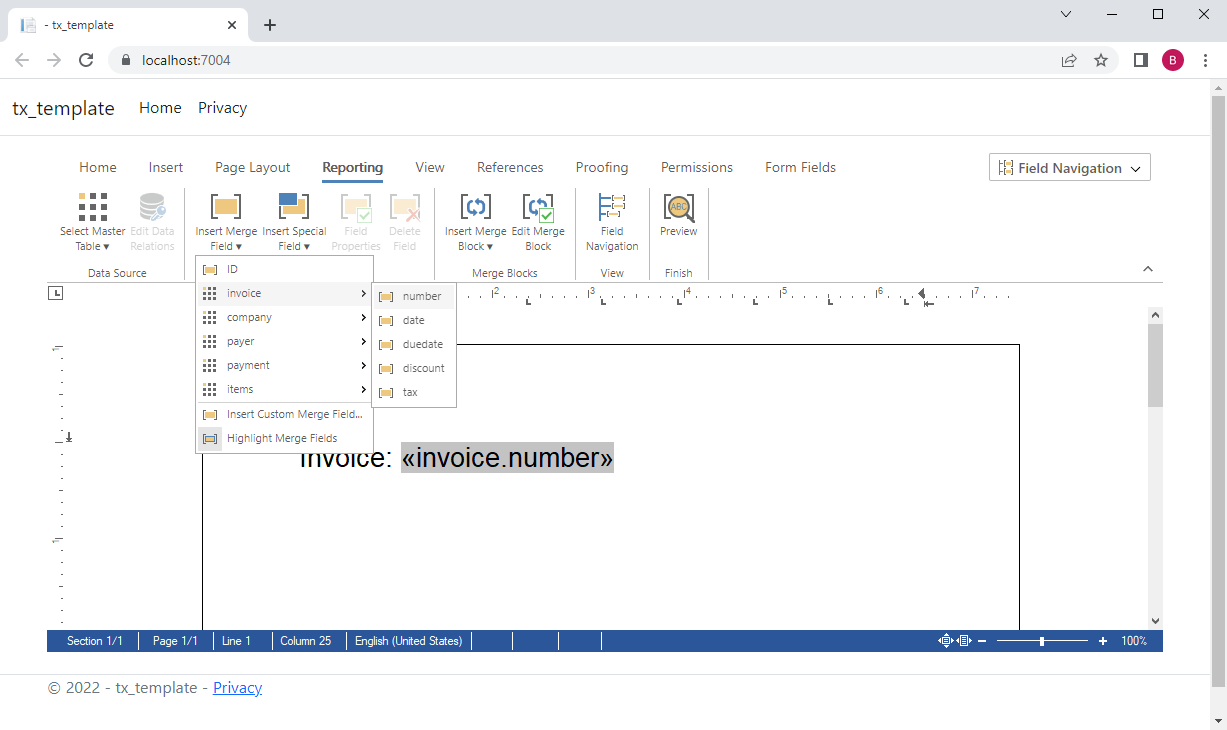
Insert the string Invoice: and select invoice -> number from the Insert Merge Field drop-down list.
Pro Tip
By looking at the name of the inserted field (invoice.number), you can see that it uses the dot-notation to access fields from a child table. This way, you can access field columns of any level in the data hierarchy.
-
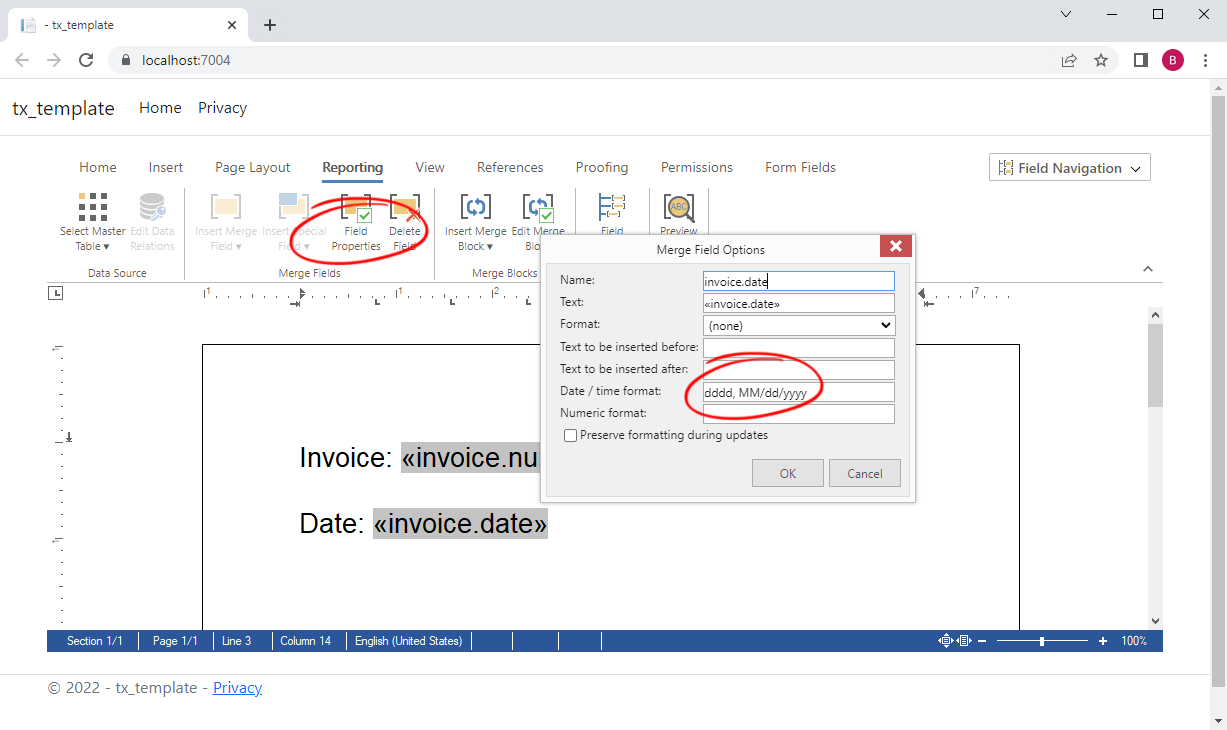
Repeat the same for the field invoice -> date. After adding the field, click the field with the mouse to set the input position into it and choose Field Properties from the ribbon bar.
In the dialog, set the Date / time format to dddd, MM/dd/yyyy. This defines a custom string formatter for this field.
-
Click on Preview to see first results.
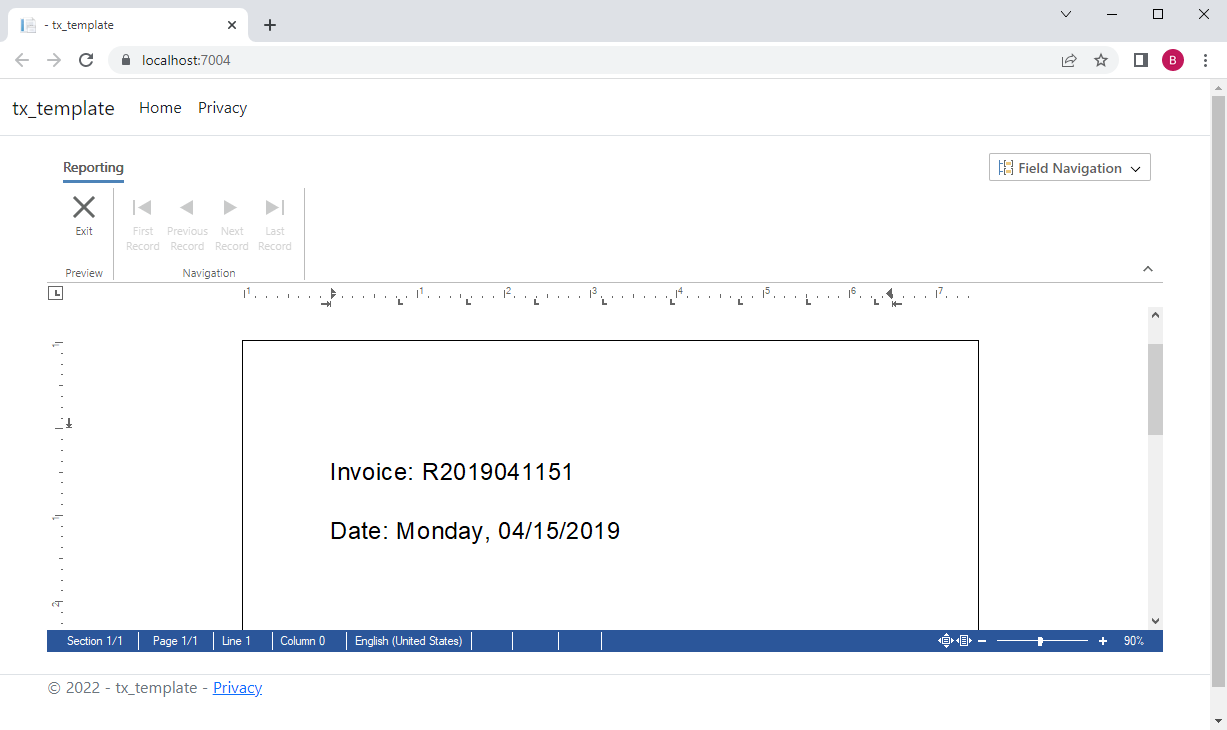
You can close the preview by clicking the Exit button in the opened contextual ribbon tab.
-
Following the above steps, insert as many fields from the data source as required into the template.
Inserting Merge Blocks
A merge block (or repeating block) is a reporting element that repeats content based on data rows. A merge block can contain anything including tables, paragraphs or single words. Typically, a table row is repeated that represents an invoice line item in our scenario.
-
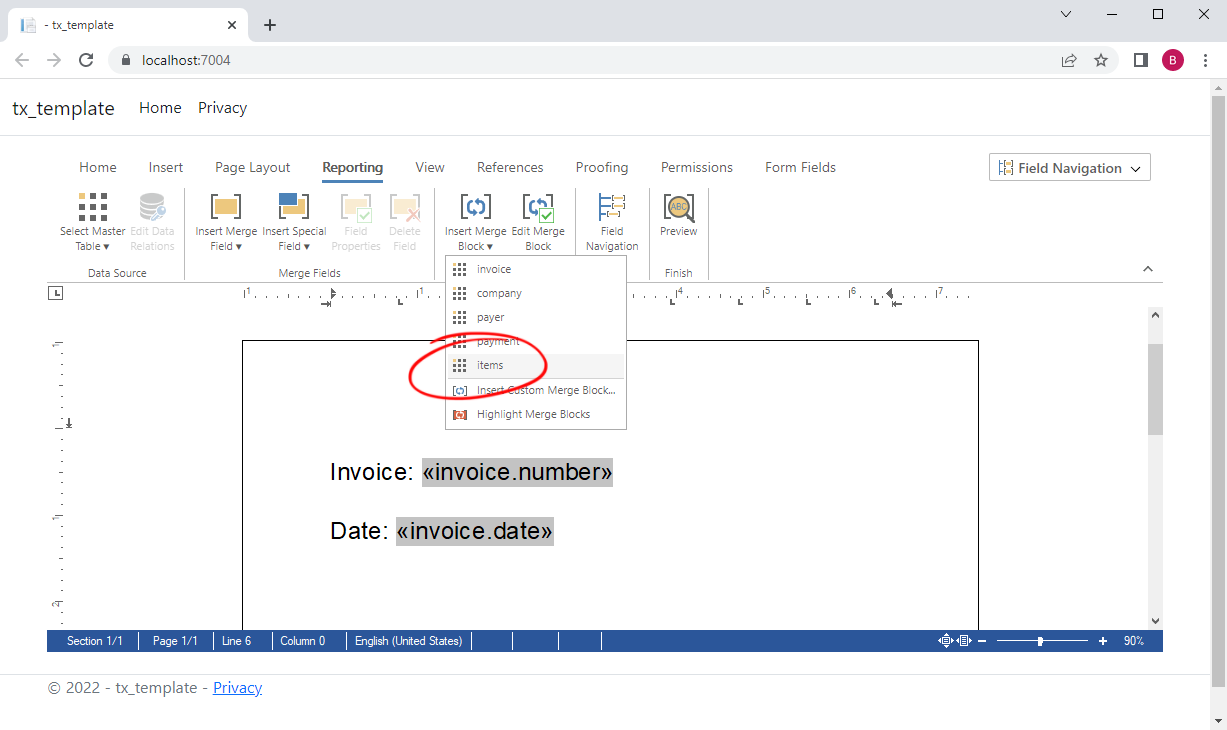
Click items in the list of available merge blocks from the Insert Merge Block drop-down list.
-
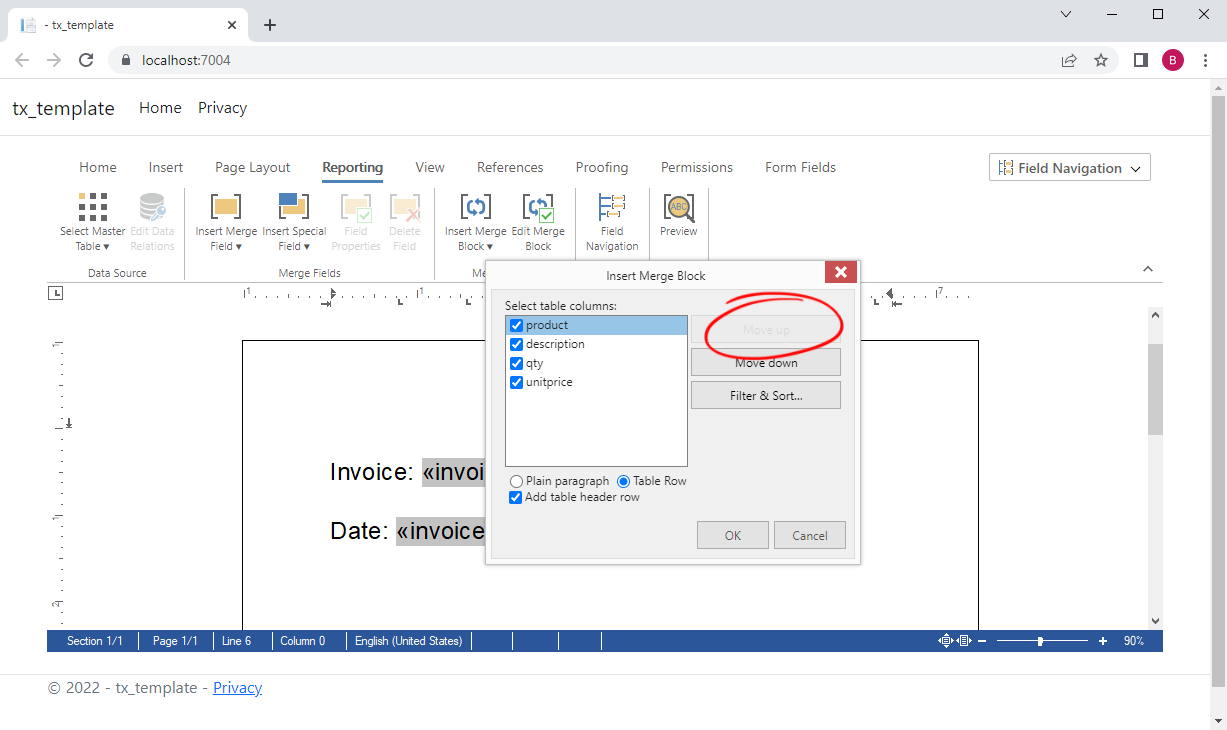
In the opened dialog, select all columns and move the item product to top as this should be our first table column.
-
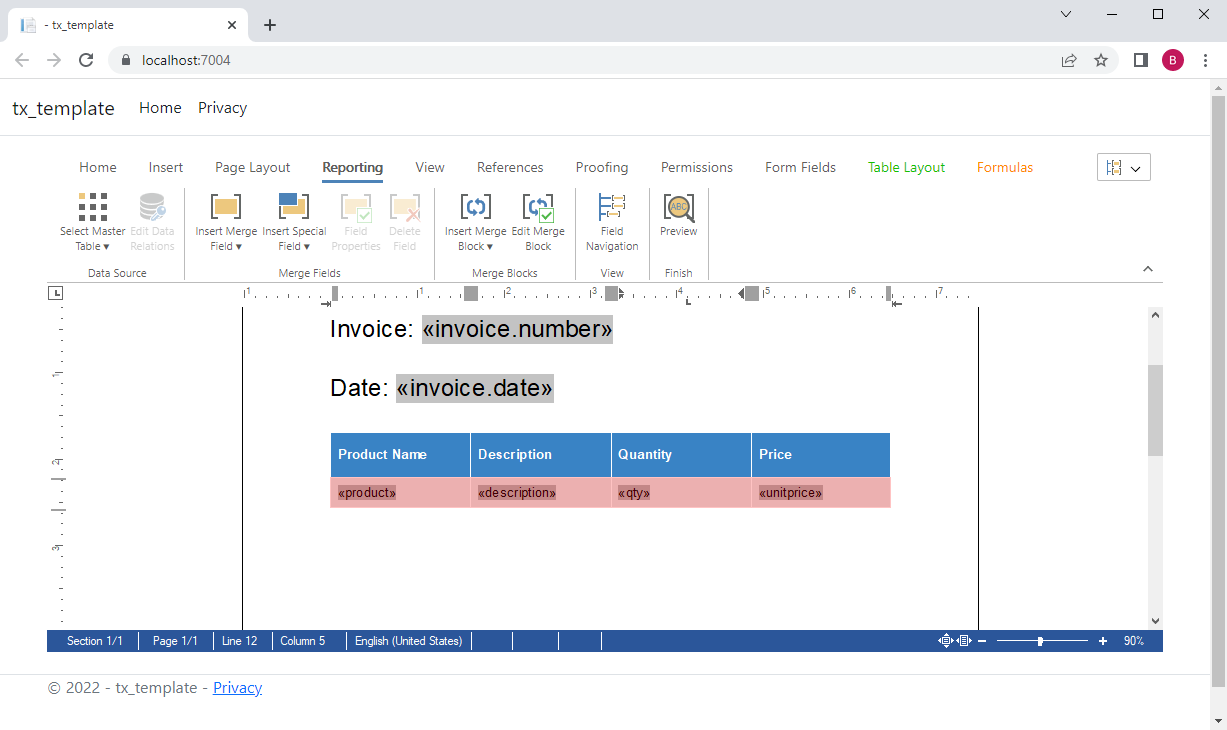
After confirming with OK, a table is added that consists of a repeating table header and the actual merge block that is highlighted in red. Manually, you can change the column titles to reflect proper descriptions.
-
Click on Preview to see the first merge block results.
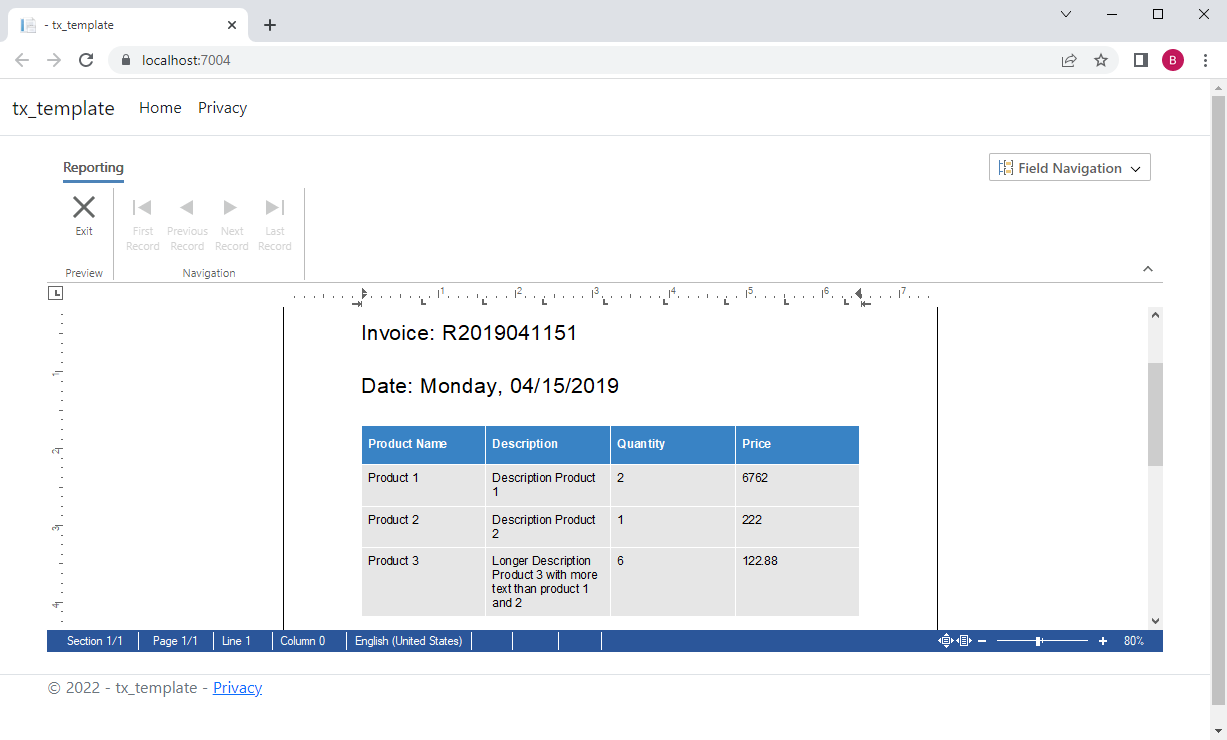
You can close the preview by clicking the Exit button in the opened contextual ribbon tab.
-
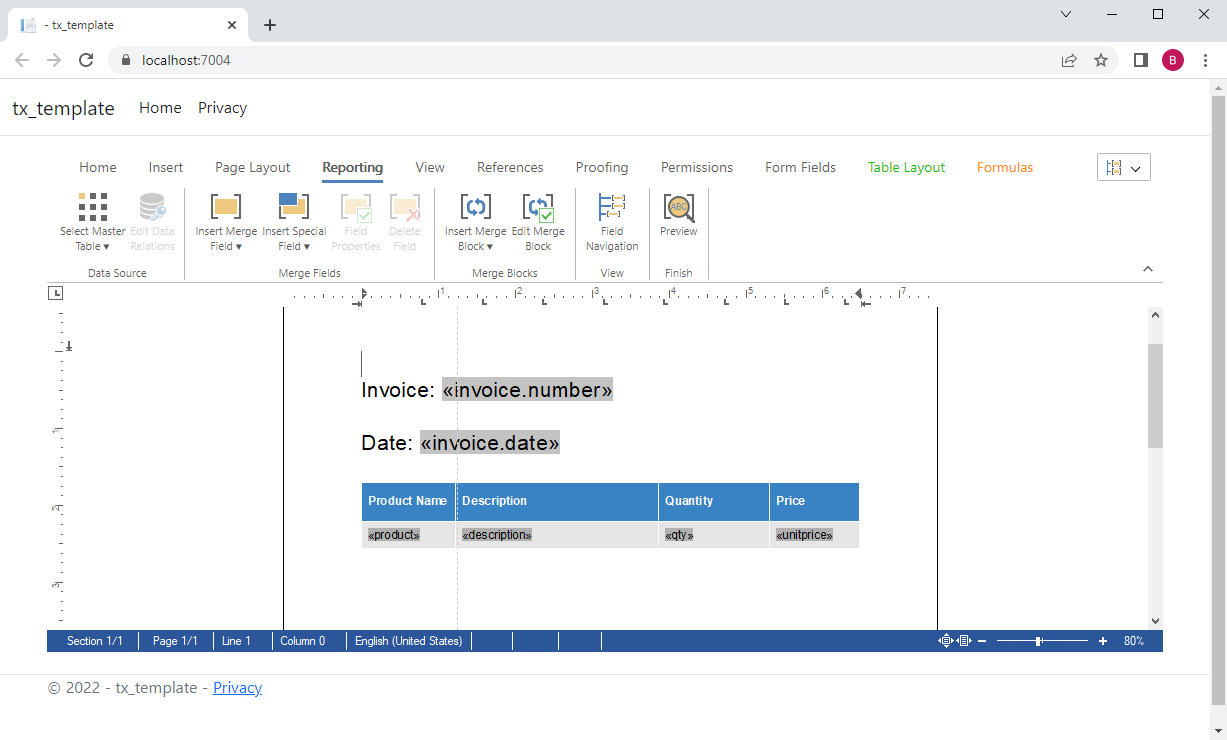
Resize the table columns using the mouse interface to provide the inserted columns a better ratio:
-
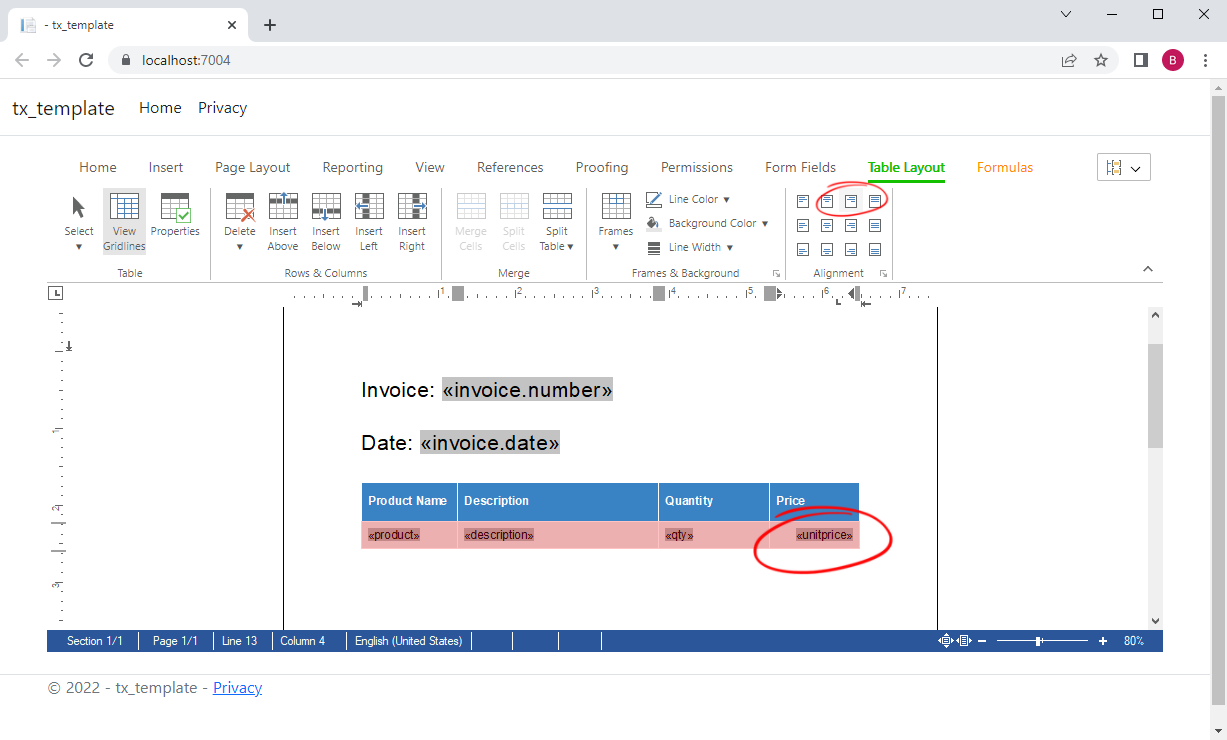
Set the input position into the field unitprice and set the alignment to top/right in the Table Layout ribbon tab.
-
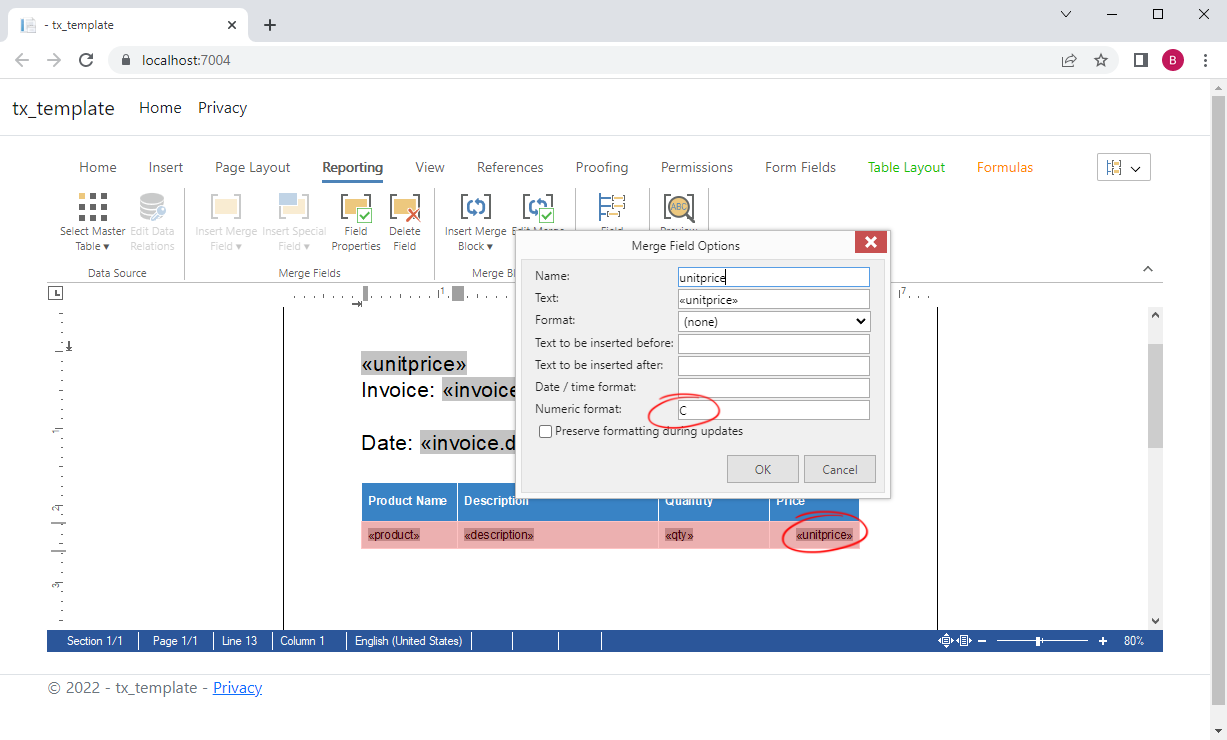
Back in the Reporting tab, select Field Properties to change the properties of the field unitprice. As it is a currency, set the value of the Numeric format to C or to your desired format such as $##.##,##.
-
In the Preview, the currency values are perfectly aligned and formatted in the desired format.
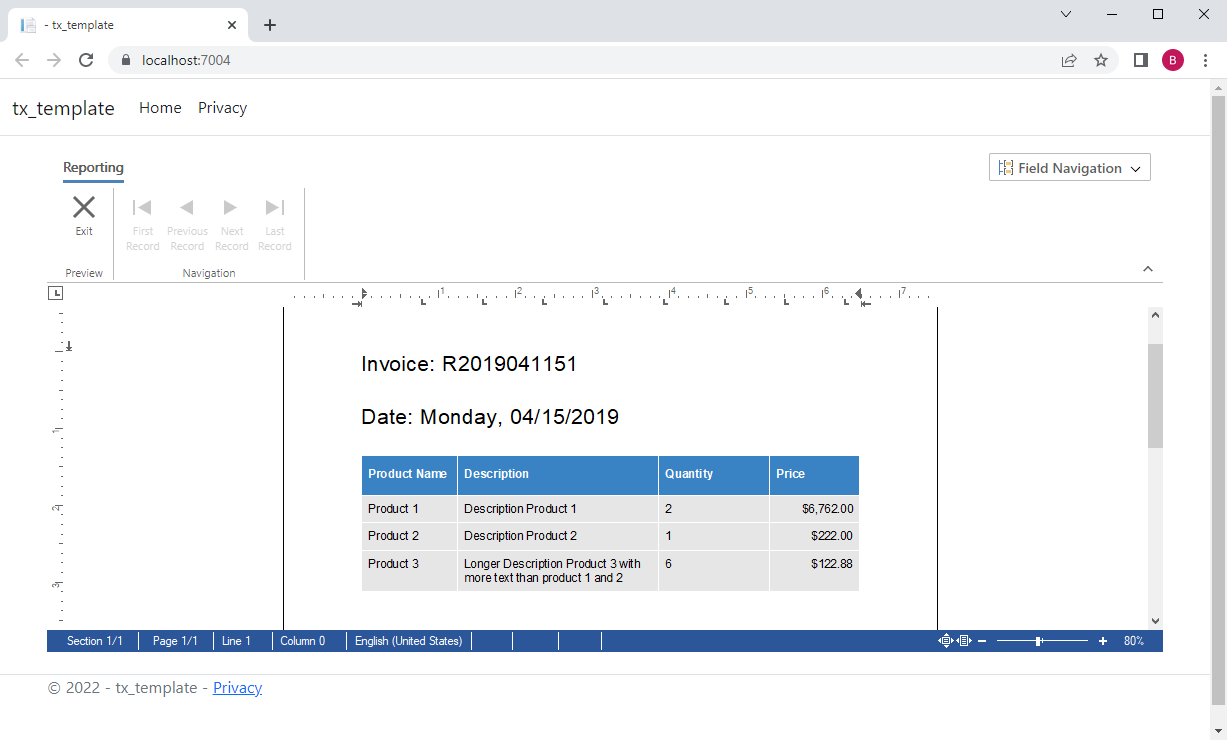
Using the document editor, there are various ways to save the document for example using the JavaScript API by sending it to a Web API controller method. This is shown in another blog article:
Loading and Saving Documents Through Controller HttpPost Methods
For TX Text Control, the template format can be any supported document format. You can save the template as an Office Open XML (DOCX) document, as RTF or in the internal TX Text Control format. In the next steps, we will use the internal TX Text Control format.
Merging the Data
In the next step, the template is merged with the actual data. Typically, this is done server-side in a non-UI process.
Pro Tip
The JSON data loaded into the Document Editor is not necessarily the actual data, but only dummy data with the correct structure or hierarchy. When merging the data into the template, you can use any form of data object (IEnumerable) with the same structure and naming.
Assuming that you created an ASP.NET Core web application according to our getting started tutorial, the following steps describe how to load the prepared template and to how to merge it with JSON data.
-
In the Solution Explorer, select your project and insert a new folder by clicking Project -> New Folder from the main menu. Name this folder App_Data.
-
Copy the created template into this folder and name it template.tx.
-
Create a new JSON file in that folder and name it data.json. Copy and paste the content of the JSON file above into the newly created file.
-
Find the HomeController.cs file in the Controllers folder. Replace the Index() method with the following code:
This file contains bidirectional Unicode text that may be interpreted or compiled differently than what appears below. To review, open the file in an editor that reveals hidden Unicode characters. Learn more about bidirectional Unicode characterspublic IActionResult Index() { // load the JSON data string jsonData = System.IO.File.ReadAllText("App_Data/data.json"); using (TXTextControl.ServerTextControl tx = new TXTextControl.ServerTextControl()) { tx.Create(); // load the template tx.Load("App_Data/template.tx", TXTextControl.StreamType.InternalUnicodeFormat); // use MailMerge to merge data using (TXTextControl.DocumentServer.MailMerge mm = new TXTextControl.DocumentServer.MailMerge()) { mm.TextComponent = tx; mm.MergeJsonData(jsonData); } // return result as HTML string result = ""; tx.Save(out result, TXTextControl.StringStreamType.HTMLFormat); ViewBag.Document = result; } return View(); }
In the above method, the template is merged automatically with data from the JSON string. The results are returned in form of an HTML document that is rendered in the view:
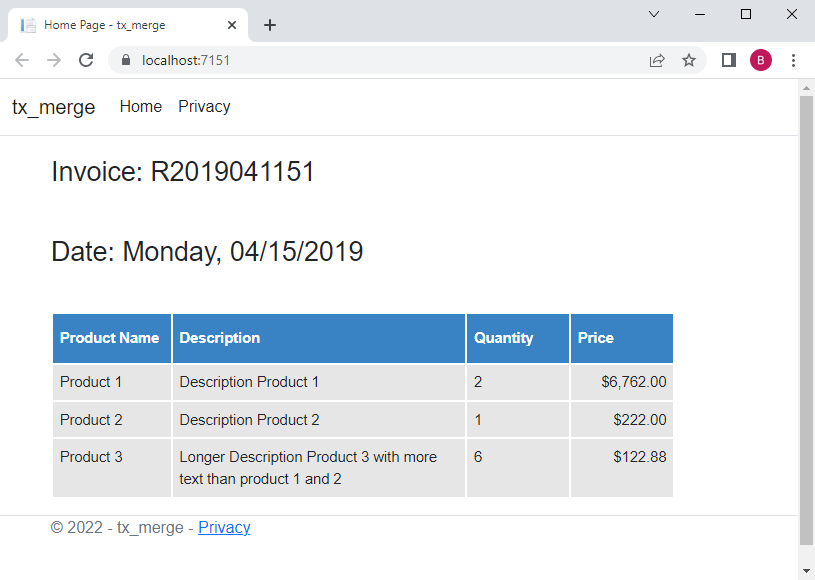
In order to create a PDF from the results, the document can be simply exported as an Adobe PDF using this code in the controller method:
| byte[] baPdf; | |
| tx.Save(out baPdf, TXTextControl.BinaryStreamType.AdobePDF); |
Getting Started
You will find this tutorial and many more in our Getting Started tutorial collection:


