A typical scenario in modern cloud applications is loading and saving documents to and from Azure Blob Storage. Azure Blob Storage, provided by Microsoft Azure, is a cloud-centric object storage service designed for handling substantial volumes of unstructured data seamlessly. This solution empowers users to effortlessly store and access various forms of textual and binary data like images, videos, and documents within the cloud environment. Leveraging Azure Blob Storage offers benefits including scalability, security enhancements, and economical storage solutions.
TX Text Control Document Editor for Angular, React, and JavaScript provides a straightforward approach to integrate Azure Blob Storage into your application. This article demonstrates how to load documents from Azure Blob Storage into the TX Text Control Document Editor using pure JavaScript. It illustrates how to create a storage container and download documents from this container.
Prerequisites
Before proceeding, ensure you have the following prerequisites:
- An Azure account. If you don't have one, you can create a free account.
- An Azure Blob Storage account. If you don't have one, you can create a storage account.
- Trial Access Token for TX Text Control. If you don't have one, you can get a free acceess token here
Creating a Storage Container
Before loading documents from Azure Blob Storage, you need to create a storage container. A storage container is a logical unit for organizing and managing blobs in Azure Storage. To create a storage container, follow these steps:
-
Sign in to the Azure portal.
-
In the Azure portal, select the storage account you want to use.
-
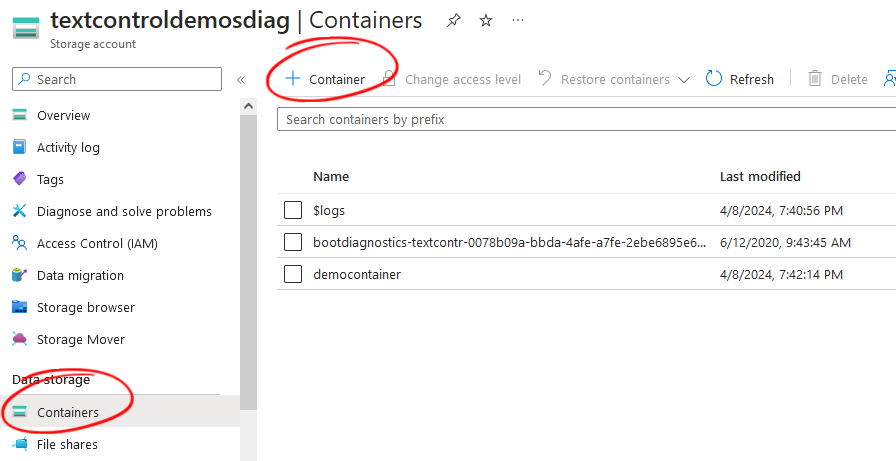
Click Containers and then click + Container.

-
Enter a name for the container and set the level of public access to Private (no anonymous access).
-
Click Create to create the container.
Uploading Documents to the Storage Container
After creating the storage container, you can upload documents to the container. To upload documents, follow these steps:
-
In the Azure portal, select the storage account you want to use.
-
Click Containers and then click the container you created.
-
Click Upload and select the document (DOC, DOCX, TX) you want to upload.
-
Click the Upload button to upload the document to the container.
-
Repeat the process to upload additional documents.
Creating a Shared Access Signature (SAS) Token
After uploading documents to the storage container, you need to create a Shared Access Signature (SAS) token to access the documents. A SAS token is a URI that grants restricted access rights to Azure Storage resources. To create a SAS token, follow these steps:
-
In the Azure portal, select the created container.
-
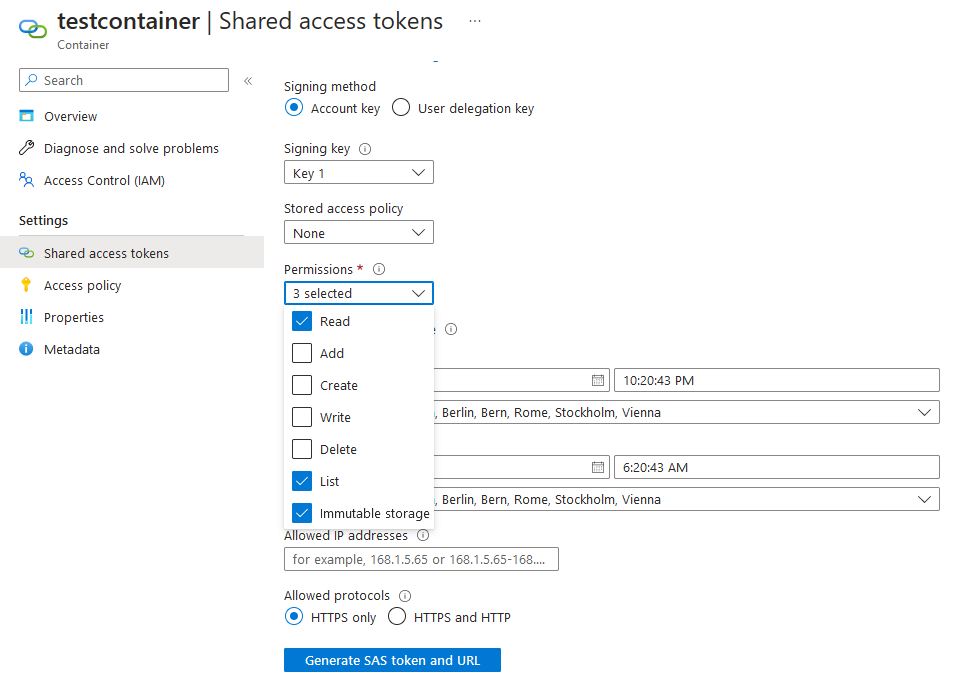
Click Shared access tokens to create a new token.
-
Select Account Key as the Signing method.
-
Choose the permissions Read, List, and Immutable Storage for the SAS token.
-
Set the start and expiry date for the SAS token.
-
Click Generate SAS andURL to create the SAS token.

-
Copy the generated SAS token to access the documents.
Loading Documents from Azure Blob Storage
After creating the storage container and uploading documents, you can load documents from Azure Blob Storage into the TX Text Control Document Editor using pure JavaScript.
Creating a Document Editor Application
-
Create a new HTML file and add the following code:
This file contains bidirectional Unicode text that may be interpreted or compiled differently than what appears below. To review, open the file in an editor that reveals hidden Unicode characters. Learn more about bidirectional Unicode characters<!DOCTYPE html> <html lang="en"> <head> <meta charset="UTF-8"> <meta name="viewport" content="width=device-width, initial-scale=1.0"> <title>Text Control JavaScript Demo</title> <script src="https://backend.textcontrol.com/api/TXWebSocket/GetResource?name=tx-document-editor.min.js"></script> <style> #txDocumentEditor { height: 800px; width: 800px; } </style> </head> <body> <div id="txDocumentEditor"></div> <select id="fileSelect" onchange="loadDocumentFromAzureBlob(this.value)"> <option value="">Select a document</option> </select> <script> const textControlAccessToken = ""; const storageAccount = ""; const containerName = ""; const sasToken = ""; TXTextControl.init({ containerID: "txDocumentEditor", webSocketURL: "wss://backend.textcontrol.com/api/TXWebSocket?access-token=" + textControlAccessToken, }); TXTextControl.addEventListener("textControlLoaded", function () { listDocumentsFromAzureBlob(); }); function listDocumentsFromAzureBlob() { var xhr = new XMLHttpRequest(); xhr.open("GET", `${storageAccount}/${containerName}?restype=container&comp=list&${sasToken}`); xhr.onload = function () { if (this.status === 200) { var xmlRespsone = this.responseText; var parser = new DOMParser(); var xmlDoc = parser.parseFromString(xmlRespsone, "text/xml"); var blobs = xmlDoc.getElementsByTagName("Blob"); for (var i = 0; i < blobs.length; i++) { var blobName = blobs[i].getElementsByTagName("Name")[0].childNodes[0].nodeValue; var option = document.createElement("option"); option.value = blobName; option.text = blobName; document.querySelector("#fileSelect").appendChild(option); } } }; xhr.send(); } function loadDocumentFromAzureBlob(blobName) { var xhr = new XMLHttpRequest(); xhr.open("GET", `${storageAccount}/${containerName}/${blobName}?${sasToken}`); xhr.responseType = "arraybuffer"; xhr.onload = function () { if (this.status === 200) { var blob = new Blob([this.response], { type: "application/octet-stream" }); var reader = new FileReader(); reader.readAsDataURL(blob); reader.onloadend = function () { var base64data = reader.result; switch (blobName.split('.').pop()) { case "docx": TXTextControl.loadDocument(TXTextControl.StreamType.WordprocessingML, base64data.split(',')[1]); break; case "doc": TXTextControl.loadDocument(TXTextControl.StreamType.MSWord, base64data.split(',')[1]); break; case "rtf": TXTextControl.loadDocument(TXTextControl.StreamType.RichTextFormat, base64data.split(',')[1]); break; case "tx": TXTextControl.loadDocument(TXTextControl.StreamType.InternalUnicodeFormat, base64data.split(',')[1]); break; default: alert("Unsupported file format"); break; } } } }; xhr.send(); } </script> </body> </html> -
Replace the textControlAccessToken constant with your TX Text Control trial access token.
-
Replace storageAccount with the URL of your Azure Blob Storage container (e.g., https://myaccount.blob.core.windows.net).
-
Replace containerName with the name of your storage container.
-
Replace sasToken with the SAS token you generated.
-
Save the file and open it in a web browser.
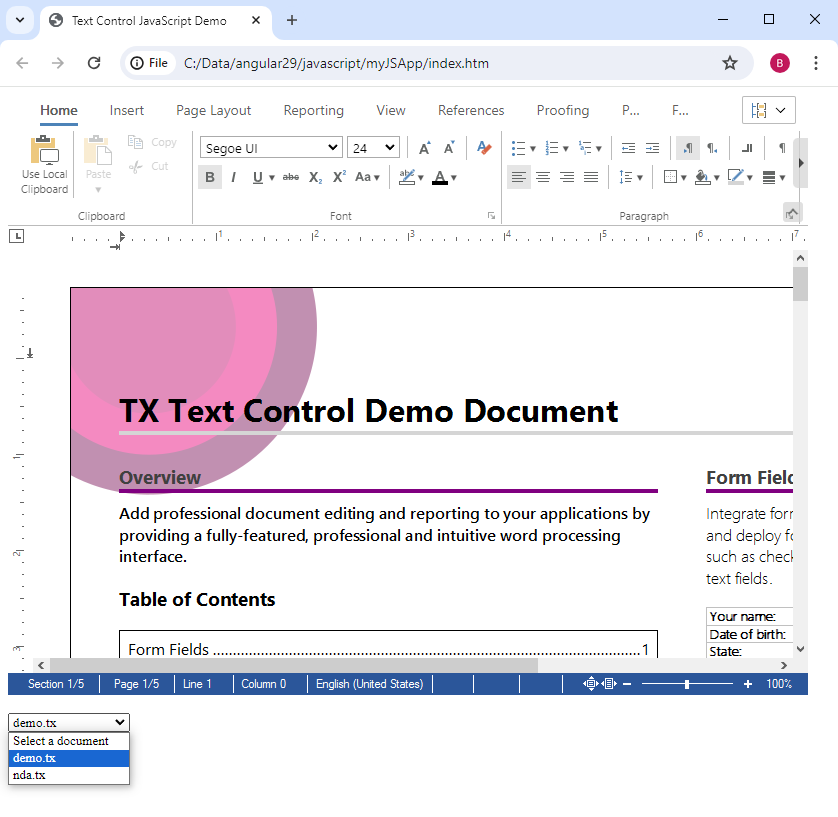
After following these steps, you will have a document editor application that loads documents from Azure Blob Storage using pure JavaScript.

The listDocumentsFromAzureBlob method gets all available documents from the container you created. The loadDocumentFromAzureBlob method downloads the document from the Azure Blob Storage and loads it into the Document Editor using the loadDocument method.
Conclusion
This article demonstrated how to load documents from Azure Blob Storage into the TX Text Control Document Editor using pure JavaScript. It showed how to create a storage container, upload documents to the container, and generate a Shared Access Signature (SAS) token to access the documents. By following these steps, you can seamlessly integrate Azure Blob Storage into your application and load documents into the Document Editor.


