Building an ASP.NET Core Backend Application to Host the Document Editor and Document Viewer
This article explains how to create an ASP.NET Core backend application to host the Document Editor and Document Viewer. This backend application is required to provide the required functionality to the frontend applications built with Angular, React, or JavaScript.

All client-side packages, including those for Angular, React, and JavaScript, require an ASP.NET Core backend application based on TX Text Control .NET Server to host the Document Editor and Document Viewer.
Prerequisites
In order to create a back-end application, you must have the TX Text Control .NET Server installed on your machine. You can download a trial version here.
Creating the Application
-
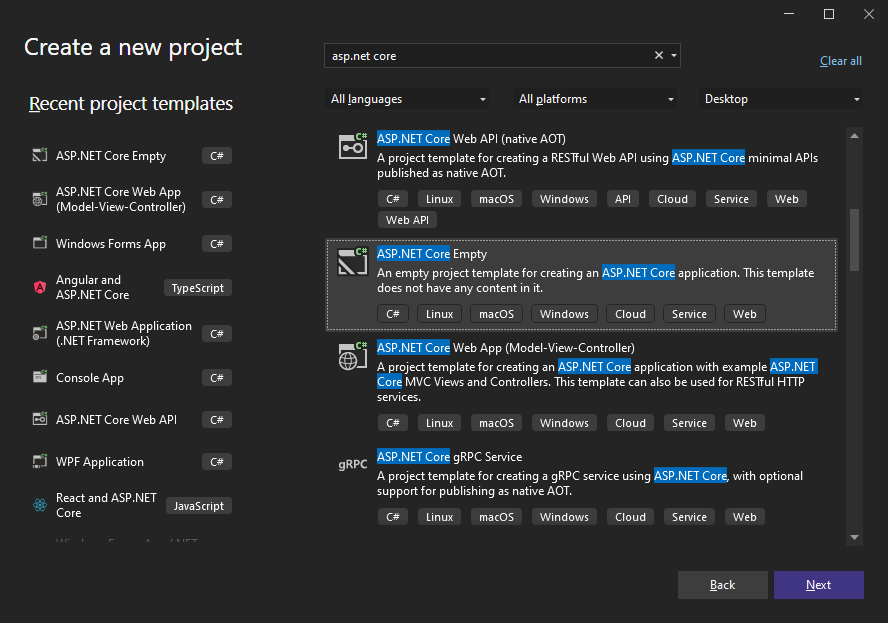
Open Visual Studio and create a new ASP.NET Core Empty application.

-
Select a project name, location and solution name in the next dialog and confirm with Next.
-
In the next dialog, choose .NET 8 (Long Term Support) as the Framework and confirm with Create.
Adding the NuGet Packages
-
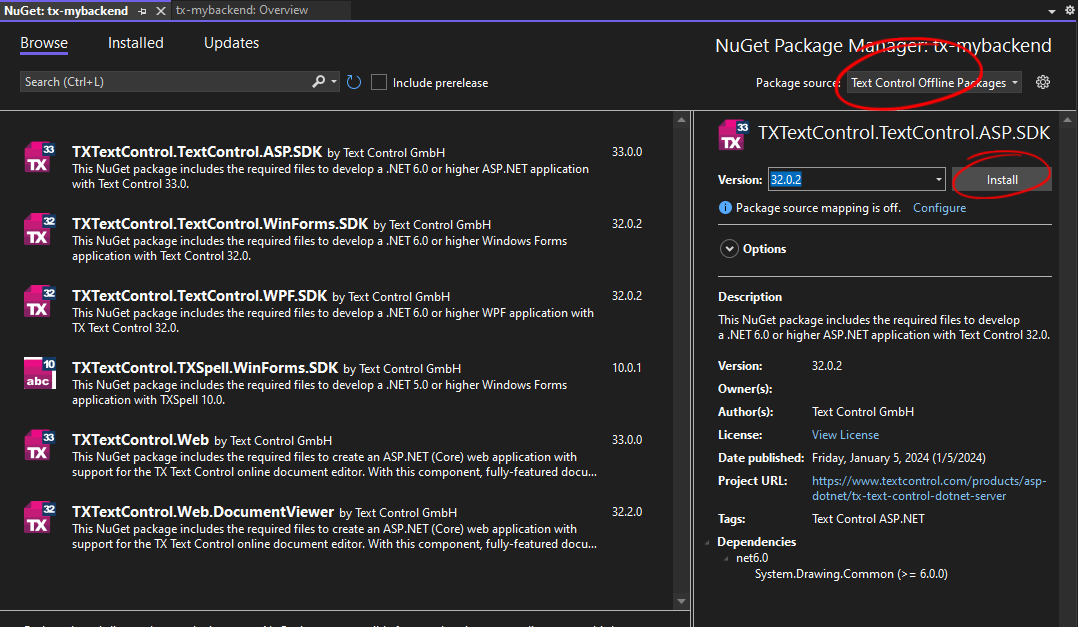
In the Solution Explorer, select your created project and choose Manage NuGet Packages... from the Project main menu.
Select Text Control Offline Packages from the Package source drop-down.
Install the latest versions of the following packages:
- TXTextControl.TextControl.ASP.SDK
- TXTextControl.Web
- TXTextControl.Web.DocumentViewer

-
Select nuget.org as the Package source and check for updates of the above packages. Update them if a newer package is available.
Adding the Middleware
-
Open the Program.cs file located in the project's root folder. Replace the complete code with the following code:
using TXTextControl.Web;
using TXTextControl.Web.MVC.DocumentViewer;

var builder = WebApplication.CreateBuilder(args);

// adding CORS policy to allow all origins
builder.Services.AddCors(options =>
{
    options.AddDefaultPolicy(
               builder =>
               {
            builder.AllowAnyOrigin()
                .AllowAnyMethod()
                .AllowAnyHeader();
        });
});

// adding controllers for DocumentViewer Web API
builder.Services.AddControllers();

var app = builder.Build();

app.MapGet("/", () => "TX Text Control .NET Server for ASP.NET Backend is up and running!");

app.UseRouting();

// adding CORS middleware
app.UseCors();

// adding WebSockets middleware
app.UseWebSockets();

// adding TX Text Control middleware
app.UseTXWebSocketMiddleware();
app.UseTXDocumentViewer();

app.Run();
Running the Backend
-
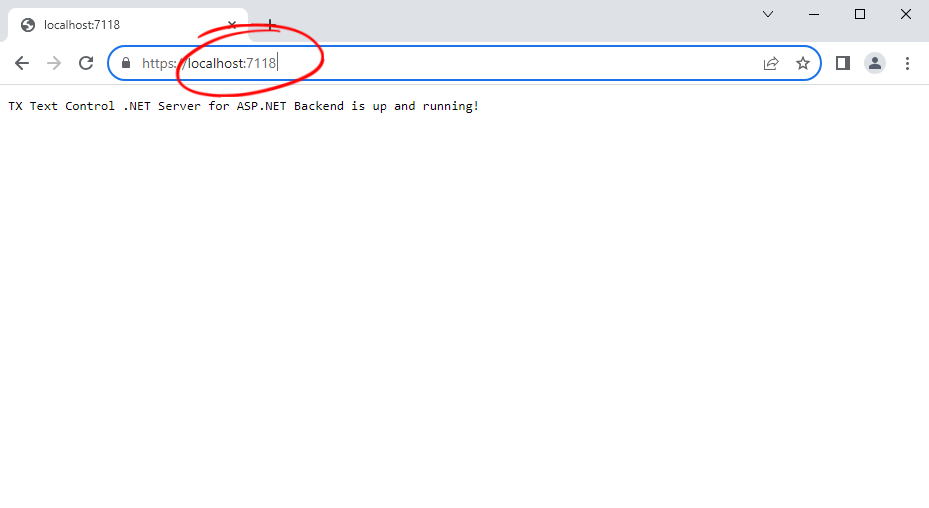
Press F5 to start the application.
After launching the application, you should see the following screen.

Connecting Client-Site Packages
The Document Editor and Document Viewer instances used in your Angular, React, or JavaScript applications can now be connected to your newly created backend.
Document Editor
In your Angular, React, or JavaScript project, change the webSocketURL attribute of the Document Editor component in the to the URL of your backend application created above. For example in Angular:
<tx-document-editor
  width="1000px"
  height="500px"
  webSocketURL="wss://localhost:7118/api/TXWebSocket">
</tx-document-editor>
Make sure that wss is used if the backend is hosted using https and that ws is used in the case of http.
Document Viewer
In your Angular, React, or JavaScript project, change the basePath attribute of the Document Viewer component in the to the URL of your backend application created above. For example in Angular:
<tx-document-viewer
   width="1000px"
   height="800px"
   basePath="https://localhost:7118"
</tx-document-viewer>ASP.NET
Integrate document processing into your applications to create documents such as PDFs and MS Word documents, including client-side document editing, viewing, and electronic signatures.
- Angular
- Blazor
- React
- JavaScript
- ASP.NET MVC, ASP.NET Core, and WebForms
Related Posts
Building an ASP.NET Core Backend (Linux and Windows) for the Document Editor…
This article shows how to create a backend for the Document Editor and Viewer using ASP.NET Core. The backend can be hosted on Windows and Linux and can be used in Blazor, Angular, JavaScript, and…
Observe When the Reporting Preview Tab is Active Using MutationObserver
This article shows how to observe when the Reporting Preview tab is active using MutationObserver. The Reporting Preview tab is a feature of the TX Text Control Document Editor that allows you to…
Build a Custom Backstage View in ASP.NET Core with TX Text Control
This article shows how to build a custom backstage view with a File tab to load your multi-format documents using TX Text Control for ASP.NET Core applications.
TX Text Control Document Editor and Viewer for Blazor Released
We are very happy to announce the immediate availability of TX Text Control packages for Blazor. This article gives an overview of the available packages and how to use them.
Announcing Our Work on a Blazor Component for Document Editing and Viewing
We are pleased to announce our work on a Blazor document editing and viewing component. This component will be part of our upcoming release and will provide an easy upgrade path from Web Forms to…


