Getting Started: Document Editor with ASP.NET Web Forms (.NET Framework)
This article shows how to use the TX Text Control ASP.NET document editor within a Web Forms application in Visual Studio 2022.

Creating the Application
Make sure that you downloaded the latest version of Visual Studio 2022.
-
In Visual Studio 2022, create a new project by choosing Create a new project.
-
Select ASP.NET Web Application (.NET Framework) as the project template and confirm with Next.
-
Choose a name for your project, select .NET Framework 4.8 as the Framework and confirm with Create.
-
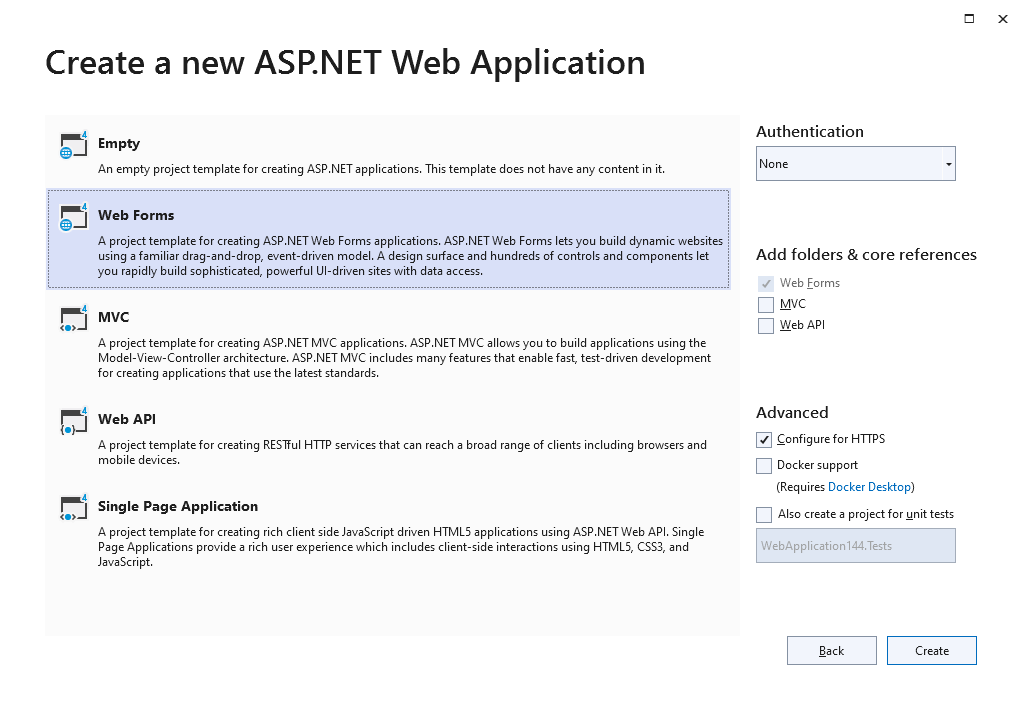
In the next dialog, choose Web Forms as the project template and confirm with Create.

Adding TX Text Control References
-
While the project is selected in the Solution Explorer, choose Project -> Add Project Reference... to open the Reference Manager. In the opened dialog, select Browse... to select the required TX Text Control assemblies. Navigate to the installation folder of TX Text Control and select the following assembly from the Assembly folder:
- TXTextControl.Web.dll
After selecting this assembly, click Add and close the Reference Manager by confirming with OK.
Adding the Control to the View
-
Find the Default.aspx file in the project's root folder. Except the first code line, remove the complete code and replace it with the following code:
<%@ Register Assembly="TXTextControl.Web" Namespace="TXTextControl.Web" TagPrefix="cc1" %> <asp:Content ID="BodyContent" ContentPlaceHolderID="MainContent" runat="server"> <cc1:TextControl ID="TextControl1" runat="server" /> <input type="button" onclick="insertTable()" value="Insert Table" /> <script> function insertTable() { TXTextControl.tables.add(5, 5, 10, function(e) { if (e === true) { // if added TXTextControl.tables.getItem(function(table) { table.cells.forEach(function(cell) { cell.setText("Cell text"); }); }, null, 10); } }) } </script> </asp:Content> -
Find the Web.config file in the project's root folder and add the following entry after the opening configuration element:
<system.webServer>
  <handlers>
    <add name="TXWebSocketHandler" verb="*" path="TXWebSocketHandler.ashx" type="TXTextControl.Web.WebSocketHandler, TXTextControl.Web, Version=32.0.1200.500, Culture=neutral, PublicKeyToken=6B83FE9A75CFB638" />
    <add name="TXPrintHandler" verb="*" path="TXPrintHandler.ashx" type="TXTextControl.Web.TXPrintHandler, TXTextControl.Web, Version=32.0.1200.500, Culture=neutral, PublicKeyToken=6B83FE9A75CFB638" />
  </handlers>
</system.webServer>
Compile and start the application.
ASP.NET
Integrate document processing into your applications to create documents such as PDFs and MS Word documents, including client-side document editing, viewing, and electronic signatures.
- Angular
- Blazor
- React
- JavaScript
- ASP.NET MVC, ASP.NET Core, and WebForms
Related Posts
ASP.NETASP.NET CoreGetting Started
Getting Started: Document Editor with ASP.NET Core
This article shows how to use the TX Text Control ASP.NET document editor within a .NET 6 application in Visual Studio 2022.
Getting Started: Document Viewer with ASP.NET MVC (.NET Framework)
This article shows how to use the TX Text Control ASP.NET document viewer within a .NET Framework web application in Visual Studio 2022.
Getting Started: Document Editor with ASP.NET MVC (.NET Framework)
This article shows how to use the TX Text Control ASP.NET document editor within a .NET Framework web application in Visual Studio 2022.
ASP.NETASP.NET CoreGetting Started
Getting Started: Document Editor with ASP.NET Core
This article shows how to use the TX Text Control ASP.NET document editor within a .NET 6 application in Visual Studio 2022.
New Getting Started Article Hub Launched
We just launched a new getting started article hub that helps to find articles, samples, and tutorials by filtering by types, technologies and Text Control components.


