Adding ASP.NET Web API Support to an Existing Visual Studio ASP.NET MVC Project
TXTextControl.Web.MVC is using the ASP.NET Web API framework to synchronize the edited document with the server in order to render the output in a true WYSIWYG manner. From Microsoft MSDN: ASP.NET Web API is a framework that makes it easy to build HTTP services that reach a broad range of clients, including browsers and mobile devices. ASP.NET Web API is an ideal platform for building RESTful applications on the .NET Framework. In our MVC tutorial, we describe how to create a new ASP.NET MVC…

TXTextControl.Web.MVC is using the ASP.NET Web API framework to synchronize the edited document with the server in order to render the output in a true WYSIWYG manner.
From Microsoft MSDN:
ASP.NET Web API is a framework that makes it easy to build HTTP services that reach a broad range of clients, including browsers and mobile devices. ASP.NET Web API is an ideal platform for building RESTful applications on the .NET Framework.
In our MVC tutorial, we describe how to create a new ASP.NET MVC project with Web API support. But very often, TX Text Control is added to existing MVC projects. This tutorial shows how to add ASP.NET Web API support to an existing MVC project.
-
Click Manage NuGet Packages... from the Project main menu.
-
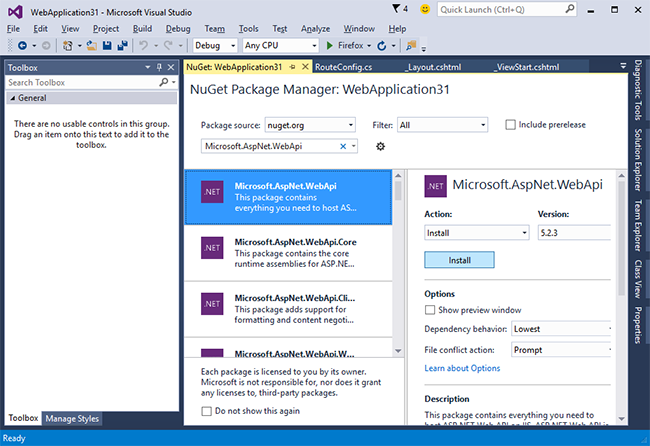
Set the Package source to nuget.org and search for Microsoft.AspNet.WebApi. Select the package Microsoft.AspNet.WebApi and click on Install. Accept the license for all 4 packages by clicking I Accept.

-
In the Solution Explorer, select the folder App_Start and choose Add New Item... from the Project main menu. Select Class as the new item and name it WebApiConfig.cs. Confirm with Add.
Add the following code to the newly created config file and import the namespace System.Web.Http:
using System.Web.Http; public class WebApiConfig { public static void Register(HttpConfiguration configuration) { configuration.Routes.MapHttpRoute("API Default", "api/{controller}/{id}", new { id = RouteParameter.Optional }); } } -
Import the namespace System.Web.Http in Global.asax.cs.
-
In the file Global.asax.cs, call GlobalConfiguration.Configure(WebApiConfig.Register); in MvcApplication.Application_Start() before registering the default web application route:
protected void Application_Start()
{
    GlobalConfiguration.Configure(WebApiConfig.Register);
    AreaRegistration.RegisterAllAreas();
    RouteConfig.RegisterRoutes(RouteTable.Routes);
}
That's it - you added Web API support to your ASP.NET MVC project. Now, you can use the TXTextControl.Web.MVC HtmlHelper in your web application.
Related Posts
ASP.NETJavaScriptDocument Editor
Detect Toggle Button Changes Using a MutationObserver
This article shows how to detect changes of toggle buttons in the ribbon of the web editor using a MutationObserver. The state of a toggle button in the ribbon visualizes the state of a certain…
AngularASP.NET CoreDocument Editor
Angular: Deploying the Backend TCP Service Separately
The Angular document editor requires an ASP.NET or ASP.NET Core backend connected to the TCP Service to synchronize the rendering. This article explains how to deploy the TCP Service separately…
Implementing Conditional Table Cell Colors with MailMerge
This ASP.NET MVC sample shows how to implement conditional table cell colors using the online document editor and an ASP.NET backend.
Adding a WebSocket Security Middleware to ASP.NET Core Web Applications
This article shows how to add a security middleware to ASP.NET Core Web Applications to secure the WebSocketHandler requests.
Securing the WebSocketHandler Endpoint in ASP.NET
This article shows how to add a security layer by adding an authentication filter to an endpoint that creates the WebSocketHandler.

