Creating the project and controls
In this first step, an application is created and Text Control is connected with a ribbon bar and ribbon tabs.
-
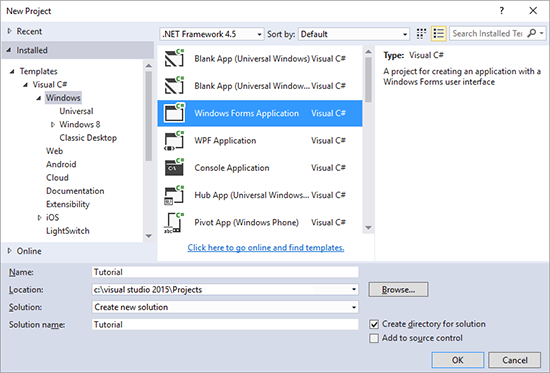
Start Visual Studio .NET and create a new project. Select either Visual Basic or C# as a project type, and Windows Forms Application as a template.
-
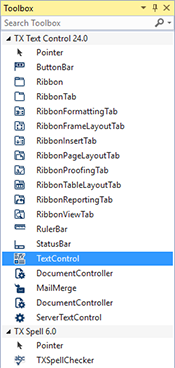
Find the TX Text Control 29.0 toolbox tab that was created automatically by the TX Text Control setup program. All usable TX Text Control controls and components are listed in this tab.
-
Click on the TextControl icon and draw it on a form.
-
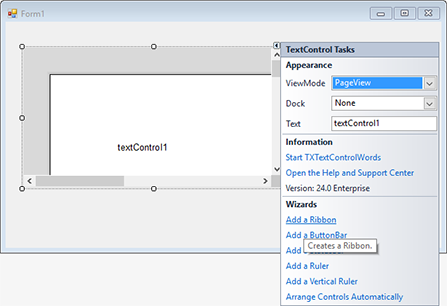
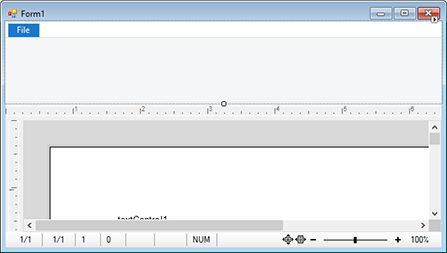
Click on the Smart Tag (little right-facing arrow) in the upper right corner of TextControl. In the Wizards group, click on Add a Ribbon, Add a Status Bar, Add a Ruler and Add a Vertical Ruler. Do not insert a ButtonBar. Finally, click on Arrange Controls Automatically. The controls are now connected and docked to fill the container:
-
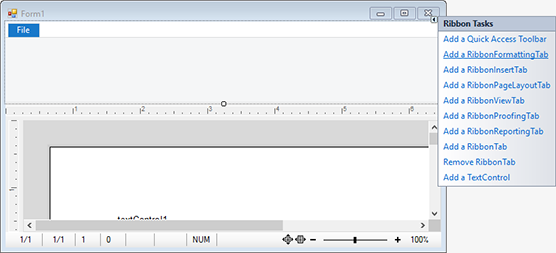
On the form, select the ribbon control by clicking the blue File tab title in order to click on the Smart Tag in the upper right corner of the ribbon control. Click on Add a RibbonFormattingTab, Add a RibbonInsertTab, Add a RibbonPageLayoutTab, Add a RibbonViewTab, Add a RibbonProofingTab and Add a RibbonReportingTab.
-
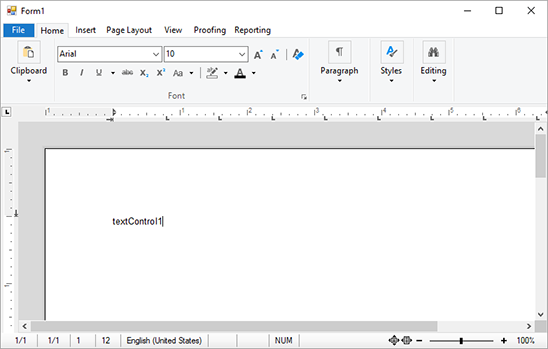
Build and start the application to see first results.
Adding Contextual Ribbon Tabs
In this step, contextual ribbon tabs for table and frame layout tasks are added and connected.
-
On the form, select the ribbon control by clicking the blue File tab title in order to click on the Smart Tag in the upper right corner of the ribbon control. Click on Add a Quick Access Toolbar to convert the form to a Windows.Forms.Ribbon.RibbonForm.
-
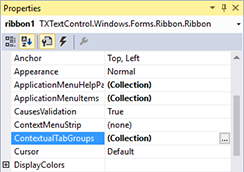
Select again the ribbon control by clicking the blue File tab title and find the ContextualTabGroups property in the Properties window.
-
Open the ContextualTabGroup Collection Editor by clicking on the ellipsis button in the (Collection) value column of the ContextualTabGroups property.
-
In the Collection Editor, click on Add to add a new Windows.Forms.Ribbon.ContextualTabGroup. Name this group m_grpTableTools, set the Header property to Table Tools and pick a BackColor.
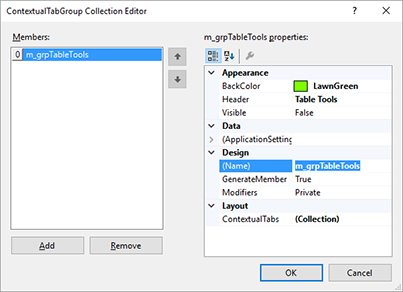
-
Find the ContextualTabs property in the m_grpTableTools properties and click on the ellipsis button in the (Collection) value column to open the RibbonTab Collection Editor.
Open the Add drop-down button and click the RibbonTableLayoutTab item.
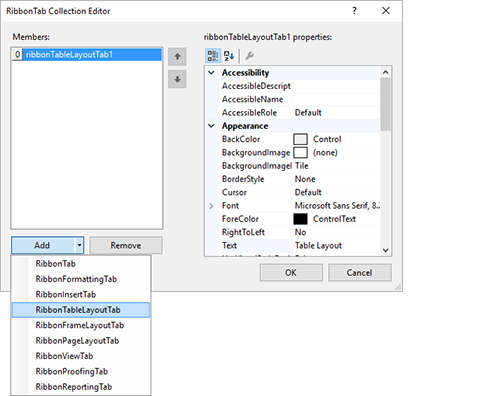
Close the dialog by clicking OK.
-
Repeat step 4 and name this new group m_grpFrameTools, set the Header property to Frame Tools and pick another BackColor.
-
Find the ContextualTabs property and click on the ellipsis button in the (Collection) value column to open the RibbonTab Collection Editor. Like in step 5, open the Add drop-down button and click the RibbonFrameLayoutTab item and close the dialog by clicking OK.
-
In the Solution Explorer, select the form Form1 and choose Code from the View main menu. Add the following code, so that the complete Form1 class code looks like this:
This file contains bidirectional Unicode text that may be interpreted or compiled differently than what appears below. To review, open the file in an editor that reveals hidden Unicode characters. Learn more about bidirectional Unicode characterspublic partial class Form1 : TXTextControl.Windows.Forms.Ribbon.RibbonForm { public Form1() { InitializeComponent(); textControl1.InputPositionChanged += TextControl1_InputPositionChanged; textControl1.FrameSelected += TextControl1_FrameSelected; textControl1.FrameDeselected += TextControl1_FrameDeselected; textControl1.DrawingActivated += TextControl1_DrawingActivated; textControl1.DrawingDeselected += TextControl1_DrawingDeselected; } private void TextControl1_DrawingDeselected(object sender, TXTextControl.DataVisualization.DrawingEventArgs e) { if ((textControl1.Frames.GetItem() == null) && (textControl1.Drawings.GetActivatedItem() == null)) { m_grpFrameTools.Visible = false; } } private void TextControl1_DrawingActivated(object sender, TXTextControl.DataVisualization.DrawingEventArgs e) { m_grpFrameTools.Visible = true; } private void TextControl1_FrameDeselected(object sender, TXTextControl.FrameEventArgs e) { if ((textControl1.Frames.GetItem() == null) && (textControl1.Drawings.GetActivatedItem() == null)) { m_grpFrameTools.Visible = false; } } private void TextControl1_FrameSelected(object sender, TXTextControl.FrameEventArgs e) { m_grpFrameTools.Visible = true; } private void TextControl1_InputPositionChanged(object sender, EventArgs e) { m_grpTableTools.Visible = textControl1.Tables.GetItem() != null; } } This file contains bidirectional Unicode text that may be interpreted or compiled differently than what appears below. To review, open the file in an editor that reveals hidden Unicode characters. Learn more about bidirectional Unicode charactersPublic Partial Class Form1 Inherits TXTextControl.Windows.Forms.Ribbon.RibbonForm Public Sub New() InitializeComponent() AddHandler textControl1.InputPositionChanged, AddressOf TextControl1_InputPositionChanged AddHandler textControl1.FrameSelected, AddressOf TextControl1_FrameSelected AddHandler textControl1.FrameDeselected, AddressOf TextControl1_FrameDeselected AddHandler textControl1.DrawingActivated, AddressOf TextControl1_DrawingActivated AddHandler textControl1.DrawingDeselected, AddressOf TextControl1_DrawingDeselected End Sub Private Sub TextControl1_DrawingDeselected(sender As Object, e As TXTextControl.DataVisualization.DrawingEventArgs) If (textControl1.Frames.GetItem() Is Nothing) AndAlso (textControl1.Drawings.GetActivatedItem() Is Nothing) Then m_grpFrameTools.Visible = False End If End Sub Private Sub TextControl1_DrawingActivated(sender As Object, e As TXTextControl.DataVisualization.DrawingEventArgs) m_grpFrameTools.Visible = True End Sub Private Sub TextControl1_FrameDeselected(sender As Object, e As TXTextControl.FrameEventArgs) If (textControl1.Frames.GetItem() Is Nothing) AndAlso (textControl1.Drawings.GetActivatedItem() Is Nothing) Then m_grpFrameTools.Visible = False End If End Sub Private Sub TextControl1_FrameSelected(sender As Object, e As TXTextControl.FrameEventArgs) m_grpFrameTools.Visible = True End Sub Private Sub TextControl1_InputPositionChanged(sender As Object, e As EventArgs) m_grpTableTools.Visible = textControl1.Tables.GetItem() IsNot Nothing End Sub End Class -
Build and start the application.
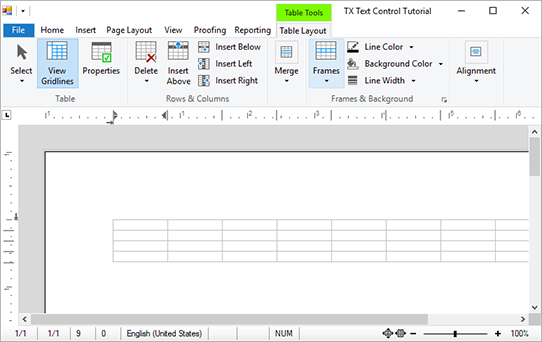
Insert a table using the Table drop-down wizard in the Insert ribbon tab. Set the input position into the table to see the contextual Table Tools tab.
Adding an Application Menu
-
In the Solution Explorer, select the form Form1 and choose Designer from the View main menu.
-
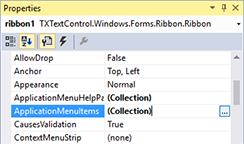
Select the ribbon control and find the ApplicationMenuItems property in the Properties window.
-
Open the Control Collection Editor by clicking on the ellipsis button in the (Collection) value column of the ApplicationMenuItems property.
-
In the Control Collection Editor, click on Add to add a new Windows.Forms.Ribbon.RibbonButton. Name this button m_rbtnLoad and set the Text property to Load.... Add a second button with the name m_rbtnSave and the Text Save.... Close the dialog by clicking OK.
-
In the Solution Explorer, select the form Form1 and choose Code from the View main menu. Attach two more events to the Form1 constructor code, so that the complete constructor code looks like this:
This file contains bidirectional Unicode text that may be interpreted or compiled differently than what appears below. To review, open the file in an editor that reveals hidden Unicode characters. Learn more about bidirectional Unicode characterspublic Form1() { InitializeComponent(); textControl1.InputPositionChanged += TextControl1_InputPositionChanged; textControl1.FrameSelected += TextControl1_FrameSelected; textControl1.FrameDeselected += TextControl1_FrameDeselected; textControl1.DrawingActivated += TextControl1_DrawingActivated; textControl1.DrawingDeselected += TextControl1_DrawingDeselected; m_rbtnLoad.Click += M_rbtnLoad_Click; m_rbtnSave.Click += M_rbtnSave_Click; } This file contains bidirectional Unicode text that may be interpreted or compiled differently than what appears below. To review, open the file in an editor that reveals hidden Unicode characters. Learn more about bidirectional Unicode charactersPublic Sub New() InitializeComponent() textControl1.InputPositionChanged += TextControl1_InputPositionChanged textControl1.FrameSelected += TextControl1_FrameSelected textControl1.FrameDeselected += TextControl1_FrameDeselected textControl1.DrawingActivated += TextControl1_DrawingActivated textControl1.DrawingDeselected += TextControl1_DrawingDeselected AddHandler m_rbtnLoad.Click, AddressOf M_rbtnLoad_Click AddHandler m_rbtnSave.Click, AddressOf M_rbtnSave_Click End Sub -
Under the Form constructor code, add the following two new event handler methods:
This file contains bidirectional Unicode text that may be interpreted or compiled differently than what appears below. To review, open the file in an editor that reveals hidden Unicode characters. Learn more about bidirectional Unicode charactersprivate void M_rbtnSave_Click(object sender, EventArgs e) { textControl1.Save(); } private void M_rbtnLoad_Click(object sender, EventArgs e) { textControl1.Load(); } This file contains bidirectional Unicode text that may be interpreted or compiled differently than what appears below. To review, open the file in an editor that reveals hidden Unicode characters. Learn more about bidirectional Unicode charactersPrivate Sub M_rbtnSave_Click(sender As Object, e As EventArgs) textControl1.Save() End Sub Private Sub M_rbtnLoad_Click(sender As Object, e As EventArgs) textControl1.Load() End Sub -
Build and start the application.
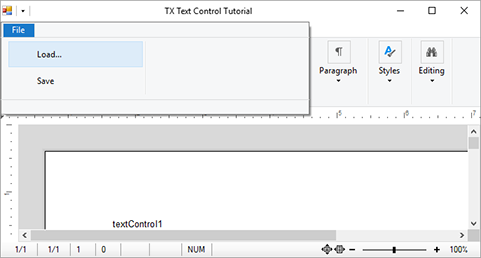
When clicking on the File application menu, the two menu items are visible to load and save documents.
