Building an ASP.NET Core Backend (Linux and Windows) for the Document Editor and Viewer
This article shows how to create a backend for the Document Editor and Viewer using ASP.NET Core. The backend can be hosted on Windows and Linux and can be used in Blazor, Angular, JavaScript, and ASP.NET Core applications.

In this tutorial, we'll walk you through building a cross-platform ASP.NET Core backend (targeting .NET 8 and beyond) specifically designed to host the TX Text Control Document Editor and Document Viewer.
Whether you're running on Windows or Linux, on-premises or in a containerized environment using Docker or Kubernetes, this backend setup gives you the flexibility to integrate powerful document editing and viewing capabilities into your applications without locking you into a specific operating system or infrastructure.
By the end of this guide, you'll have a robust, production-ready backend that provides rich document handling capabilities while taking advantage of the performance and cross-platform benefits of .NET 8.
Prerequisites
You need to download and install the trial version of TX Text Control .NET Server to get access to the required NuGet packages.
- Download Trial Version
Setup download and installation required.
Creating the Application
Make sure that you downloaded the latest version of Visual Studio 2022 that comes with the .NET 8 SDK.
-
In Visual Studio 2022, create a new project by choosing Create a new project.
-
Select ASP.NET Core Web API as the project template and confirm with Next.
-
Choose a name for your project and confirm with Next.
-
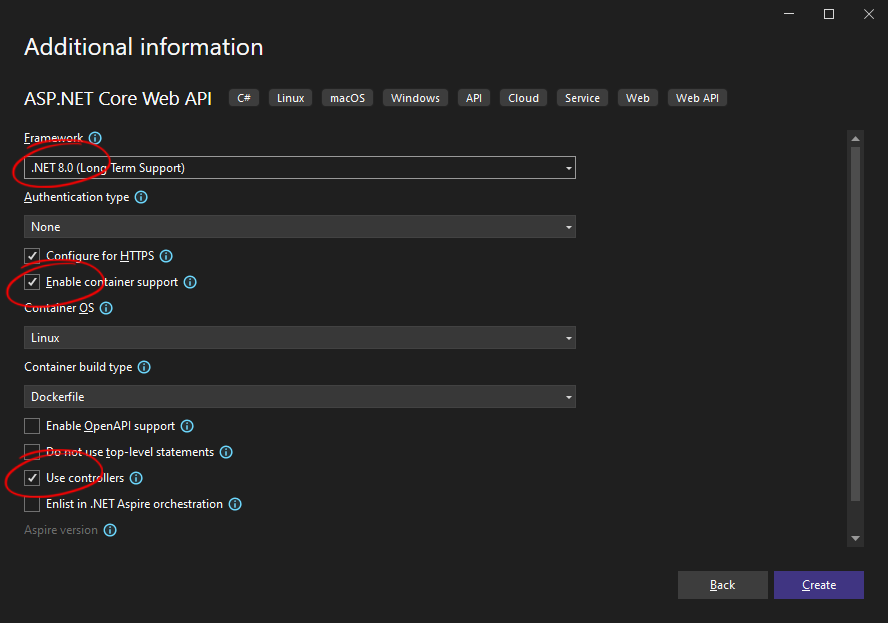
In the next dialog, choose .NET 8 (Long Term Support) as the Framework, select Enable container support if required, check Use controllers, and confirm with Create.

Adding the Web Server Backend
-
Create a new class by right-clicking the project in the Solution Explorer and choose Add -> Class.... Name the class TXWebServerProcess.cs and confirm with Add. Replace the complete content with the following code:
using System.Diagnostics; using System.Reflection; public class TXWebServerProcess : IHostedService { private readonly ILogger<TXWebServerProcess> _logger; public TXWebServerProcess(ILogger<TXWebServerProcess> logger) => _logger = logger; public Task StartAsync(CancellationToken cancellationToken) { try { string? path = Path.GetDirectoryName(Assembly.GetExecutingAssembly().Location); string dllPath = Path.Combine(path ?? "", "TXTextControl.Web.Server.Core.dll"); if (string.IsNullOrEmpty(path) || !File.Exists(dllPath)) _logger.LogWarning("TX Web Server process could not be started."); else { Process.Start(new ProcessStartInfo("dotnet", $"\"{dllPath}\" &") { UseShellExecute = true, WorkingDirectory = path }); _logger.LogInformation("TX Web Server process started."); } } catch (Exception ex) { _logger.LogError(ex, "Error starting TX Web Server."); } return Task.CompletedTask; } public Task StopAsync(CancellationToken cancellationToken) { _logger.LogInformation("Stopping TX Web Server process..."); return Task.CompletedTask; } } -
Now right-click the project in the Solution Explorer and choose Add -> Existing Item.... Navigate to the installation folder of TX Text Control .NET Server:
C:\Program Files\Text Control GmbH\TX Text Control 33.0.NET Server for ASP.NET\Assembly\net8.0
Set the file filter to All Files (*.*) and select the following files:
- TXTextControl.Web.Server.Core.deps.json
- TXTextControl.Web.Server.Core.dll
- TXTextControl.Web.Server.Core.Process.deps.json
- TXTextControl.Web.Server.Core.Process.dll
- TXTextControl.Web.Server.Core.Process.runtimeconfig.json
- TXTextControl.Web.Server.Core.runtimeconfig.json
- TXTextControl.Web.Server.Core.config.json
Confirm with Add.
-
Select the added files in the Solution Explorer and set the Copy to Output Directory property to Copy always.
Adding the NuGet Packages
-
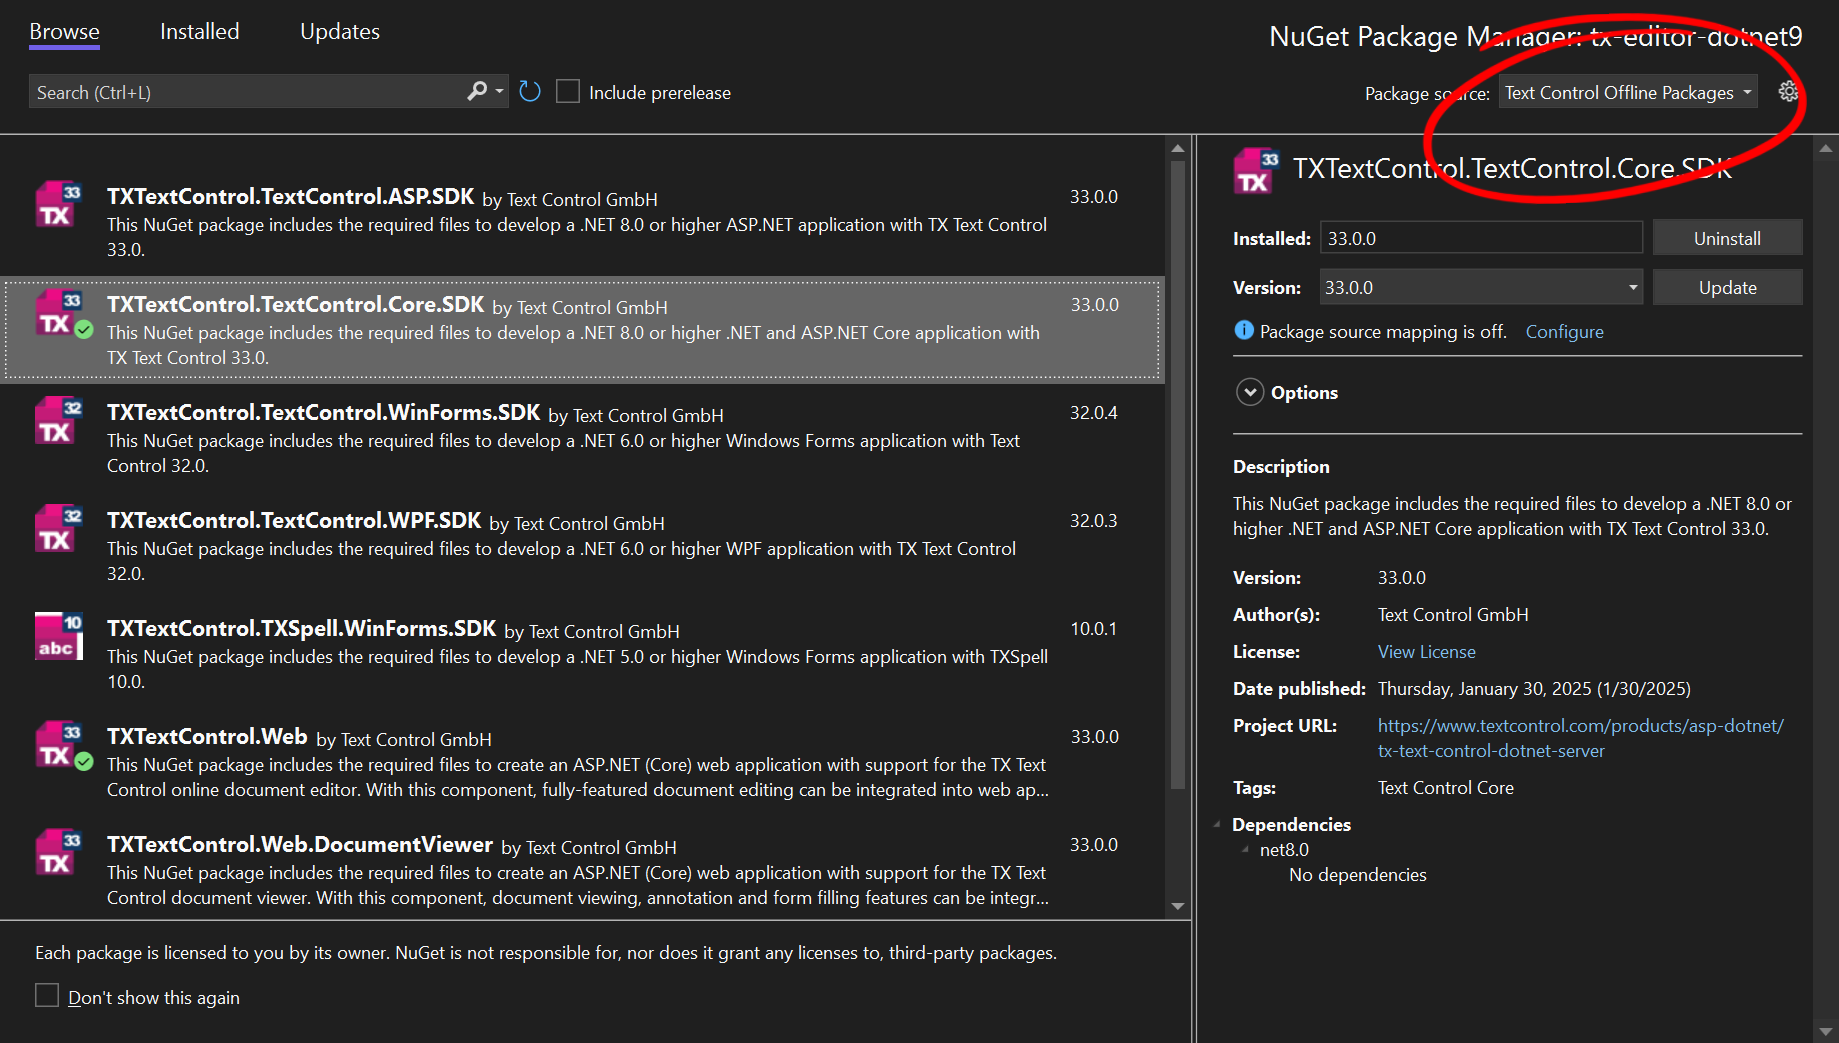
In the Solution Explorer, select your created project and choose Manage NuGet Packages... from the Project main menu. Select Text Control Offline Packages as the Package source.
Install the following packages:
- TXTextControl.Web
- TXTextControl.Web.DocumentViewer
- TXTextControl.TextControl.Core.SDK

Configure the Application
-
Open the Program.cs file located in the project's root folder and replace the code with the following:
using TXTextControl.Web;
using TXTextControl.Web.MVC.DocumentViewer;

var builder = WebApplication.CreateBuilder(args);

// Add services to the container.
builder.Services.AddControllers();
builder.Services.AddHostedService<TXWebServerProcess>();

// *** Required for Document Viewer ***
builder.Services.AddCors(p => p.AddPolicy("corsapp", builder =>
{
    builder.WithOrigins("*").AllowAnyMethod().AllowAnyHeader();
}));

var app = builder.Build();

// Configure the HTTP request pipeline.

app.UseHttpsRedirection();

app.UseAuthorization();

app.MapControllers();

// *** Required for Document Editor ***
// add the WebSocket middleware
app.UseWebSockets();
app.UseTXWebSocketMiddleware();

// *** Required for Document Viewer ***
// add the DocumentViewer middleware
app.UseCors("corsapp");
app.UseRouting();
app.UseTXDocumentViewer();

app.Run();
Learn More
This article describes how to configure the TX Text Control Document Editor Backend Web Server, including port and logging settings.
Configuring the TX Text Control Document Editor Backend Web Server, including Port and Logging
Running the Backend
Press F5 to start the application. The backend is now running and listening on the port that is defined the in the [your-application-name].http file.
The default Visual Studio template uses a sample controller that returns a list of weather forecasts. You can remove this controller and replace it with one of your own.
Now, you have a fully functional ASP.NET Core backend that is ready to host the TX Text Control Document Editor and Document Viewer.
Connecting the Frontend
Now that the backend is running, you can connect the frontend to the backend. The frontend can be any client-side framework such as Angular, React, or JavaScript.
Connecting JavaScript
For JavaScript, you can use the following code to connect the Document Editor to the backend:
<!DOCTYPE html>
<html>
<head>
  <meta charset="utf-8" />
  <title>TX Text Control Document Editor from JS</title>
  <script
    src="https://localhost:32769/api/TXWebSocket/GetResource?name=tx-document-editor.min.js">
  </script>
  <style>
    #txDocumentEditor {
      height: 800px;
      width: 800px;
    }
  </style>
</head>
<body>

  <div id="txDocumentEditor"></div>

  <script type="module">
    TXTextControl.init({
      containerID: "txDocumentEditor",
      webSocketURL: "wss://localhost:32769/api/TXWebSocket"
    });

    var documentString = "Hey - it compiles! <strong>Ship it!</strong>";

    TXTextControl.addEventListener("textControlLoaded", function () {
      TXTextControl.loadDocument(TXTextControl.StreamType.HTMLFormat, btoa(documentString));
    });
  </script>

</body>
</html>
Make sure to adjust the URL to the backend that is running on your machine.
To connect the Document Viewer, use the following code:
<!DOCTYPE html>
<html>
<head>
  <meta charset="utf-8" />
  <title>TX Text Control Document Viewer from JS</title>
  <script src="https://localhost:32769/TextControl/GetResource?Resource=minimized.tx-viewer.min.js"></script>
  <script src="https://localhost:32769/TextControl/GetResource?Resource=minimized.tx-viewer-component.min.js"></script>
  <style>
    #txDocumentViewer {
      height: 800px;
      width: 800px;
    }
  </style>
</head>
<body>

  <tx-document-viewer
    id="viewer1"
    settings='{"documentData":"VGV4dCBDb250cm9s", "dock":1, "basePath":"https://localhost:32769"}'>
  </tx-document-viewer>

</body>
</html>
Connecting Angular
For Angular, you can use the following code to connect the Document Editor to the backend:
<tx-document-editor
   width="1000px"
   height="800px"
   webSocketURL="wss://localhost:5260/TXWebSocket"
   statusBarColor="#FF00FF"
   [controlChars]="true"
   [userNames]="['Tim Typer']">
</tx-document-editor>
Pay attention to the protocol wss that is required for the WebSocket connection.
To connect the Document Viewer, use the following code:
<tx-document-viewer
   width="1000px"
   height="800px"
   basePath="http://localhost:5260"
   dock="Window"
   [toolbarDocked]="true"
   documentPath="demo.docx"
   [isSelectionActivated]="true"
   [showThumbnailPane]="true">
</tx-document-viewer>
Backend Deployment
This backend can be deployed to any hosting provider that supports ASP.NET Core applications. You can deploy it to Azure, AWS, or any other cloud provider as a VM, container or as a serverless service.
ASP.NET
Integrate document processing into your applications to create documents such as PDFs and MS Word documents, including client-side document editing, viewing, and electronic signatures.
- Angular
- Blazor
- React
- JavaScript
- ASP.NET MVC, ASP.NET Core, and WebForms
Related Posts
TX Text Control Document Editor and Viewer for Blazor Released
We are very happy to announce the immediate availability of TX Text Control packages for Blazor. This article gives an overview of the available packages and how to use them.
Announcing Our Work on a Blazor Component for Document Editing and Viewing
We are pleased to announce our work on a Blazor document editing and viewing component. This component will be part of our upcoming release and will provide an easy upgrade path from Web Forms to…
Building an ASP.NET Core Backend Application to Host the Document Editor and…
This article explains how to create an ASP.NET Core backend application to host the Document Editor and Document Viewer. This backend application is required to provide the required functionality…
TX Text Control for Blazor: Mail Merge Integration Tutorial
This tutorial shows how to integrate the TX Text Control MailMerge component into a Blazor application using the TX Text Control .NET Server.
Getting Started: Document Editor for Blazor in ASP.NET Core
This article shows how to integrate the Document Editor for Blazor into an ASP.NET Core application running on Windows and Linux. The Document Editor is a powerful word processing component that…


