Getting Started: Document Editor for Blazor in ASP.NET Core
This article shows how to integrate the Document Editor for Blazor into an ASP.NET Core application running on Windows and Linux. The Document Editor is a powerful word processing component that can be used to create, edit, and view documents in various formats.

Prerequisites
You need to download and install the trial version of TX Text Control .NET Server to host the required backend:
- Download Trial Version
Setup download and installation required.
Creating the Application
Make sure that you downloaded the latest version of Visual Studio 2022 that comes with the .NET 8 SDK.
-
In Visual Studio 2022, create a new project by choosing Create a new project.
-
Select Blazor Web App as the project template and confirm with Next.
-
Choose a name for your project and confirm with Next.
-
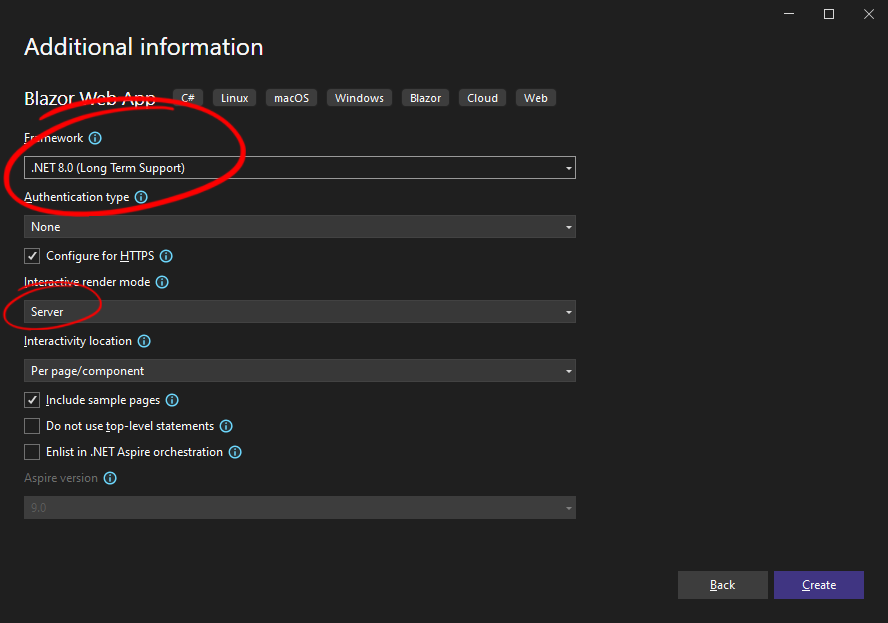
In the next dialog, choose .NET 8 (Long Term Support) as the Framework, select Server as the Interactive render mode and confirm with Create.

Adding the NuGet Packages
-
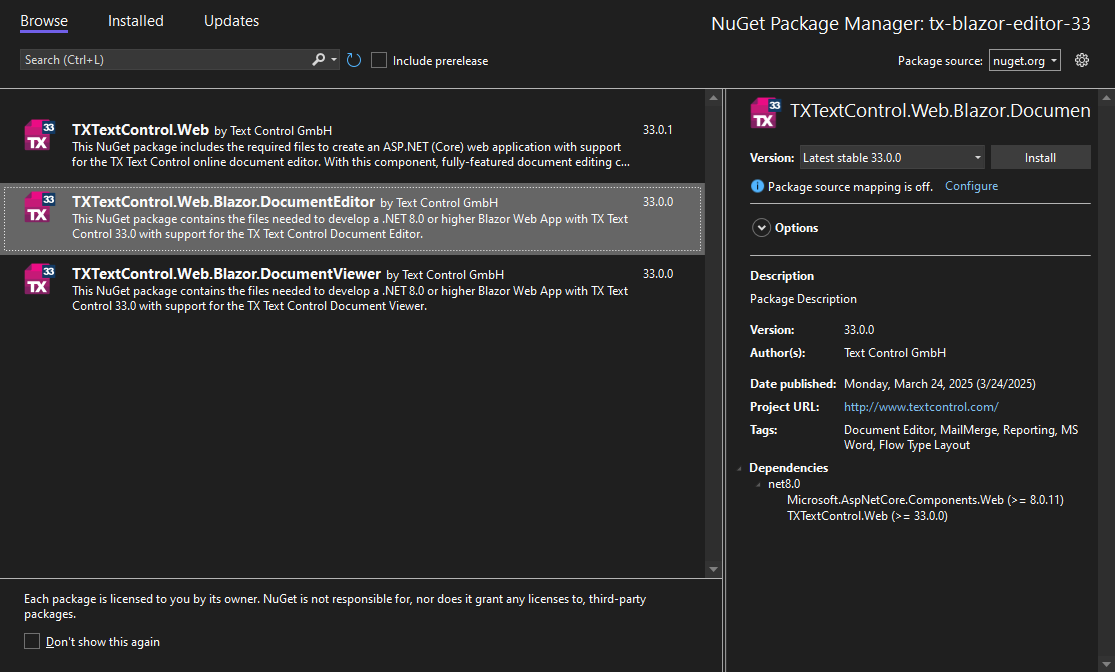
In the Solution Explorer, select your created project and choose Manage NuGet Packages... from the Project main menu. Select nuget.org as the Package source.
Install the following package:
- TXTextControl.Web.Blazor.DocumentEditor

Configure the Application
-
Open the Program.cs file located in the project's root folder. At the very top of the file, insert the following code:
using TXTextControl.Web;Add the following code after the entry app.UseHttpsRedirection();:
// enable Web Sockets
app.UseWebSockets();

// attach the Text Control WebSocketHandler middleware
app.UseTXWebSocketMiddleware();
Adding the Control to the View
-
Find the Home.razor file in the Components -> Pages folder. Replace the complete content with the following code to add the document editor to the view:
@page "/"
@rendermode InteractiveServer

<PageTitle>Home</PageTitle>

<h1>Hello, Blazor!</h1>

<TXTextControl.Web.Blazor.DocumentEditor.DocumentEditor
    @ref="_documentEditor" Width="800px" Height="500px" />

<button class="btn btn-primary mt-5" @onclick="ButtonLoad">
    Load Document
</button>

@code {
    private TXTextControl.Web.Blazor.DocumentEditor.DocumentEditor _documentEditor;

    private async Task ButtonLoad()
    {
        try
        {
            await _documentEditor.LoadDocumentAsync("Documents/template.docx",
                TXTextControl.Web.StreamType.WordprocessingML);
        }
        catch (Exception ex)
        {
            Console.Error.WriteLine($"Error loading document: {ex.Message}");
        }
    }
}
Adding Documents
To show how to load documents into the Document Editor, we will add a few sample documents to the application.
-
Create a new folder in the project's root folder and name it Documents.
-
Place any documents you want to load into the Document Editor into this folder. In this sample, we will use a document named template.docx.
Running the Application
-
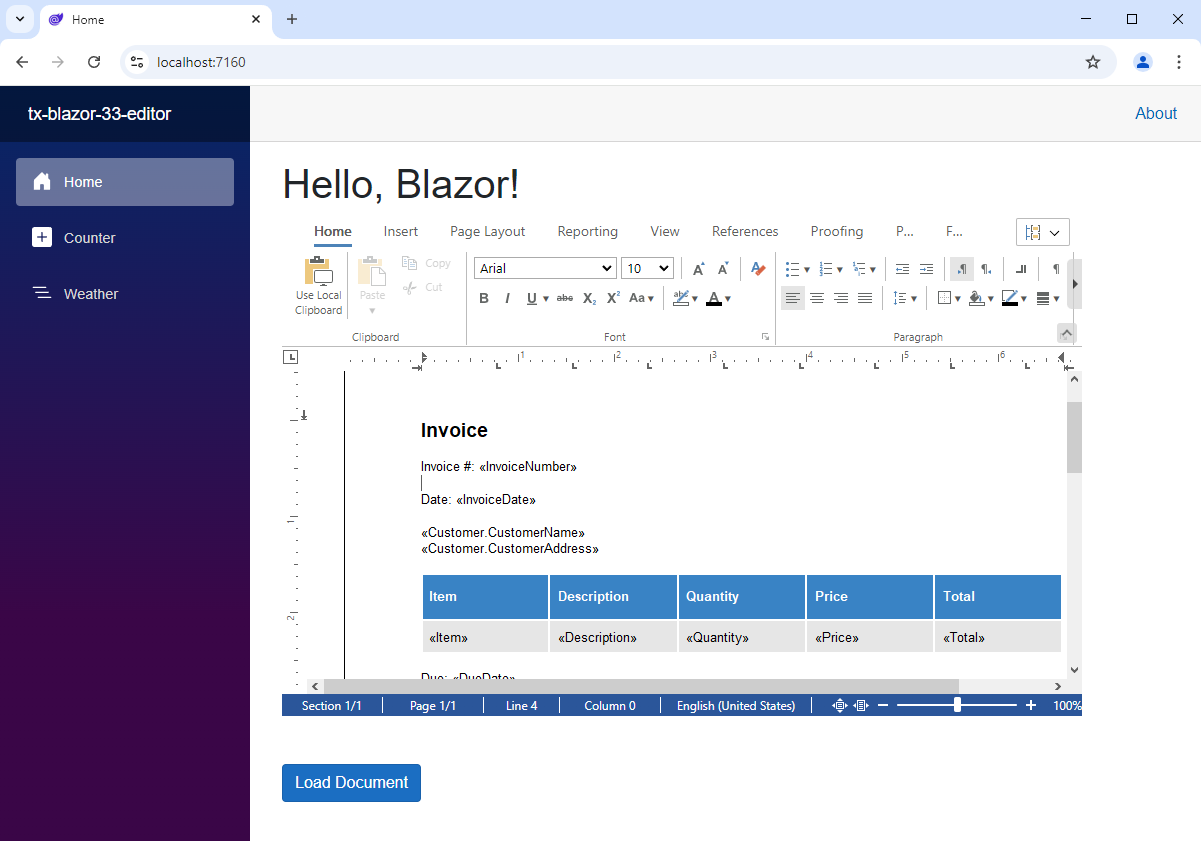
Run the application by pressing F5 or by choosing Debug -> Start Debugging from the main menu.
When clicking the Load Document button, the document template.docx will be loaded into the Document Editor.

Deploying to Linux?
If you want to deploy to Linux or run it with WSL or Docker support, see the following article to learn how to deploy the required web server to Linux.
Getting Started: Document Editor with ASP.NET Core and Linux WSL Support
ASP.NET
Integrate document processing into your applications to create documents such as PDFs and MS Word documents, including client-side document editing, viewing, and electronic signatures.
- Angular
- Blazor
- React
- JavaScript
- ASP.NET MVC, ASP.NET Core, and WebForms
Related Posts
Building an ASP.NET Core Backend (Linux and Windows) for the Document Editor…
This article shows how to create a backend for the Document Editor and Viewer using ASP.NET Core. The backend can be hosted on Windows and Linux and can be used in Blazor, Angular, JavaScript, and…
TX Text Control for Blazor: Mail Merge Integration Tutorial
This tutorial shows how to integrate the TX Text Control MailMerge component into a Blazor application using the TX Text Control .NET Server.
TX Text Control Document Editor and Viewer for Blazor Released
We are very happy to announce the immediate availability of TX Text Control packages for Blazor. This article gives an overview of the available packages and how to use them.
Announcing Our Work on a Blazor Component for Document Editing and Viewing
We are pleased to announce our work on a Blazor document editing and viewing component. This component will be part of our upcoming release and will provide an easy upgrade path from Web Forms to…
ASP.NETASP.NET CoreDocument Editor
ASP.NET Core Document Editor with Backend via the Text Control Private NuGet…
This article demonstrates how to create a Document Editor ASP.NET Core application using the Text Control Private NuGet Feed. We will build a basic web application that enables users to edit…


