Using TXTextControl.Web in ASP.NET Core Razor Pages
By default, TXTextControl.Web is built for ASP.NET Core MVC Web Applications. But it can be used with Razor Pages as well by adding the required static files to page level.

When using the NuGet package for the TX Text Control document editor, static files must be added to serve JavaScript, CSS and resource files.
Adding Static Files
Adding TX Text Control to an ASP.NET Core Razor Pages application is the same like for MVC applications. If you create a new ASP.NET Core Web Application based on our tutorial, the following configuration code is added to the Startup.cs:
// serve static linked files (JavaScript and CSS for the editor)
app.UseStaticFiles(new StaticFileOptions
{
    FileProvider = new Microsoft.Extensions.FileProviders.PhysicalFileProvider(
       System.IO.Path.Combine(System.IO.Path.GetDirectoryName(
           System.Reflection.Assembly.GetEntryAssembly().Location),
           "TXTextControl.Web")),
    RequestPath = "/TXTextControl.Web"
});
In the above code, the TXTextControl.Web directory hierarchy is publicly available in the TXTextControl.Web URI segment. The request to http://<server_address>/TXTextControl.Web/JS/tx-min.js serves the tx-min.js file.
This concept works very well for MVC applications where a controller is routing the requests to the views and the above static file requests are always routed to the root folder.
Razor Pages
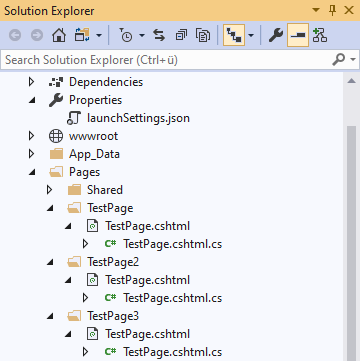
With Razor Pages, by convention, associations of URL paths to pages are determined by the page's location in the file system. This tutorial shows how to create a simple ASP.NET Core Razor Pages application. The content of the various segments is stored in folders named after the pages. The following screenshot shows this structure with folders for the available pages TestPage, TestPage2 and TestPage3:

Now, the resource request for the static files for TestPage is:
http://<server_address>/TestPage/TXTextControl.Web/JS/tx-min.js
In order to solve this routing, another entry in the Startup.cs is required:
app.UseStaticFiles(new StaticFileOptions
{
    FileProvider = new Microsoft.Extensions.FileProviders.PhysicalFileProvider(
   System.IO.Path.Combine(System.IO.Path.GetDirectoryName(
       System.Reflection.Assembly.GetEntryAssembly().Location),
       "TXTextControl.Web")),
    RequestPath = "/TestPage/TXTextControl.Web",
});
Pay attention to the RequestPath property that contains the page name as the first segment. Repeat this for all pages where TX Text Control is used to get the resources loaded properly.
Related Posts
ASP.NETASP.NET CoreDocument Automation
Why Document Processing Libraries Require a Document Editor
A document processing library alone cannot guarantee reliable and predictable results. Users need a true WYSIWYG document editor to design and adjust templates to appear exactly as they will after…
JavaScriptASP.NET CoreDocument Editor
Format Painter in ASP.NET Core: Building Custom Text Formatting with TX Text…
This article demonstrates how to build a Format Painter feature using the TX Text Control Document Editor, implementing format detection, copy and paste operations, and custom style handling…
ASP.NETASP.NET CoreDocument Editor
Getting Started Video Tutorial: Document Editor in ASP.NET Core C# on Linux
This video tutorial shows how to use the Document Editor in an ASP.NET Core application using C# and deploy on Linux using Docker. This tutorial is part of the TX Text Control Getting Started…
ASP.NETApp ServicesASP.NET Core
Deploying the TX Text Control Document Editor in an ASP.NET Core Web App to…
This tutorial shows how to deploy the TX Text Control Document Editor to Azure App Services using an ASP.NET Core Web App. The Document Editor is a powerful word processing component that can be…
Building an ASP.NET Core Backend (Linux and Windows) for the Document Editor…
This article shows how to create a backend for the Document Editor and Viewer using ASP.NET Core. The backend can be hosted on Windows and Linux and can be used in Blazor, Angular, JavaScript, and…

