API Documentation
The full documentation can be found in our online documentation hub Text Control Docs:
TXTextControl.Web.MVC.DocumentViewer
Video Tutorial
Create Your Application
-
Make sure that you installed at least a trial version of TX Text Control .NET Server for ASP.NET on your development machine:
-
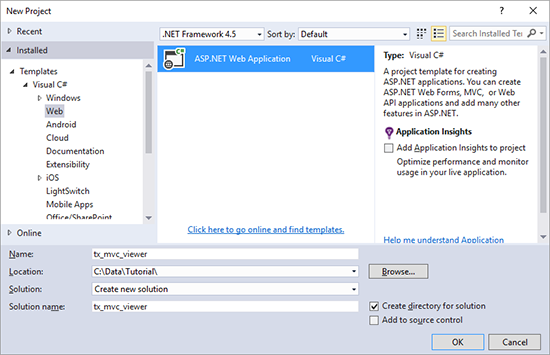
Open Visual Studio and create a new ASP.NET Web Application. Make sure to select .NET Framework 4.5 as the .NET Framework project version.
-
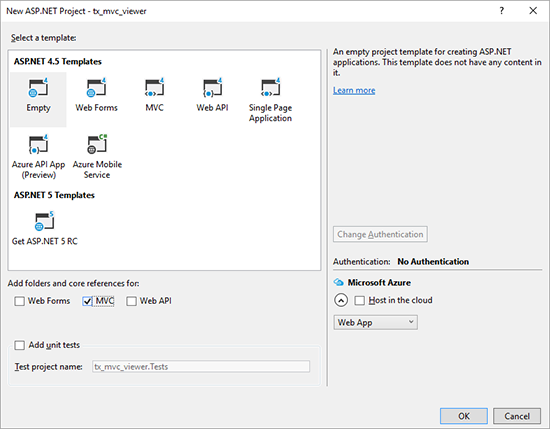
In the next dialog New ASP.NET Project, select Empty as your project template. Check the checkbox MVC to add the folders and core references. Close the dialog with OK.
-
Click Manage NuGet Packages... from the Project main menu. Select nuget.org from the Online package source panel. In the upper right corner, search for TXTextControl.Web.DocumentViewer. Find the latest version and click on Install.
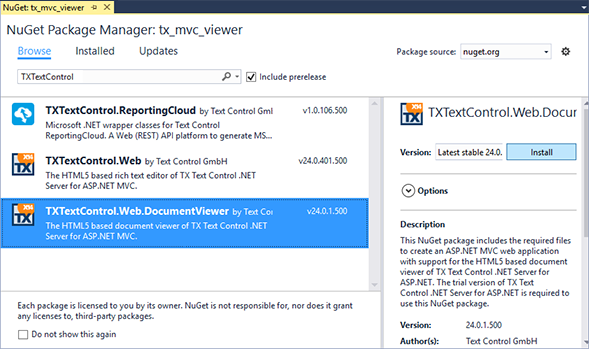
Make sure to update the Microsoft ASP.NET MVC packages, if they are available in the Updates panel. Close the dialog with Close.
-
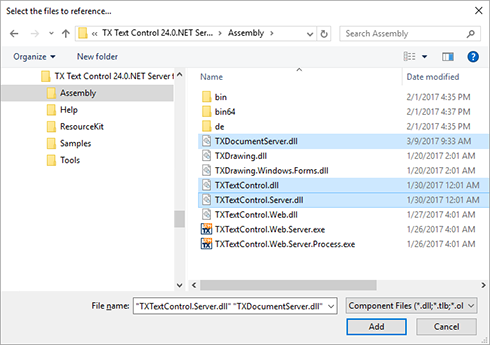
Click Add Reference... from the Project main menu. In the opened Reference Manager, click on Browse... and find the TX Text Control Assembly folder that is located in the installation directory of TX Text Control .NET Server for ASP.NET:
C:\Program Files\Text Control GmbH\TX Text Control 29.0.NET Server for ASP.NET\Assembly\
Select the 3 files TXDocumentServer.dll, TXTextControl.dll and TXTextControl.Server.dll and confirm with Add.
-
In the Solution Explorer, select the project and choose Add New Item... from the Project main menu. Select General -> Text File as the template, name it licenses.licx and confirm with Add.
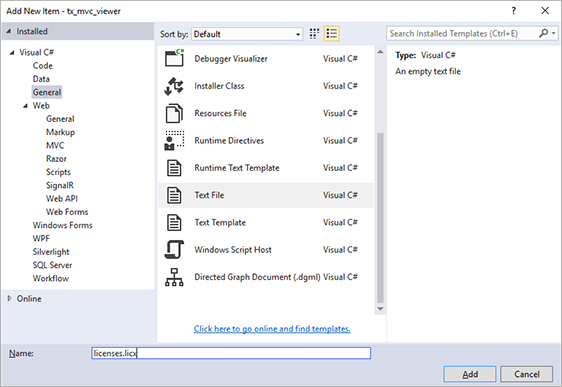
Paste the following string into the newly created file:
TXTextControl.ServerTextControl, TXTextControl.Server, Culture=neutral, PublicKeyToken=6b83fe9a75cfb638
-
In the Solution Explorer, select App_Data and click Add Existing Item... from the Project main menu.
Browse to the following TX Text Control installation folder:
C:\Program Files\Text Control GmbH\TX Text Control 29.0.NET Server for ASP.NET\Samples\Demo\
Select the file demo.rtf and confirm with Add.
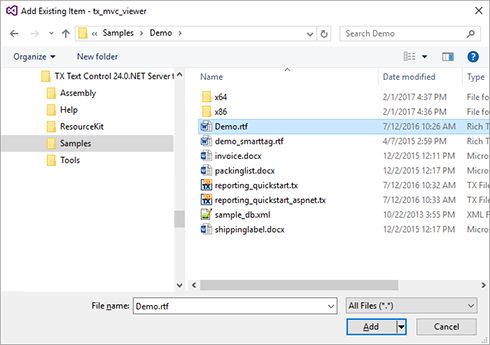
-
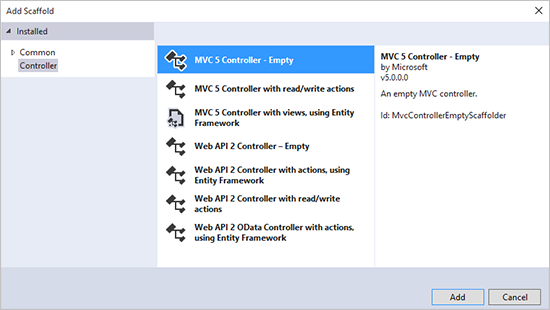
In the Solution Explorer, right-click the Controllers folder and choose Add -> Controller... from the context menu. In the opened dialog Add Scaffold, select MVC 5 Controller - Empty and confirm with Add. Set the name to HomeController and insert it by clicking the Add button.
-
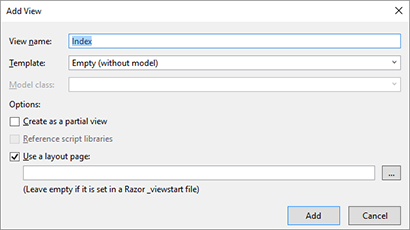
In the Solution Explorer, right-click the newly created folder Home and choose Add -> View from the context menu. Name the view Index and confirm with Add.
-
Open the Index.cshtml view from the Views -> Home folder. Add the following Razor code to the top of the view:
This file contains bidirectional Unicode text that may be interpreted or compiled differently than what appears below. To review, open the file in an editor that reveals hidden Unicode characters. Learn more about bidirectional Unicode characters@using TXTextControl.Web.MVC.DocumentViewer -
Add the following HtmlHelper code to the end of the view page:
This file contains bidirectional Unicode text that may be interpreted or compiled differently than what appears below. To review, open the file in an editor that reveals hidden Unicode characters. Learn more about bidirectional Unicode characters@Html.TXTextControl().DocumentViewer(settings => { settings.DocumentPath = Server.MapPath("~/App_Data/Demo.rtf"); settings.Dock = DocumentViewerSettings.DockStyle.Window; settings.IsSelectionActivated = true; settings.ShowThumbnailPane = true; }).Render() The complete Index.cshtml should now look like this:
This file contains bidirectional Unicode text that may be interpreted or compiled differently than what appears below. To review, open the file in an editor that reveals hidden Unicode characters. Learn more about bidirectional Unicode characters@using TXTextControl.Web.MVC.DocumentViewer @{ ViewBag.Title = "Index"; } <h2>Index</h2> @Html.TXTextControl().DocumentViewer(settings => { settings.DocumentPath = Server.MapPath("~/App_Data/Demo.rtf"); settings.Dock = DocumentViewerSettings.DockStyle.Window; settings.IsSelectionActivated = true; settings.ShowThumbnailPane = true; }).Render() -
Compile and start the application.


