MailMerge: Creating Shipping Labels Using TX Text Control
Creating labels for mailings, shipping or labeling is a common task for reporting tools. TX Text Control's MailMerge component gives you powerful features to create such labels or to print content on pre-printed Avery labels. Using TX Text Control, creating labels is a very easy task. The following tutorial shows the details: In a first step, the template must be created. Therefore, the shipped template designer TX Text Control Words can be used or you can reuse existing MS Word documents.…

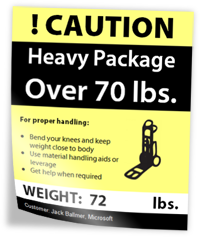
Creating labels for mailings, shipping or labeling is a common task for reporting tools. TX Text Control's MailMerge component gives you powerful features to create such labels or to print content on pre-printed Avery labels.
Using TX Text Control, creating labels is a very easy task. The following tutorial shows the details:
-
In a first step, the template must be created. Therefore, the shipped template designer TX Text Control Words can be used or you can reuse existing MS Word documents. In this tutorial, a label template is created from scratch in TX Text Control Words.
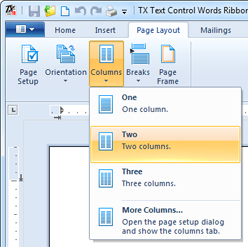
Open TX Text Control Words and create a new document. Open the Page Layout ribbon tab and set the number of columns to 2.
-
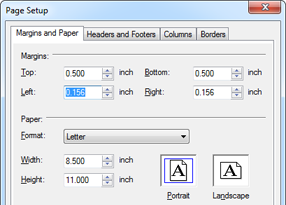
Set the page margins to the specific margins of your full sheet label paper. Many Avery® labels have a top and bottom margin of 0.5" and a left and right border of 0.156".
-
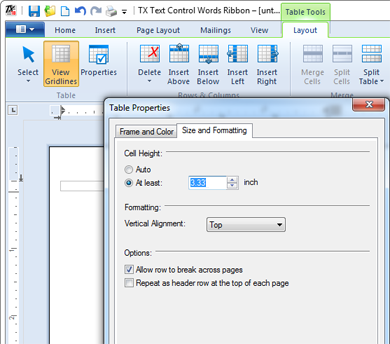
Insert a table with 1 row and 1 column and set the minimum height to the vertical label dimension. Insert the table using the Table button of the Insert ribbon tab. Set the input position inside the table and open the Properties dialog box of the Table Tools contextual ribbon tab. Confirm with OK.
-
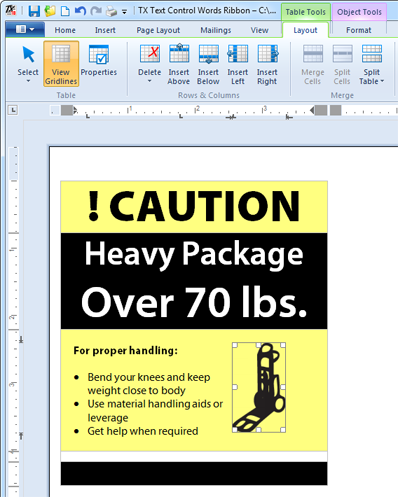
Now you can start designing your label. In our sample, a nested table is used to arrange different textual label sections:
-
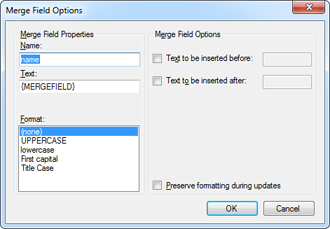
In a last step, merge fields must be added for the variable label data. Open the Mailings ribbon tab and insert merge fields at the desired positions. Set the cursor to a specific input position and click the Insert Merge Field button. In the opened dialog box, type in a name for the field. In this sample, the data source is an XML file with 3 fields per label:
<label>
    <name>Jack Ballmer</name>
    <company>Microsoft</company>
    <package_weight>72</package_weight>
</label>
Analogically, the merge field names are: name, company and package_weight.
The final template should look like this:
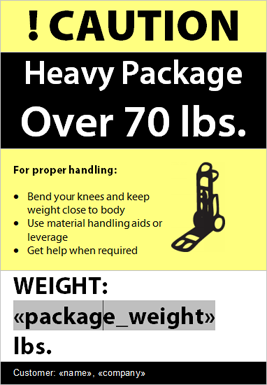
Save the template as DOC, DOCX, RTF or in the internal TX Text Control format.
-
You need a TextControl and a MailMerge instance in your .NET application. Refer to the documentation to learn how to create and connect these controls:
Connecting MailMerge to TextControl
Two easy steps are required to create the labels. First, the template must be loaded into TX Text Control:
TXTextControl.LoadSettings ls = new TXTextControl.LoadSettings();
ls.ApplicationFieldFormat = TXTextControl.ApplicationFieldFormat.MSWord;
textControl1.Load("template.docx",
    TXTextControl.StreamType.WordprocessingML, ls);
Loading the XML data source in order to fill a DataSet and to merge the document is the second step:
DataSet ds = new DataSet();
ds.ReadXml("data.xml");
mailMerge1.MergeBlocks(ds);
mailMerge1.Merge(ds.Tables[0], false);
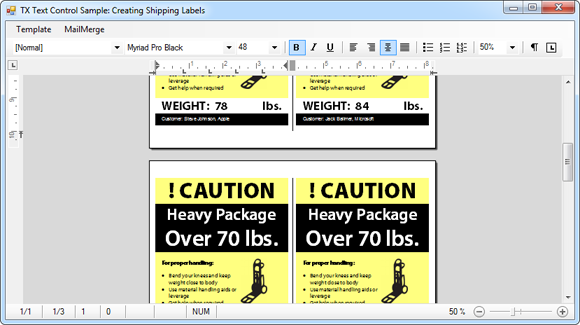
This is all you need to create pixel perfect labels. Based on the number of data rows, the number of labels are created:
Try it out and download the template and the Visual Studio project. A trial or full version of TX Text Control .NET for Windows Forms X8 is required to run this application.
Related Posts
Create a Table of Contents in Windows Forms using C#
This article explains how to create a table of contents in Windows Forms using the ribbon or programmatically. Creating a table of contents is required to organize large documents.
Official TX Text Control .NET Sample Applications Are Now Hosted on GitHub
This article gives a quick overview of the new repositories, their structure and our plans for the future.
ASP.NETJavaScriptDocument Editor
Detect Toggle Button Changes Using a MutationObserver
This article shows how to detect changes of toggle buttons in the ribbon of the web editor using a MutationObserver. The state of a toggle button in the ribbon visualizes the state of a certain…
Two Ways to Restart Numbered Lists in TX Text Control
In TX Text Control, numbered lists are continued by default and need to be reset when required. There is more than one way if you want to restart numbered lists in a document. In this article, two…
Zoom Tricks: Disabling CTRL + MOUSE WHEEL and More
This article shows how to disable CTRL + MOUSE WHEEL, implement zooming with keyboard and reset the zoom factor to its default value.

