TX Text Control Supports .NET 8 in ASP.NET Core Applications
At the .NET Conf 2023, Microsoft officially announced .NET 8, which is the next long term support (LTS) release after .NET 6. TX Text Control .NET Server supports ASP.NET Core applications built with .NET 8, and this article shows some performance improvements.

We are pleased to announce Day 0 support for the latest version of the .NET for TX Text Control .NET Server. At the .NET Conf 2023, Microsoft officially announced .NET 8. This new version is supported for 3 years with free support and patches and is the LTS successor to .NET 6.
All update notes and especially the performance improvements can be found in a very detailed blog post by Stephen Toub.
Performance Improvements in .NET 8
TX Text Control .NET Server 32.0 supports .NET 8 applications and we have tested our libraries with early versions and the final release version.
Memory and Performance Improvements
To see how the memory footprint and performance improved, we created a simple ASP.NET Core Web App to test the new version.
Creating the Application
Make sure that you downloaded the latest version of Visual Studio 2022 that comes with the .NET 8 SDK. Or download the .NET 8 SDK here:
-
In Visual Studio 2022, create a new project by choosing Create a new project.
-
Select ASP.NET Core Web App (Model-View-Controller) as the project template and confirm with Next.
-
Choose a name for your project and confirm with Next.
-
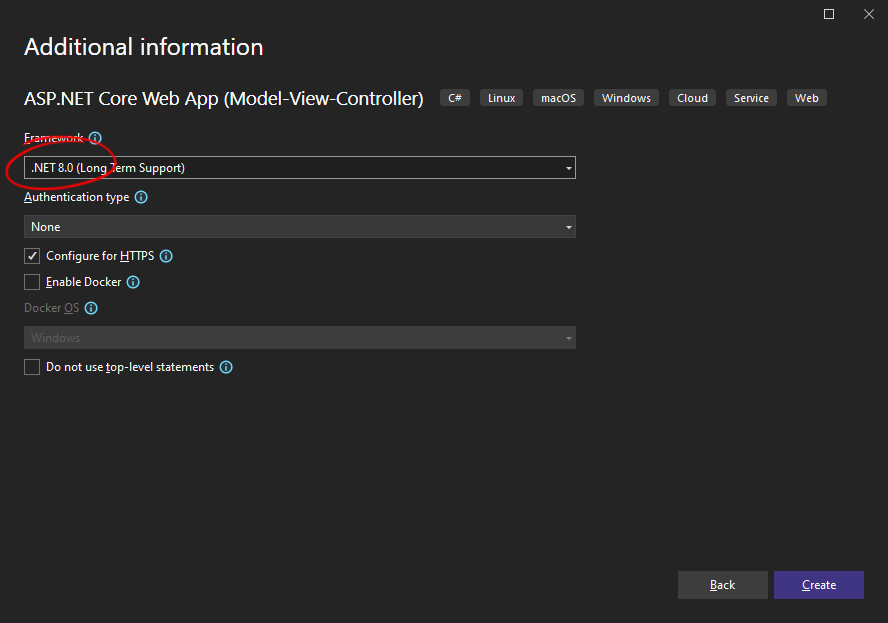
In the next dialog, choose .NET 8 (Long-term support) as the Framework and confirm with Create.

Adding the NuGet Package
-
In the Solution Explorer, select your created project and choose Manage NuGet Packages... from the Project main menu.
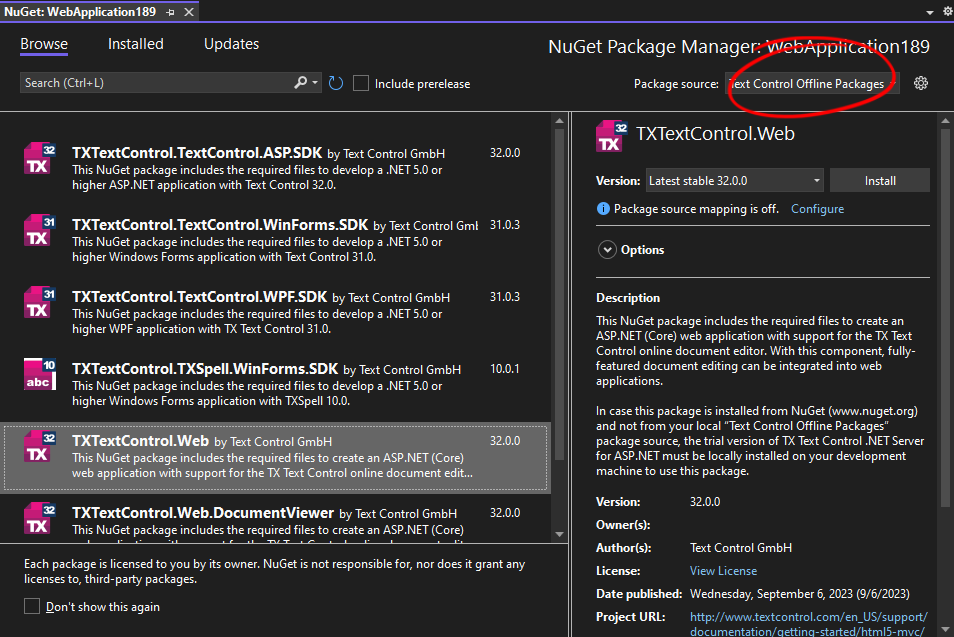
Select Text Control Offline Packages from the Package source drop-down.
Install the latest versions of the following packages:
- TXTextControl.TextControl.ASP.SDK
- TXTextControl.Web

Configure the Application
-
Open the Program.cs file located in the project's root folder.
At the very top of the file, insert the following code:
using TXTextControl.Web;Add the following code after the entry
app.UseStaticFiles();:// enable Web Sockets app.UseWebSockets(); // attach the Text Control WebSocketHandler middleware app.UseTXWebSocketMiddleware();
Adding the Control to the View
-
Find the Index.cshtml file in the Views -> Home folder. Replace the complete content with the following code to add the document editor to the view:
@using TXTextControl.Web.MVC

@Html.TXTextControl().TextControl().Render()

<input type="button" onclick="loadDocument()" value="Generate Document" />

@section Scripts {
    <script>
        function loadDocument() {
            $.get('@Url.Action("LoadDocument")', function (data) {
                TXTextControl.loadDocument(TXTextControl.StreamType.InternalUnicodeFormat, data);
            });
        }
    </script>
}
This code adds the Document Editor and a button to the view that loads a document generated in a server-side controller method.
-
Find the HomeController.cs file in the Controllers folder. Insert the following method to the file:
[HttpGet] [Route("Home/LoadDocument")] public IActionResult LoadDocument() { byte[] document; using (var tx = new TXTextControl.ServerTextControl()) { tx.Create(); tx.Load("App_Data/invoice.tx", TXTextControl.StreamType.InternalUnicodeFormat); var jsonData = System.IO.File.ReadAllText("App_Data/data.json"); using (var mailMerge = new MailMerge { TextComponent = tx }) { mailMerge.MergeJsonData(jsonData, true); } tx.Save(out document, TXTextControl.BinaryStreamType.InternalUnicodeFormat); } return new JsonResult(document); } -
Create a folder named App_Data in the root of your project. Copy the files contained in this ZIP file into this folder.
Executing the Application
When the button is clicked, the MailMerge class is used to merge the JSON data into a template, which is then returned to the editor. The Visual Studio Diagnostic Tools are used to monitor memory usage and document merge time. These values will be compared to the same application that is running with .NET 6.
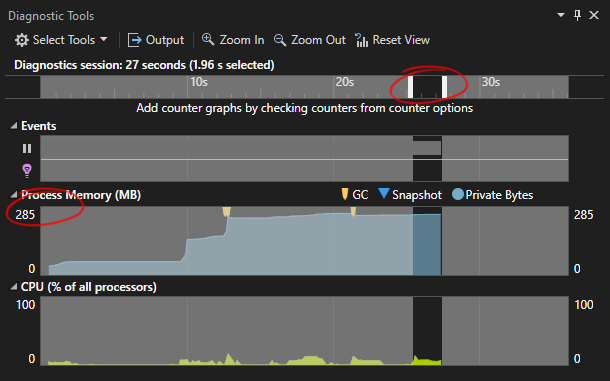
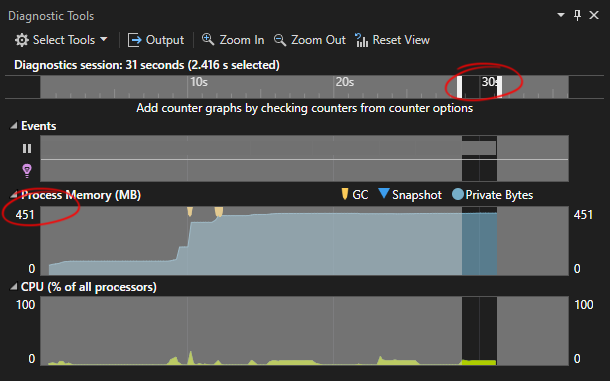
Start the application by pressing F5 and click the Generate Document button. The document is loaded and the merge process is started. The following screenshots shows the memory usage and the merge time:
.NET 8
In .NET 8, the maximum amount of memory that the application will use is 285 MB or process memory. The ServerGarbageCollection option is set to true for this demo. More information on the differences is available here: Workstation and server garbage collection.
The time it takes to load the template, merge the JSON data, and export the document, resulting in a 25-page document, is approximately 1.9 seconds.

.NET 6
The same application running with .NET 6 uses 451 MB of process memory. The average time to create the document using the same template and data is approximately 2.4 seconds.

Conclusion
NET 8 uses approximately 35% less process memory than .NET 6 for this particular benchmark application. The time it takes to generate the document in the controller method is reduced by about 18%.
ASP.NET
Integrate document processing into your applications to create documents such as PDFs and MS Word documents, including client-side document editing, viewing, and electronic signatures.
- Angular
- Blazor
- React
- JavaScript
- ASP.NET MVC, ASP.NET Core, and WebForms
Related Posts
TX Text Control 34.0 SP2 is Now Available: What's New in the Latest Version
TX Text Control 34.0 Service Pack 2 is now available, offering important updates and bug fixes for all platforms. If you use TX Text Control in your document processing applications, this service…
Build a Custom Backstage View in ASP.NET Core with TX Text Control
This article shows how to build a custom backstage view with a File tab to load your multi-format documents using TX Text Control for ASP.NET Core applications.
Configuring Web.Server.Core for TX Text Control Document Editor: Changing…
This article will explain how to configure TXTextControl.Web.Server.Core for the TX Text Control Document Editor. We will focus on changing ports and supported IP versions. We will provide…
Software Origin, Compliance, and Trust: Made in Germany
For many organizations across Europe, software is a critical component of business processes. As regulatory requirements increase and audit expectations become more detailed, the origin and…
Building a TX Text Control Project with GitHub Actions and the Text Control…
This tutorial provides a step-by-step guide to setting up a clean, reproducible environment using GitHub Actions. It starts with a brand-new project and ends with a fully automated build and test…


