Using TX Text Control .NET Server with .NET 5
.NET 5 has been officially released several days ago. This article shows how to use the TX Text Control ASP.NET editor and the ServerTextControl within a .NET 5 application in Visual Studio 2019.

.NET 5 has been released officially these days during the .NET Conf. .NET 5 brings .NET Core and the .NET Framework more together (including the Win32 layer). Although, .NET 5 is not a replacement for the .NET Framework, .NET 5 is the main implementation of .NET and the .NET Framework 4.8 is still supported.
Specifically in the web world, .NET 5 will be the major platform going forward. We will release a detailed strategy about our .NET plans very soon including release dates for .NET 5 supported Windows Forms and WPF libraries.
ASP.NET Core
Our ASP.NET web components part of TX Text Control .NET Server can be already used in .NET 5 ASP.NET Core web applications built in Visual Studio 2019 (> 16.8.0). In earlier versions of .NET Core, the required System.Drawing assembly was not included and the license manager (LC.EXE) didn't work. .NET 5 finally fixed these outstanding issues.
The following tutorial shows how to create a .NET 5 ASP.NET Core web application using the online editor Text
Creating the Application
Make sure that you downloaded the latest version of Visual Studio 2019 (> 16.8.0) that comes with the .NET 5 SDK.
-
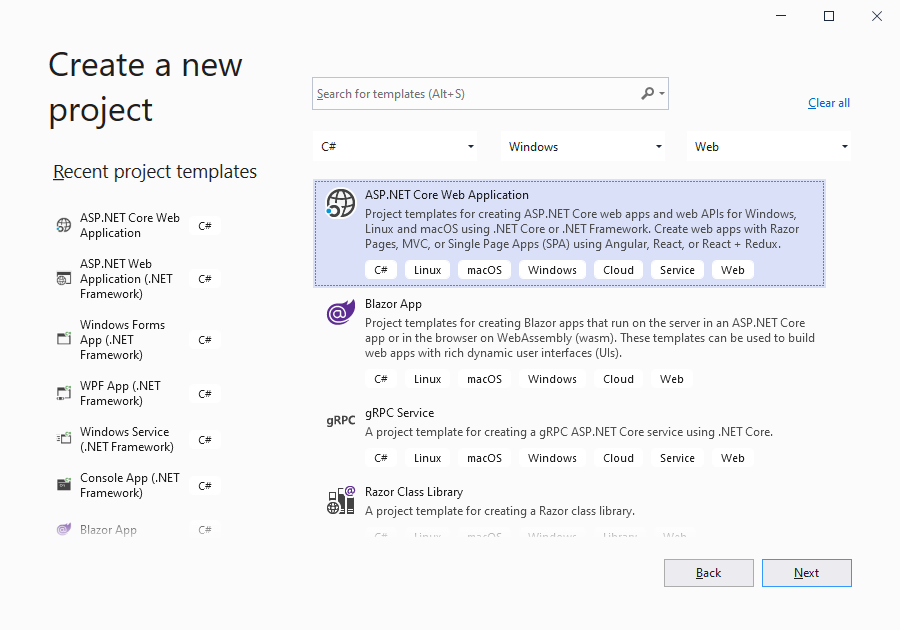
In Visual Studio 2019, create a new project by choosing Create a new project.
-
Select ASP.NET Core Web Application as the project template and confirm with Next.
-
Choose a name for your project and confirm with Create.
-
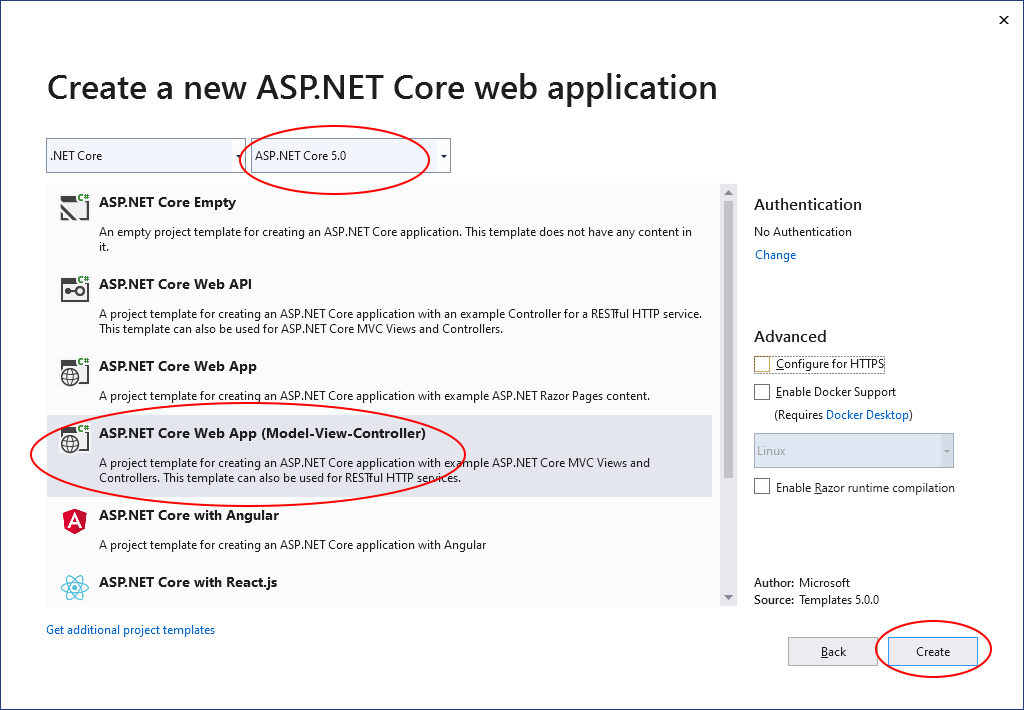
In the next dialog, choose ASP.NET Core 5.0 as the platform, select ASP.NET Core Web App (Model-View-Controller) as the template and confirm with Create.
Adding the NuGet Package
-
In the Solution Explorer, select your created project and choose Manage NuGet Packages... from the Project main menu.
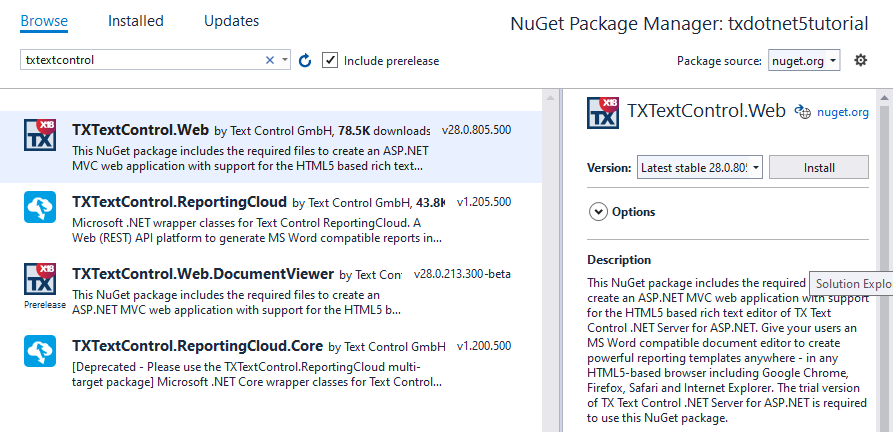
Browse for txtextcontrol.web and Install the latest version of the TXTextControl.Web package.
Configure the Application
-
Open the Startup.cs file located in the project's root folder. In the Configure method, add the following code to the end of the method:
// serve static linked files (JavaScript and CSS for the editor)
app.UseStaticFiles(new StaticFileOptions
{
    FileProvider = new Microsoft.Extensions.FileProviders.PhysicalFileProvider(
       System.IO.Path.Combine(System.IO.Path.GetDirectoryName(
           System.Reflection.Assembly.GetEntryAssembly().Location),
           "TXTextControl.Web")),
    RequestPath = "/TXTextControl.Web"
});

// enable Web Sockets
app.UseWebSockets();

// attach the Text Control WebSocketHandler middleware
app.UseMiddleware<TXTextControl.Web.WebSocketMiddleware>();
Adding the Control to the View
-
Find the Index.cshtml file in the Views -> Home folder. Replace the complete content with the following code:
@using TXTextControl.Web.MVC

@Html.TXTextControl().TextControl().Render()

<input type="button" value="Create PDF" onclick="createPDF()" />

@section Scripts {
    <script type="text/javascript">

        // converts base64 string back to a blob
        function base64ToBlob(base64) {
            var binary = atob(base64.replace(/\s/g, ''));
            var len = binary.length;
            var buffer = new ArrayBuffer(len);
            var view = new Uint8Array(buffer);

            for (var i = 0; i < len; i++) {
                view[i] = binary.charCodeAt(i);
            }

            return view;
        }

        function createPDF() {
            // save the contents of the editor
            TXTextControl.saveDocument(TXTextControl.streamType.InternalUnicodeFormat, function (e) {

                // call the Web API "CreatePDF"
                $.ajax({
                    type: "POST",
                    url: "/Home/CreatePDF?id=123",
                    contentType: 'application/json',
                    data: JSON.stringify({
                        document: e.data
                    }),

                    success: successFunc,
                    error: errorFunc
                });

                function successFunc(data, status) {
                    // create a file blob
                    var file = new Blob([base64ToBlob(data)], { type: "application/pdf" });

                    // create a temporary link element
                    var a = document.createElement("a");
                    a.href = URL.createObjectURL(file);
                    a.download = "results.pdf";

                    // attach to body and click
                    document.body.appendChild(a);
                    a.click();

                    // remove the element
                    setTimeout(function () {
                        document.body.removeChild(a);
                    }, 0);

                }

                function errorFunc(xhr, ajaxOptions, thrownError) {
                    alert(thrownError);
                }
            });
        }
    </script>
}
This code adds the Text Control to the view and button that calls a Web API endpoint to create a PDF document.
Adding ServerTextControl to the Project
-
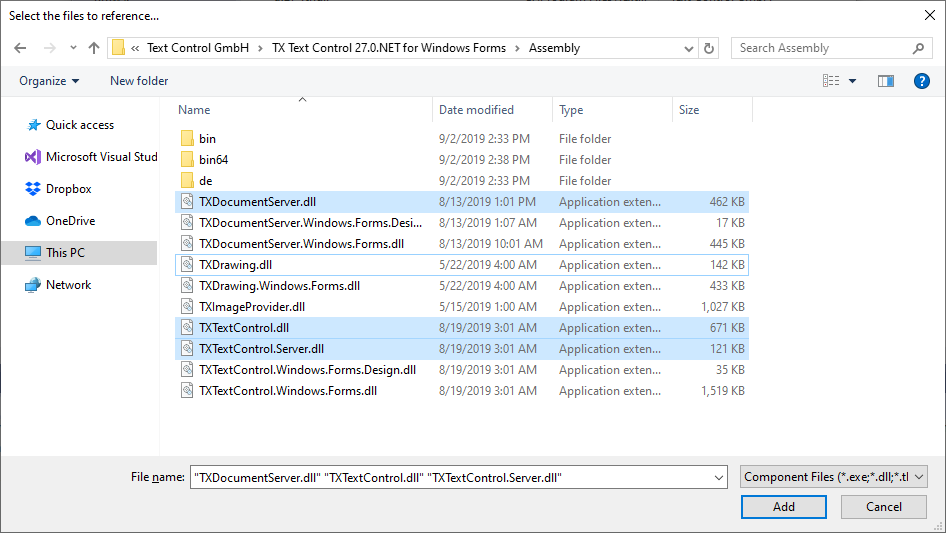
While the project is selected in the Solution Explorer, choose Project -> Add Reference... to open the Reference Manager. In the opened dialog, select Browse... to select the required TX Text Control assemblies. Navigate to the installation folder of TX Text Control and select the following assemblies from the Assembly folder:
- TXDocumentServer.dll
- TXTextControl.dll
- TXTextControl.Server.dll
Repeat this step with the following assemblies from the Assembly/bin64 folder:
- txic.dll
- txkernel.dll
- txtools.dll
After selecting these assemblies, close the Reference Manager by confirming with OK.
-
While the project is selected in the Solution Explorer, choose Project -> Add Existing Item.... Browse to the TX Text Control installation folder and select the following files from the Assembly/bin64:
- tx28_xml.dll
- tx28_css.dll
- tx28_doc.dll
- tx28_dox.dll
- tx28_htm.dll
- tx28_pdf.dll
- tx28_rtf.dll
- tx28_xlx.dll
-
Select the files from step 6 in the Solution Explorer and set the Copy to Output Directory to Copy always.
-
While the project is selected in the Solution Explorer, choose Project -> Add New Item.... Select Text File, name the file licenses.licx and close the dialog by clicking Add.
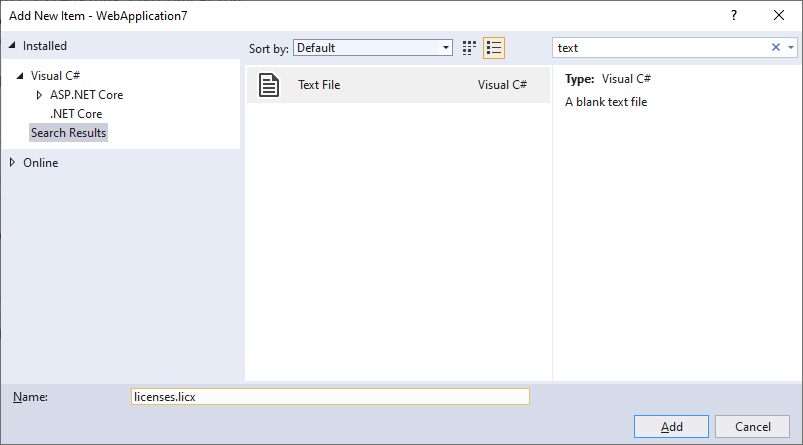
Open the newly added file and add the following content:
TXTextControl.ServerTextControl, TXTextControl.Server, Culture=neutral, PublicKeyToken=6b83fe9a75cfb638Set the Build Action property to Embedded Resource.
-
Select the project in the Solution Explorer and choose Edit Project File from the Project main menu. Find the PropertyGroup entry and replace the whole node with the following code:
<PropertyGroup>
  <TargetFramework>net5.0</TargetFramework>
  <EnableUnsafeBinaryFormatterSerialization>true</EnableUnsafeBinaryFormatterSerialization>
</PropertyGroup>
Adding a Web API Endpoint
-
Create a new class file in the Models folder named TransferDocument.cs and add the following code to the class:
public class TransferDocument { public string Document { get; set; } } -
Open the HomeController.cs and add the following method:
[HttpPost]
public IActionResult CreatePDF([FromBody] TransferDocument document) {

  // create a ServerTextControl
  using (TXTextControl.ServerTextControl tx = new TXTextControl.ServerTextControl()) {

    tx.Create();
    tx.Load(Convert.FromBase64String(document.Document),
      TXTextControl.BinaryStreamType.InternalUnicodeFormat);

    byte[] bPDF;

    tx.Save(out bPDF, TXTextControl.BinaryStreamType.AdobePDF);

    return Ok(bPDF);

  }
}
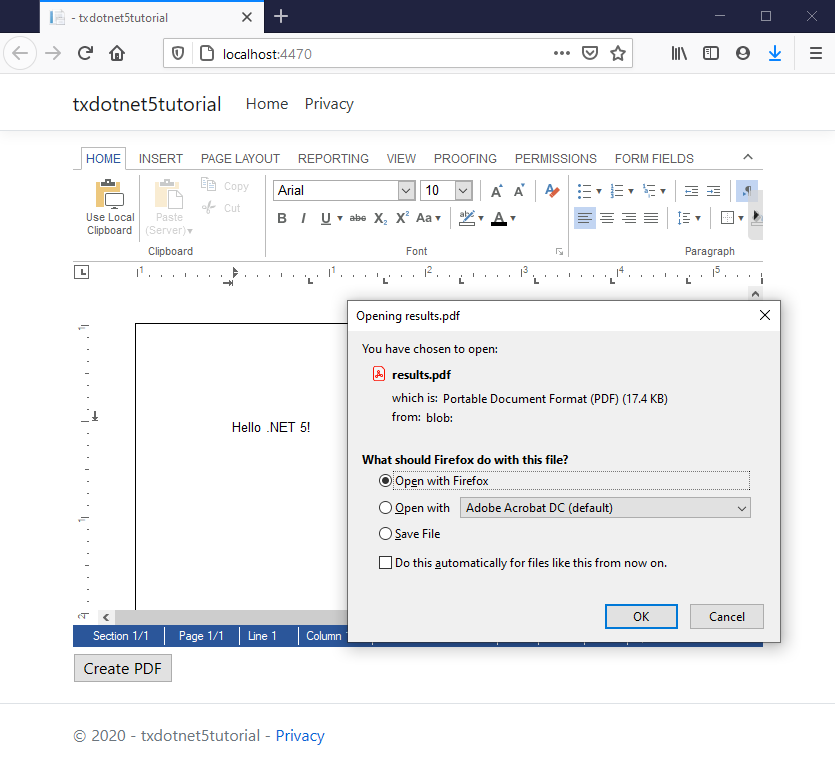
Now, compile and start the application. Type in some text and click the button Create PDF to call the created endpoint.
ASP.NET
Integrate document processing into your applications to create documents such as PDFs and MS Word documents, including client-side document editing, viewing, and electronic signatures.
- Angular
- Blazor
- React
- JavaScript
- ASP.NET MVC, ASP.NET Core, and WebForms
Related Posts
ASP.NETASP.NET CoreInline Styling
RegEx Based Inline Styling in TX Text Control Using JSON Rules
In this article, we demonstrate how to apply inline styling to text in TX Text Control using regular expressions defined in JSON format. This approach allows for dynamic and flexible text…
Convert CSV to PDF in .NET C#
Learn how to convert CSV data to a table in C# using the ServerTextControl library with this step-by-step tutorial. Easily generate PDF documents from CSV files in your .NET applications.
5 Document Workflows You Can Automate With JavaScript Rich Text Editor
Enterprise JavaScript rich text editors outperform open source and basic alternatives for document automation. This guide covers five document workflows with TX Text Control: contract generation…
AI-Ready Legal Documents: What to Fix Before Adding AI
Summerization, analysis, and risk detection: AI can help legal professionals process documents faster and more efficiently. However, before integrating AI into your legal document workflows, it's…
Explaining Contract Tracked Changes Automatically Using .NET C# and AI
Learn how to use AI and .NET C# to automatically explain changes to contracts, improving the document review and collaboration processes. This comprehensive guide provides practical implementation…


