Deploying TX Text Control .NET Applications Using ClickOnce
Deploying your Windows Forms or WPF applications using ClickOnce has huge advantages over a traditional setup deployment. The user only has to click a link on a website in order to install the application. Additionally, as a developer, you can publish updates to a server that are automatically downloaded to the clients to update the application. Thanks to Microsoft Visual Studio, the publishing process is straightforward. But there are some details you need to know to deploy your TX Text…


Deploying your Windows Forms or WPF applications using ClickOnce has huge advantages over a traditional setup deployment. The user only has to click a link on a website in order to install the application. Additionally, as a developer, you can publish updates to a server that are automatically downloaded to the clients to update the application.
Thanks to Microsoft Visual Studio, the publishing process is straightforward. But there are some details you need to know to deploy your TX Text Control applications smoothly.
-
Adding the TX Text Control redistributables
The TX Text Control redistributables are split into separate files to save disk space when some files are not required. Therefore, all files must be added to the project before the application can be published.
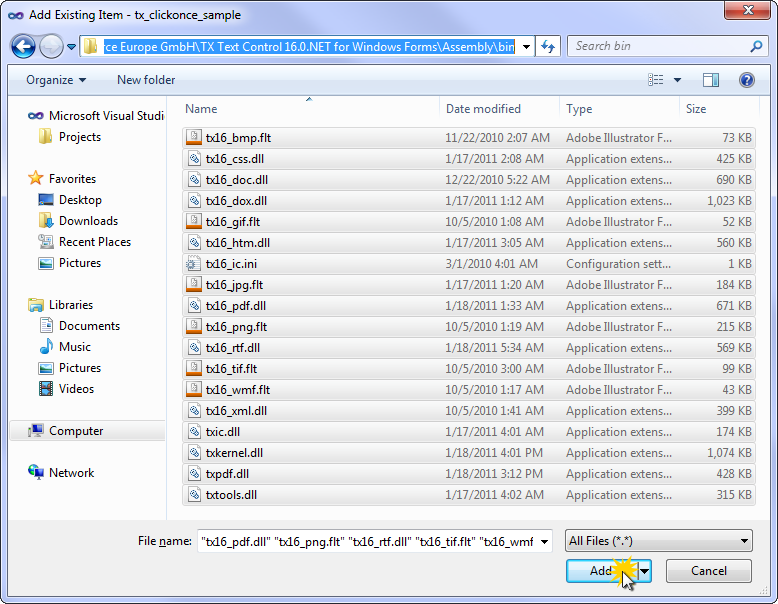
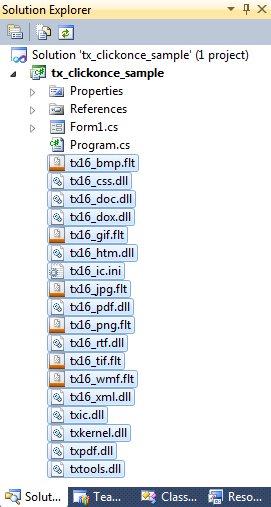
Assuming that you created an application in Visual Studio, select the project in the Solution Explorer and select Add Existing Item... from the Project main menu. In the opened dialog, browse for the Bin or Bin64 directory in the TX Text Control installation folder and add all files to the current project. Please refer to the TX Text Control documentation to learn when to deploy 32bit or 64bit files.
-
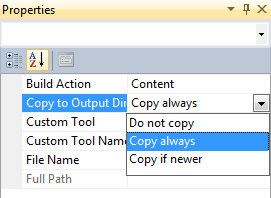
In the next step, the files must be added as Content to the project. Select the added files in the Solution Explorer and set the Build Action to Content and the Copy to Output Directory to Copy always.
-
Adjusting the ClickOnce settings
Open the project's properties by clicking the Properties... menu item in the Project main menu (ensure that you selected the project in the Solution Explorer).
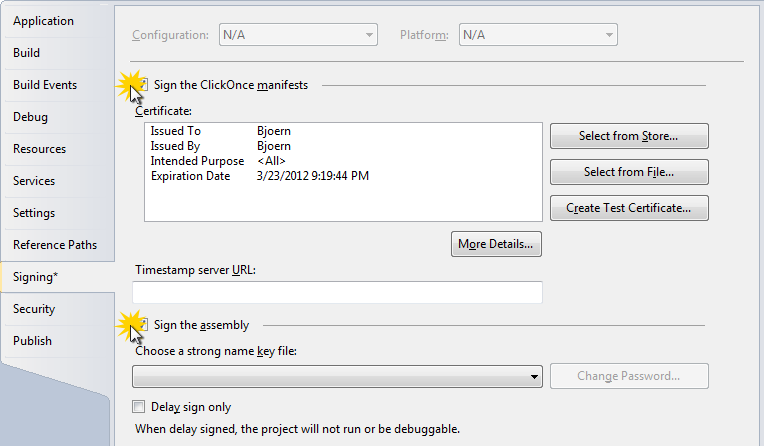
Open the Signing tab page and check Sign the ClickOnce manifests checkbox. Visual Studio is creating a test certificate automatically when publishing the application. Refer to Visual Studio's documentation when you need to add your own certificate.
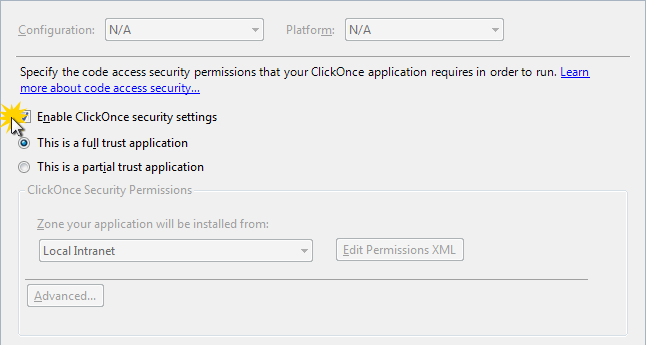
In the Security tab page, enable the ClickOnce security settings and choose This is a full trust application.
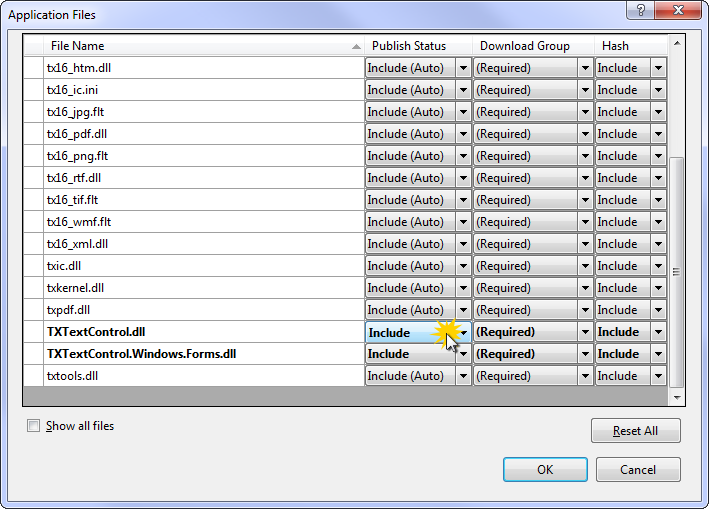
Open the Publish tab page and click on the Application Files... button to open the appropriate dialog. Ensure that the Publish Status is set to Include for all files and confirm with OK.
Now, your application is ready to be published. You can click the Publish Wizard... or Publish Now button to deploy your application.
Related Posts
Create a Table of Contents in Windows Forms using C#
This article explains how to create a table of contents in Windows Forms using the ribbon or programmatically. Creating a table of contents is required to organize large documents.
Official TX Text Control .NET Sample Applications Are Now Hosted on GitHub
This article gives a quick overview of the new repositories, their structure and our plans for the future.
ASP.NETJavaScriptDocument Editor
Detect Toggle Button Changes Using a MutationObserver
This article shows how to detect changes of toggle buttons in the ribbon of the web editor using a MutationObserver. The state of a toggle button in the ribbon visualizes the state of a certain…
Two Ways to Restart Numbered Lists in TX Text Control
In TX Text Control, numbered lists are continued by default and need to be reset when required. There is more than one way if you want to restart numbered lists in a document. In this article, two…
Zoom Tricks: Disabling CTRL + MOUSE WHEEL and More
This article shows how to disable CTRL + MOUSE WHEEL, implement zooming with keyboard and reset the zoom factor to its default value.


