The Document Viewer allows users to sign any supported document type by drawing, typing, or uploading signature images. The images are then merged into the signature fields and digitally signed using an electronic certificate.
Learn More
This getting started tutorial shows how to electronically sign documents using the Document Viewer and how to digitally sign the signed signature fields server-side.
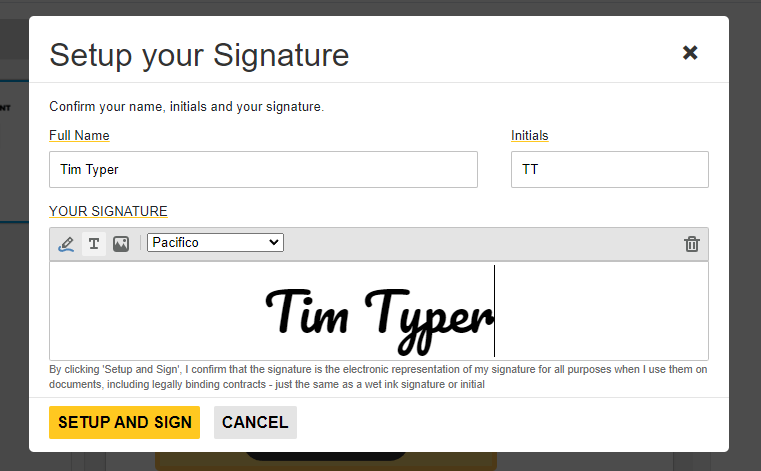
The following screenshot shows the Document Viewer signature soft pad, which provides this out-of-the-box functionality for capturing user signatures.

By default, typical fonts that are available on all platforms, browsers, and devices will be enabled.
Importing Fonts
However, you are able to specify any fonts that you want for this process. The Document Viewer will automatically use any loaded web fonts that have been added to your html using a <link> in the head of your html or by using the @import method.
For example, if you wanted to use the Pacifico font from Google Fonts, you could use the following stylesheet:
| <style> | |
| @import url('https://fonts.googleapis.com/css2?family=Pacifico&display=swap'); | |
| </style> |
As an alternative, you can also add the links to the header of your html page:
| <link rel="preconnect" href="https://fonts.googleapis.com"> | |
| <link rel="preconnect" href="https://fonts.gstatic.com" crossorigin> | |
| <link href="https://fonts.googleapis.com/css2?family=Pacifico&display=swap" rel="stylesheet"> |
Default Font
To set a default font that is automatically selected in the signature softpad, you can use the DefaultSignatureFont property of the Signature
╰ Web.MVC.DocumentViewer Namespace
╰ SignatureSettings Class
The SignatureSettings class describes the settings that are required for a document signing process using the DocumentViewer. class while creating a Document Viewer instance.
The following code shows how to set the font in ASP.NET Razor code:
| @Html.TXTextControl().DocumentViewer(settings => { | |
| settings.DocumentPath = "documents/signme.tx"; | |
| settings.Dock = DocumentViewerSettings.DockStyle.Fill; | |
| settings.SignatureSettings.DefaultSignatureFont = new SignatureFontSettings() { | |
| Family = "Pacifico", | |
| }; | |
| }).Render() |
The following code shows how to set the default font in a React application:
| <DocumentViewer | |
| width="1000px" | |
| height="800px" | |
| basePath="https://backend.textcontrol.com?access-token=yourtoken" | |
| signatureSettings={{ defaultSignatureFont: { family: "Pacifico" }}} | |
| > | |
| </DocumentViewer> |
In Angular, the default font would be set as shown in the following code:
| <tx-document-viewer | |
| width = "800px" | |
| height = "800px" | |
| basePath = "https://backend.textcontrol.com?access-token=yourtoken" | |
| [signatureSettings] = "{ | |
| showSignatureBar: true, | |
| ownerName: 'Paul', | |
| signerName: 'Jacob', | |
| defaultSignatureFont: { family: 'Pacifico' }, | |
| signatureBoxes: [{name: 'txsign', signingRequired: true, style: 1}] | |
| }"> | |
| </tx-document-viewer> |
Conclusion
By using custom fonts, you can provide a unique look and feel to the signature soft pad in the Document Viewer. This article showed how to use custom fonts for the signature appearance and how to import CSS fonts from Google Fonts.


