Text Control's libraries for digital document processing can be used to edit, create, and view Adobe PDF documents. In this tutorial, you will learn how to create a new ASP.NET Core Web application that generates PDF documents and how to make those documents available by using the Document Viewer.
Requirements
In order to create the project in this tutorial, it is required to install TX Text Control .NET Server for ASP.NET. Download a trial version here:
Creating the Application
Make sure that you downloaded the latest version of Visual Studio 2022 that comes with the .NET 6 SDK.
-
In Visual Studio 2022, create a new project by choosing Create a new project.
-
Select ASP.NET Core Web App (Model-View-Controller) as the project template and confirm with Next.
-
Choose a name for your project and confirm with Next.
-
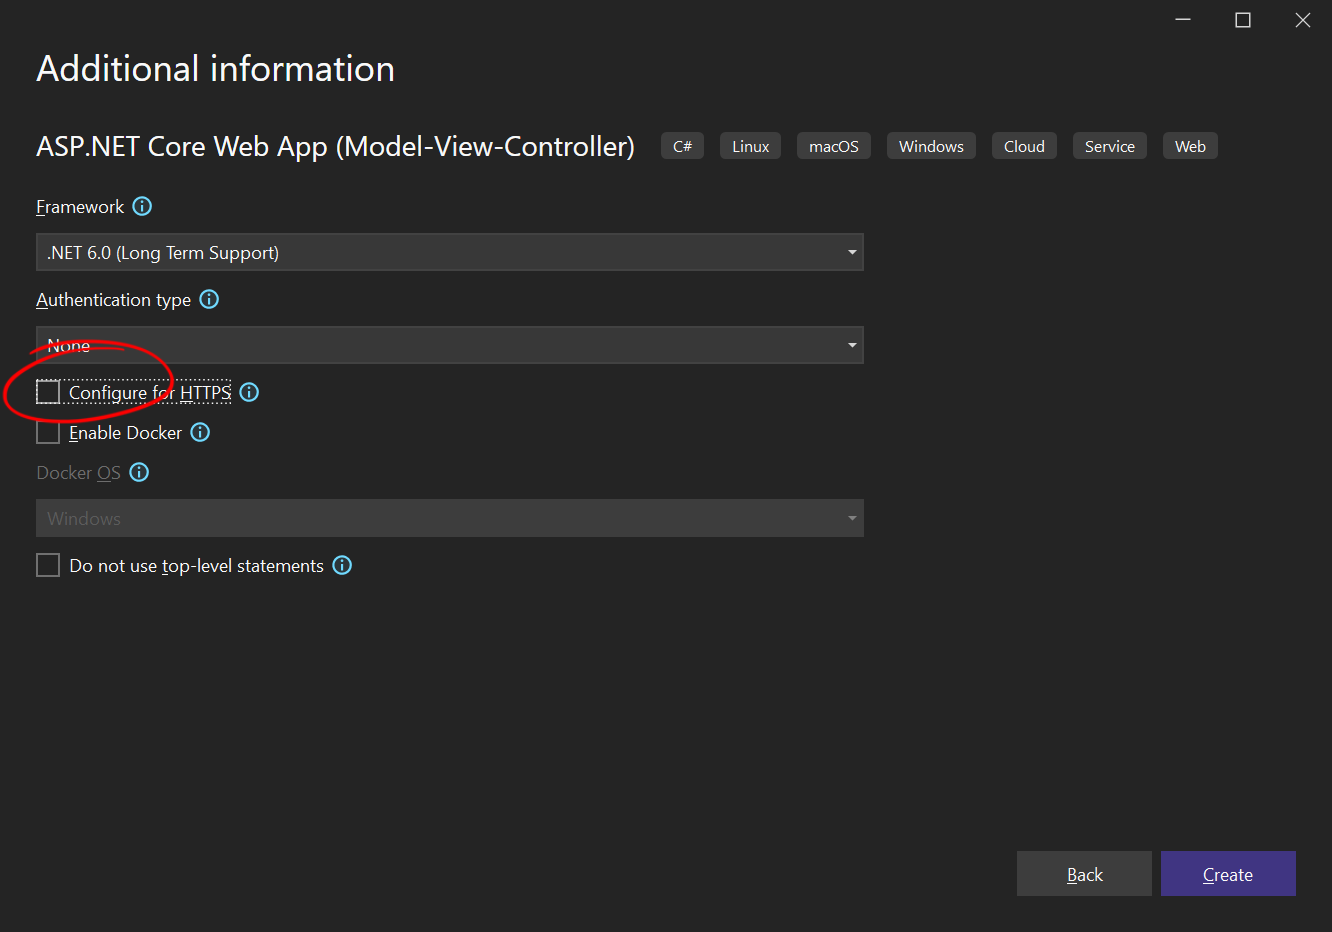
In the next dialog, choose .NET 6 (Long-term support) as the Framework, disable Configure for HTTPS for effortless testing, do not check Enable Docker and confirm with Create.

Adding the NuGet Package
-
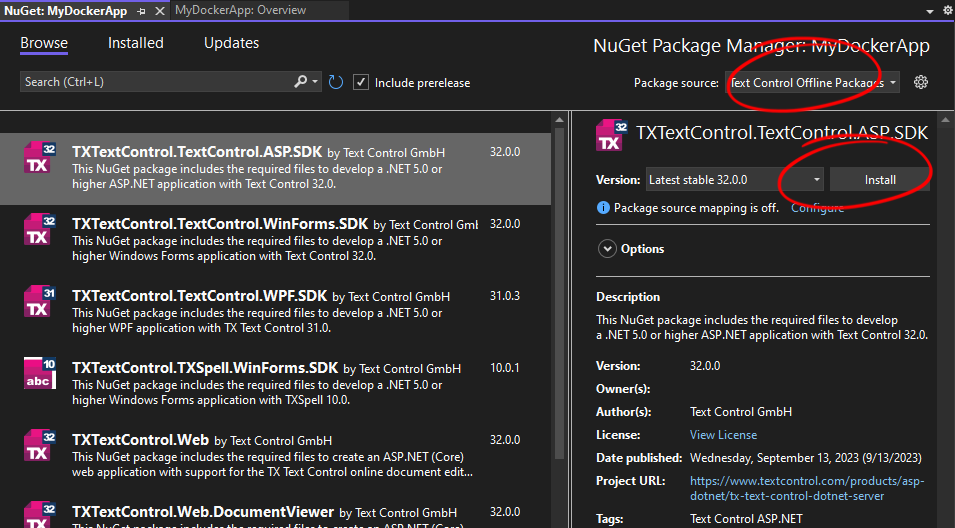
In the Solution Explorer, select your created project and choose Manage NuGet Packages... from the Project main menu.
Select Text Control Offline Packages from the Package source drop-down.
Install the latest version of the following packages:
- TXTextControl.TextControl.ASP.SDK
- TXTextControl.Web.DocumentViewer

Building the Document
The TX Text Control API is used to generate a document that can be exported to all supported file formats, including PDF and PDF/A.
-
Find the HomeController.cs file in the Controllers folder. Replace the Index() method with the following code:
This file contains bidirectional Unicode text that may be interpreted or compiled differently than what appears below. To review, open the file in an editor that reveals hidden Unicode characters. Learn more about bidirectional Unicode characterspublic IActionResult Index() { using (TXTextControl.ServerTextControl tx = new TXTextControl.ServerTextControl()) { tx.Create(); // adding static text TXTextControl.Selection sel = new TXTextControl.Selection(); sel.Text = "Welcome to Text Control\r\n"; sel.Bold = true; tx.Selection = sel; // adding merge fields TXTextControl.DocumentServer.Fields.MergeField mergeField = new TXTextControl.DocumentServer.Fields.MergeField() { Text = "{{company}}", Name = "company", TextBefore = "Company name: " }; tx.ApplicationFields.Add(mergeField.ApplicationField); // merge fields with MailMerge engine using (TXTextControl.DocumentServer.MailMerge mailMerge = new TXTextControl.DocumentServer.MailMerge()) { mailMerge.TextComponent = tx; mailMerge.MergeJsonData("[{\"company\": \"Text Control, LLC\" }]"); } byte[] baPdf; tx.Save(out baPdf, TXTextControl.BinaryStreamType.AdobePDF); ViewBag.Document = baPdf; } return View(); }
Learn More
In the example above, the document is created from scratch. However, there are many ways to create a PDF document, from using MS Word templates to converting other formats to PDF.
Displaying the PDF
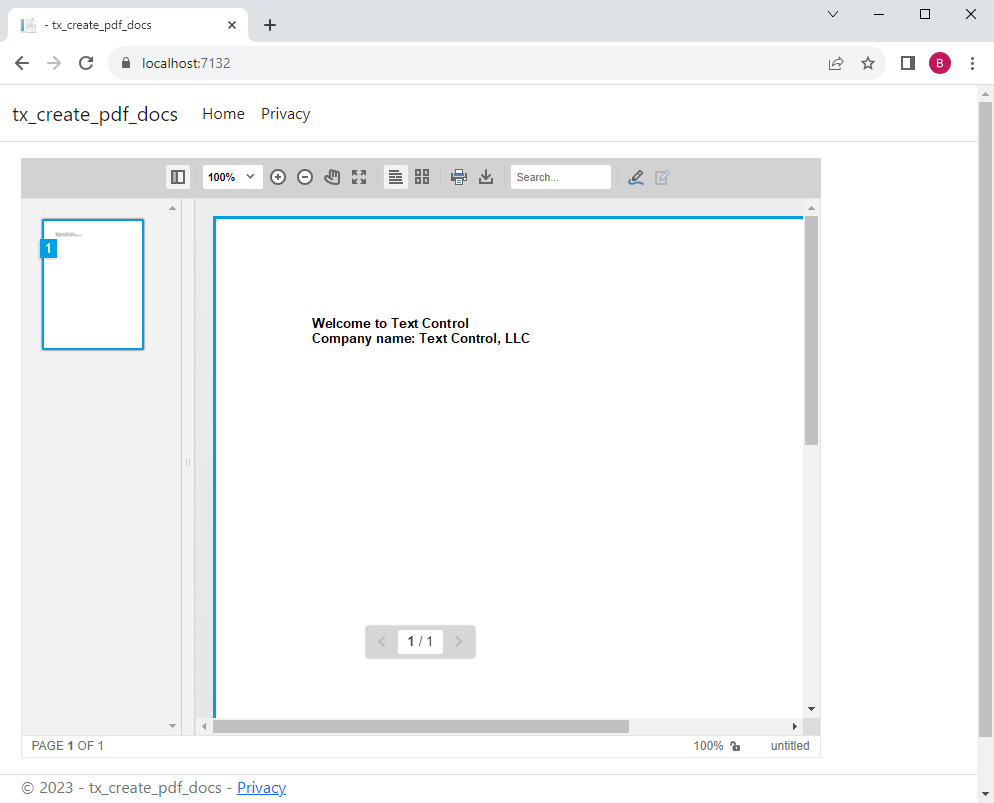
In order to deploy the PDF document, the Document Viewer is used to render the document that has been generated.
-
Find the Index.cshtml file in the Views -> Home folder. Replace the complete content with the following code:
This file contains bidirectional Unicode text that may be interpreted or compiled differently than what appears below. To review, open the file in an editor that reveals hidden Unicode characters. Learn more about bidirectional Unicode characters@using TXTextControl.Web.MVC.DocumentViewer @using System.Text <div style="width: 800px; height: 600px;"> @Html.TXTextControl().DocumentViewer(settings => { settings.DocumentData = Convert.ToBase64String(ViewBag.Document); settings.Dock = DocumentViewerSettings.DockStyle.Fill; }).Render() </div>
Compile and start the application.

Adding PDF.js Support
PDF documents are rendered using TX Text Control by default. You can add a reference to PDF.js to use this rendering engine for the display of PDF documents in the Document Viewer.
-
Right-click the project in the Solution Explorer and select Add -> Client-Side Library... from the context menu.
-
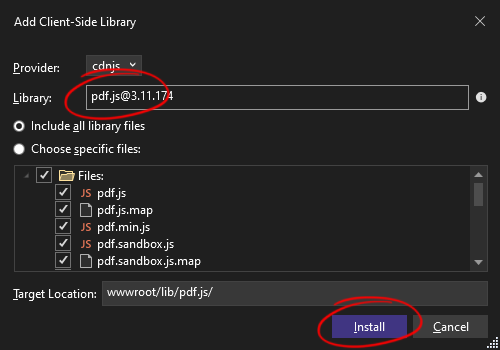
In the dialog that opens, type pdf.js in the Library text box and let Visual Studio autocomplete the entry with the latest version. Make sure that Include all library files is selected and confirm with Install.

-
Find the Index.cshtml file in the Views -> Home folder. Replace the complete content with the following code:
This file contains bidirectional Unicode text that may be interpreted or compiled differently than what appears below. To review, open the file in an editor that reveals hidden Unicode characters. Learn more about bidirectional Unicode characters@using TXTextControl.Web.MVC.DocumentViewer @using System.Text <div style="width: 800px; height: 600px;"> @Html.TXTextControl().DocumentViewer(settings => { settings.DocumentData = Convert.ToBase64String(ViewBag.Document); settings.Dock = DocumentViewerSettings.DockStyle.Fill; settings.DocumentLoadSettings.PDFJS.BasePath = "lib/pdf.js/"; }).Render() </div> Using CDN Package Sources
In the example above, the PDF.js files are imported directly into the project. If you want to link to a CDN-hosted version, simply add the full path to the BasePath property.
This file contains bidirectional Unicode text that may be interpreted or compiled differently than what appears below. To review, open the file in an editor that reveals hidden Unicode characters. Learn more about bidirectional Unicode characters@using TXTextControl.Web.MVC.DocumentViewer @using System.Text <div style="width: 800px; height: 600px;"> @Html.TXTextControl().DocumentViewer(settings => { settings.DocumentData = Convert.ToBase64String(ViewBag.Document); settings.Dock = DocumentViewerSettings.DockStyle.Fill; settings.DocumentLoadSettings.PDFJS.BasePath = "https://cdnjs.cloudflare.com/ajax/libs/pdf.js/3.2.146"; }).Render() </div>


