When you integrate the TX Text Control ASP.NET Document Editor into an ASP.NET Core Web application, the editor requires two parts:
- NuGet package
The ASP.NET MVC NuGet package for the client-side components
- Backend: Synchronization service
Server-side backend synchronization service running TX Text Control
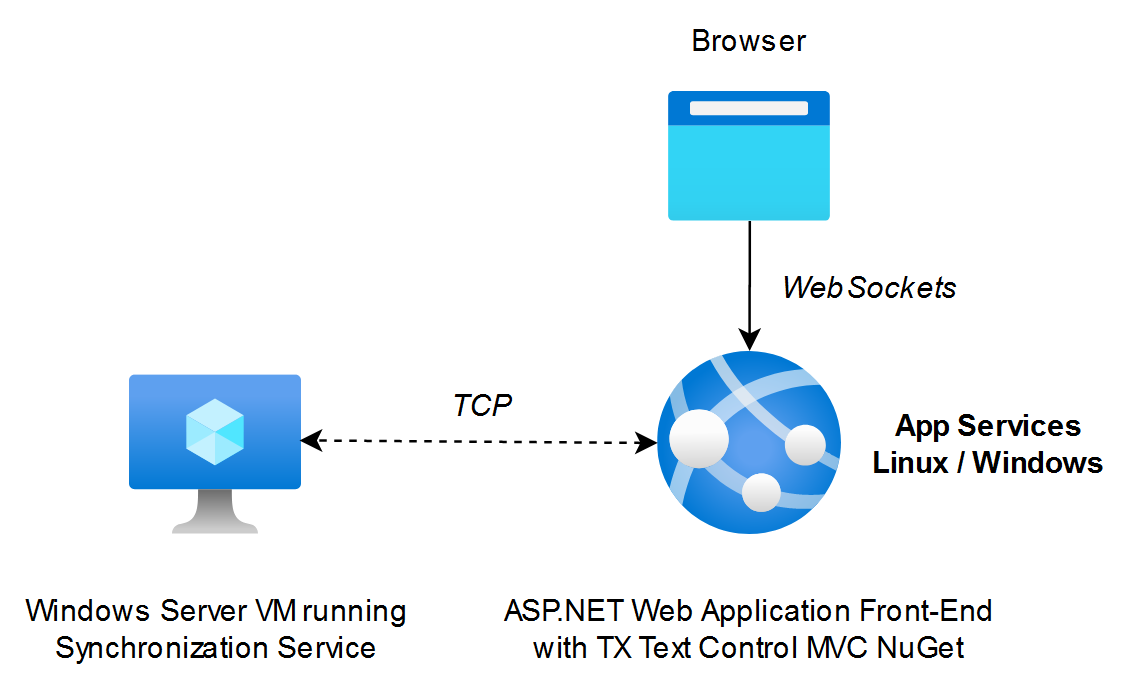
To deploy the TX Text Control document editor on Linux as part of an ASP.NET Core Web application, the synchronization service must be deployed separately on a Windows VM. Thus, the web application itself can be deployed on Azure App Services or other container-based deployment services.
This article shows how to create an ASP.NET Core Web application that runs in a Linux container and how to connect it to the synchronization service that is deployed on another, separate server. The following diagram shows a simplified version of such a deployment without any load balancing:
Creating the ASP.NET Web Application
The first step is to create the ASP.NET Web application. As a prerequisite for this tutorial, you must have at least Visual Studio 2022, Docker (Linux containers enabled), and .NET 8 installed.
- Create an ASP.NET Core Web Application
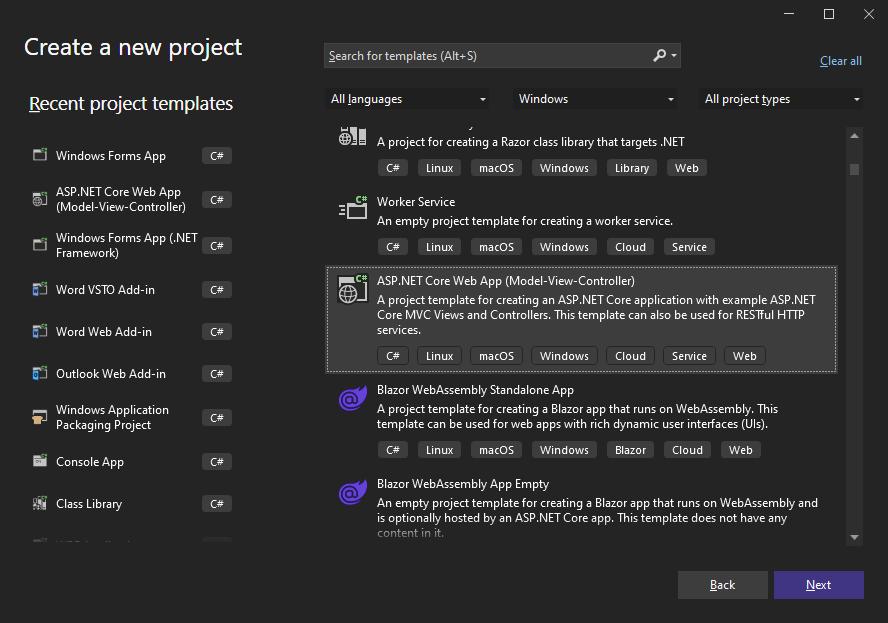
In Visual Studio, create a new ASP.NET Core Web App (Model-View-Controller).
-
Specify a name for the project and continue with Next.
-
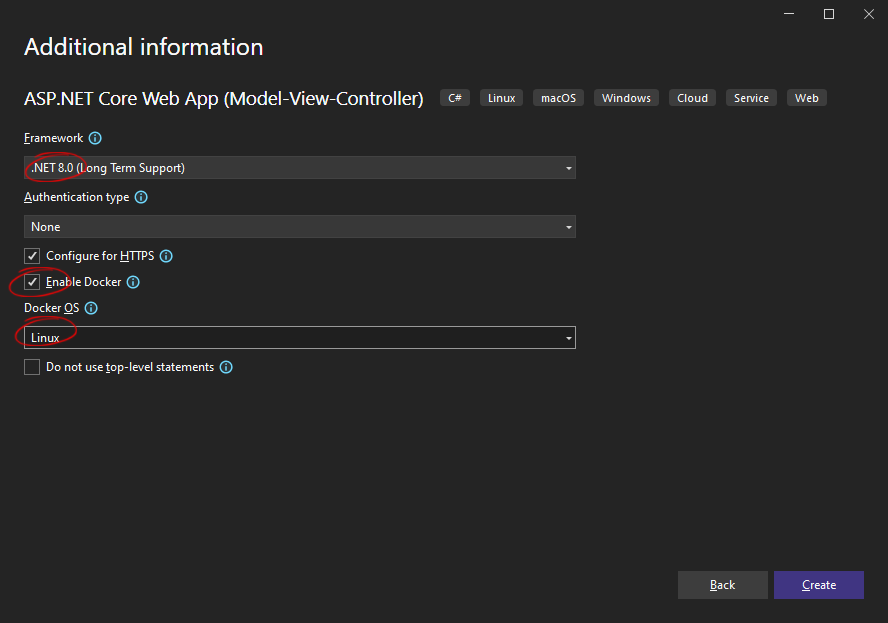
Select .NET 8 (Long Term Support) as the Framework, check Configure for HTTPS and Enable Docker. Select Linux as the Docker OS. Confirm with Create.
Adding the NuGet Package
-
In the Solution Explorer, select your created project and choose Manage NuGet Packages... from the Project main menu.
Package Source
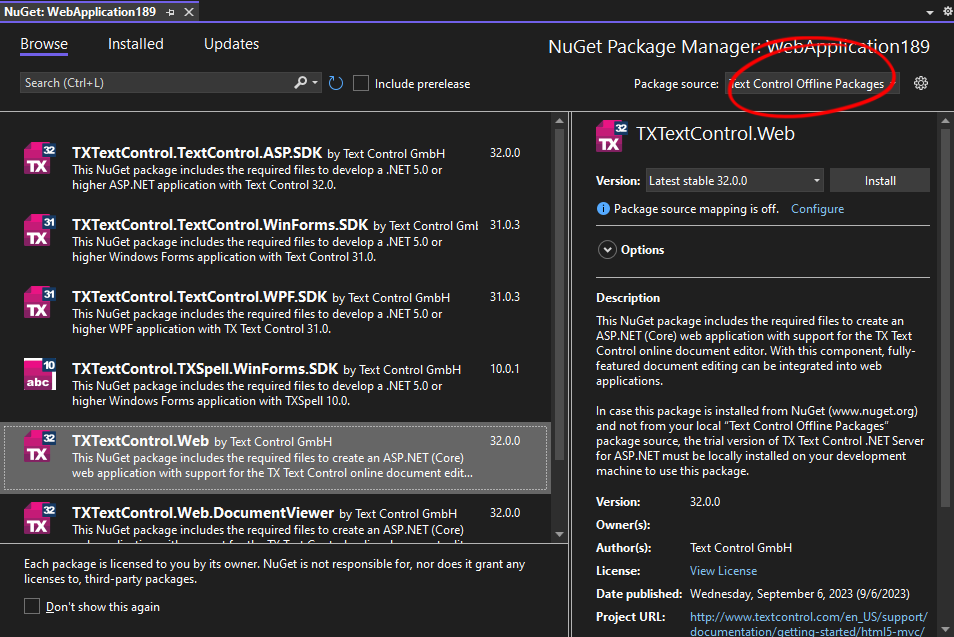
Select either Text Control Offline Packages or nuget.org as the Package source. Packages in the official Text Control NuGet profile are frequently updated.
In case you are using a Trial Access Token, please choose nuget.org.
Browse for txtextcontrol.web and Install the latest version of the TXTextControl.Web package.
Configure the Application
-
Open the Program.cs file located in the project's root folder.
At the very top of the file, insert the following code:
This file contains bidirectional Unicode text that may be interpreted or compiled differently than what appears below. To review, open the file in an editor that reveals hidden Unicode characters. Learn more about bidirectional Unicode charactersusing TXTextControl.Web; Add the following code after the entry
app.UseRouting();:This file contains bidirectional Unicode text that may be interpreted or compiled differently than what appears below. To review, open the file in an editor that reveals hidden Unicode characters. Learn more about bidirectional Unicode characters// enable Web Sockets app.UseWebSockets(); // attach the Text Control WebSocketHandler middleware app.UseTXWebSocketMiddleware("127.0.0.1"); Important
The parameter given in the constructor define the IP address and port of your hosted synchronization service. Replace the first parameter ("127.0.0.1") with your IP.
Adding the Control to the View
-
Find the Index.cshtml file in the Views -> Home folder. Replace the complete content with the following code to add the document editor to the view:
This file contains bidirectional Unicode text that may be interpreted or compiled differently than what appears below. To review, open the file in an editor that reveals hidden Unicode characters. Learn more about bidirectional Unicode characters@using TXTextControl.Web.MVC @Html.TXTextControl().TextControl().Render()
Hosting the Synchronization Service
In order to deploy the synchronization service, a full Windows Server or VM is required as the TCP service runs as a Windows Service. Assuming that you already have a Windows Server available or created a VM in your preferred cloud provider such as Microsoft Azure, follow these steps to deploy the service.
Docker Deployment
The following tutorial shows how to manually deploy to a full VM and explains the steps involved. If you want to deploy the TCP Service as part of a Docker container, see the following article.
Deployment with Docker and Windows Server Core 2019 and 2022
-
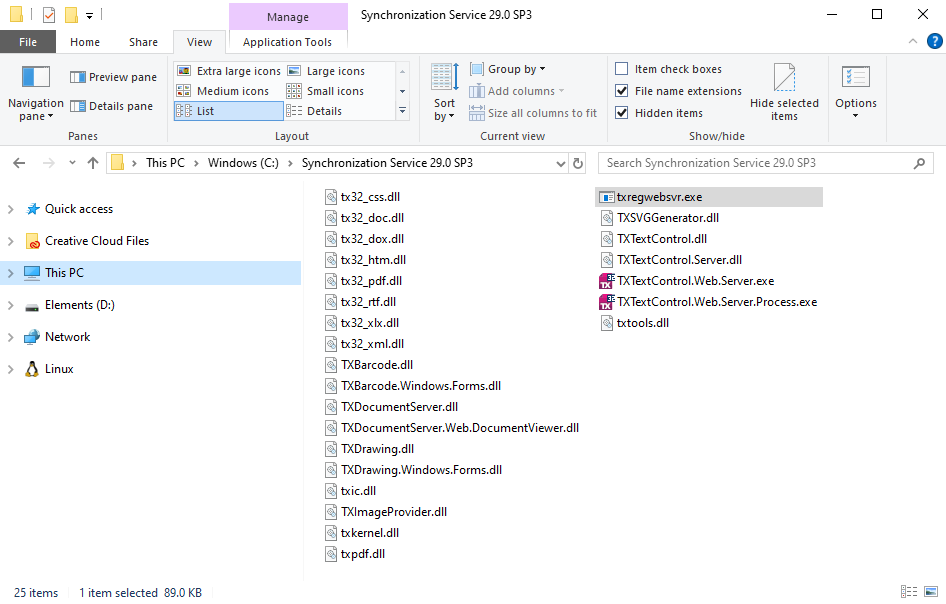
On your development machine (where you installed the developer setup of TX Text Control), create a folder and copy all files from the following folders into the same folder.
Pro Tip
Name the folder including the TX Text Control version number. For example: TX Synchronization Service 32.0 SP2.
-
C:\Program Files\Text Control GmbH\TX Text Control 32.0.NET Server for ASP.NET\Assembly
-
C:\Program Files\Text Control GmbH\TX Text Control 32.0.NET Server for ASP.NET\Assembly\bin64
-
C:\Program Files\Text Control GmbH\TX Text Control 32.0.NET Server for ASP.NET\Tools
Your folder now should contain these files:
-
-
Copy this folder to any location on the dedicated Windows Server or your VM.
-
On the server, open a command prompt with administrator privileges and change to the directory where you copied the TX Text Control service files. Type and run the following command
txregwebsvr.exe /i
Adjusting Firewalls
The ASP.NET Core Web Application communicates with the previously installed service using pure TCP on the given port number. TCP traffic must be allowed on this specific port.
-
On your server that hosts the synchronization service, open a command prompt window and type:
wf.msc
-
From the left-hand tree view, select Inbound Rules and create a new rule by clicking New Rule....
-
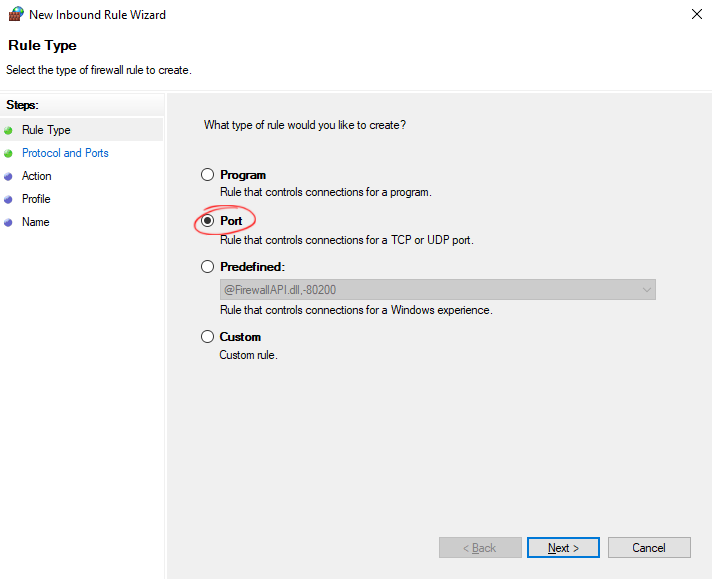
In the opened dialog, select Port and confirm with Next >.
-
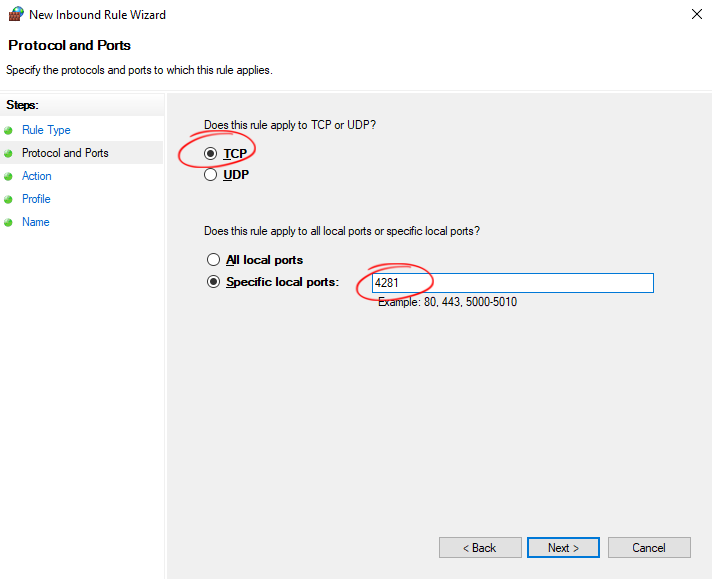
Select TCP and specify the port number and confirm with Next >.
Important
The synchronization TCP service port numbers are fixed for each release and increase with each major release:
- Version 32.0: 4281
- Version 33.0: 4282
-
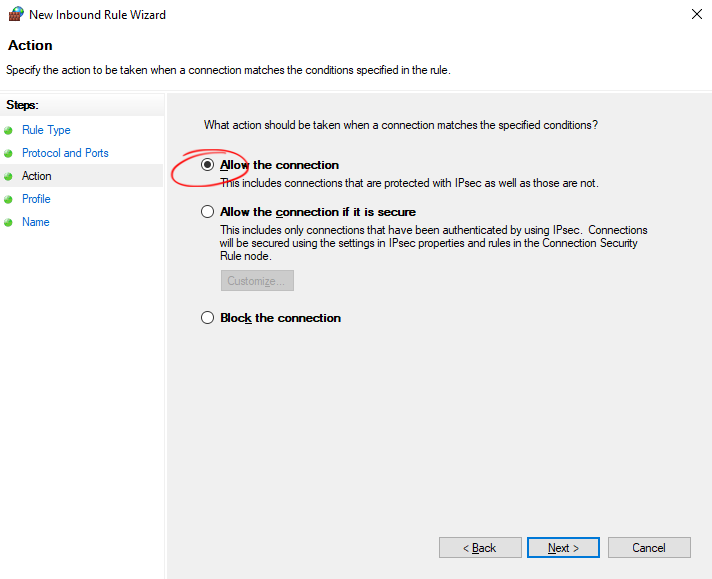
Select Allow and confirm with Next >.
-
Select the preferred network areas (Domain, Private and Public).
-
Name the rule TX Service 32.0 and click Finish.
In case you are using Azure or another cloud service, you might have to open this port for the VM as well. For Azure, follow the next steps.
-
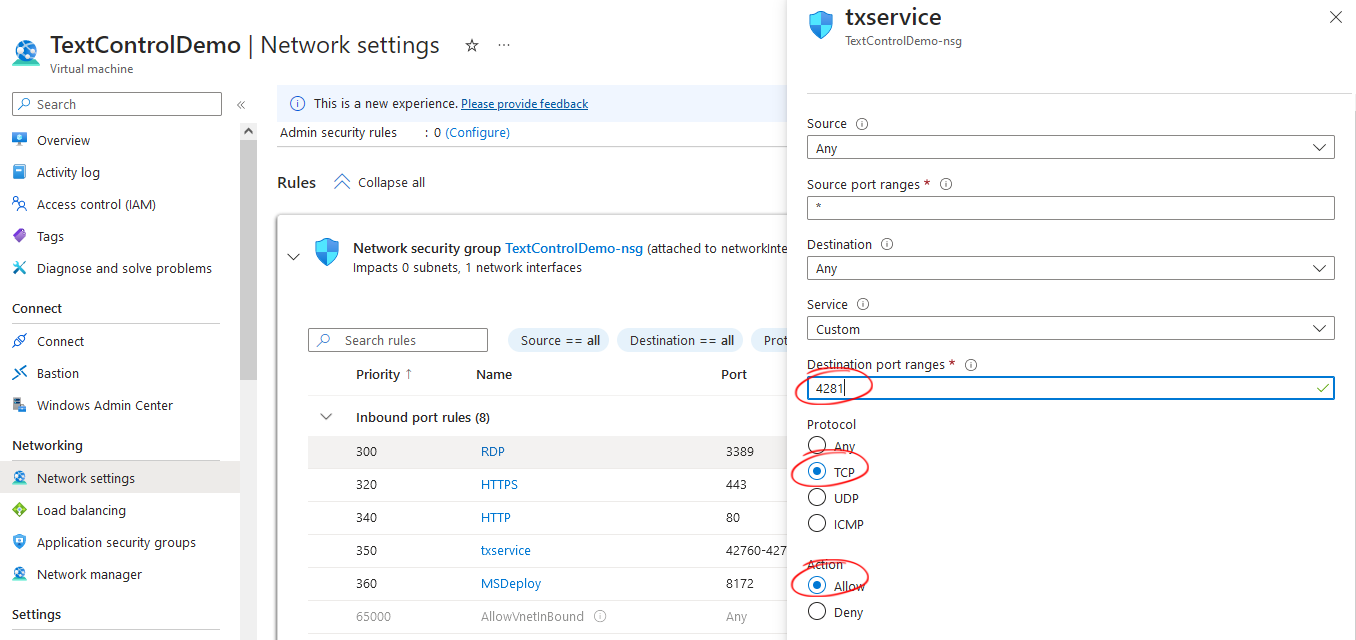
In your Network security group, select Inbound security rules. Then select + Add to add a new rule.
-
Set the Destination port ranges to 4281, Protocol to TCP and Action to Allow. Confirm with Add.
Now is a good time to verify the IP address in step 7 of Creating the ASP.NET Web Application. Make sure to add the IP address of your Vm that hosts the synchronization service.
After these steps, you successfully deployed TX Text Control to Linux with a separate synchronization service running on a Windows Server VM.


