Creating the project and controls
-
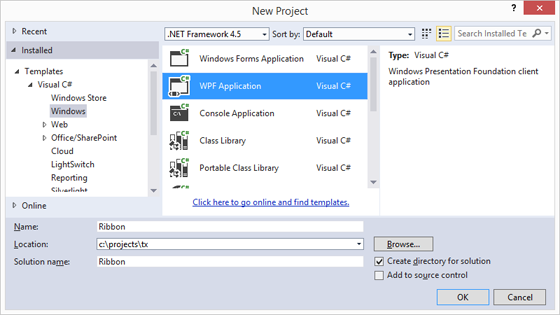
Assuming that you have already run the TX Text Control installation program, start Visual Studio .NET and create a new project. Select either Visual Basic or Visual C# as the project type and WPF Application as the template.
-
In the XAML view, replace the Grid with a DockPanel control as shown in the below screenshot:

-
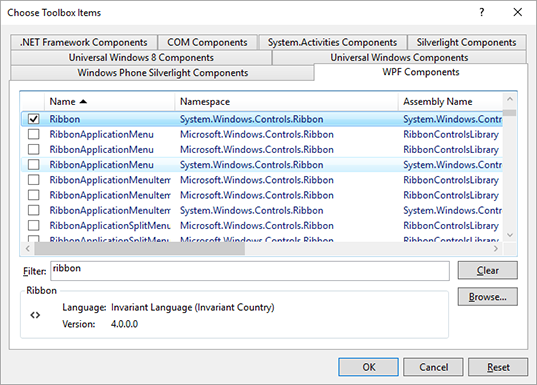
Click Choose Toolbox Items... from the Tools main menu to customize the toolbox. In the tab WPF Components, filter for Ribbon and find the Ribbon from the assembly System.Windows.Controls.Ribbon. Select the control and confirm with OK.
-
Find the recently added control Ribbon, drag and drop it into the DockPanel.
-
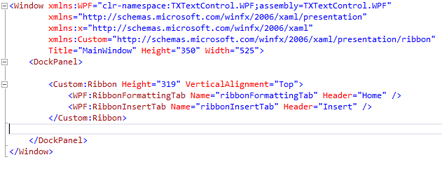
Find the controls RibbonFormattingTab and RibbonInsertTab in the toolbox group TX Text Control 29.0, drag and drop them into the created Ribbon tag. Add a name parameter to both controls and name them ribbonFormattingTab and ribbonInsertTab. Additionally, set the Header parameter to Home and Insert. The XAML should look like this now:
-
In the next steps, the order in the controls are added to the Window is important.
Double-click the RulerBar in the toolbox to add it to the Window. Repeat this for the StatusBar, a second RulerBar and finally TextControl. Set the DockPanel.Dock property of the first RulerBar to top, set Bottom for the StatusBar, Left for the second RulerBar and finally Top for TextControl. Make sure that all other automatically created parameters such as Width, Height or Margin is removed from the tags.
For the secondly added RulerBar, set the HorizontalAlignment to Left and the VerticalAlignment to Stretch.
Now, add a Name for each control according to the following screenshot:

-
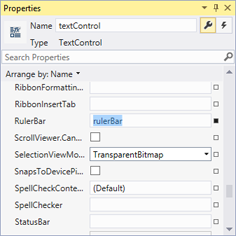
In this step, the controls must be connected. Therefore, select textControl to open it's properties in the Properties window of Visual Studio. First, look for the RulerBar property and type in the name of the added RulerBar: rulerBar.
-
Set the StatusBar property to statusBar and VerticalRulerBar to verticalRulerBar.
-
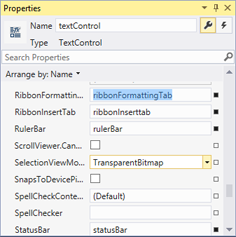
Now, the ribbon tabs must be connected. Find the RibbonFormattingTab property and set it to ribbonFormattingTab, the name of the insert ribbon tab control. Repeat this step for the RibbonInsertTab and set it to ribbonInsertTab.
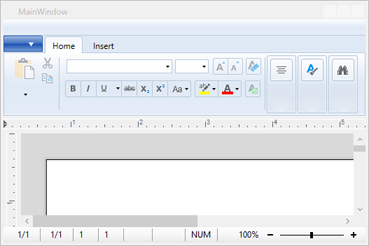
The design view of the Window should now look like in the following screenshot:
-
In the XAML, add the Loaded="textControl_Loaded" event handler to the textControl element as a parameter, so that the line looks like this:
This file contains bidirectional Unicode text that may be interpreted or compiled differently than what appears below. To review, open the file in an editor that reveals hidden Unicode characters. Learn more about bidirectional Unicode characters<WPF:TextControl DockPanel.Dock="Top" Name="textControl" Loaded="textControl_Loaded" RulerBar="rulerBar" StatusBar="statusBar" VerticalRulerBar="verticalRulerBar" RibbonFormattingTab="ribbonFormattingTab" RibbonInsertTab="ribbonInsertTab"/> Now, in the XAML right-click on textControl_Loaded and choose Go To Definition from the opened context menu. Add the following code to the event handler:
This file contains bidirectional Unicode text that may be interpreted or compiled differently than what appears below. To review, open the file in an editor that reveals hidden Unicode characters. Learn more about bidirectional Unicode charactersprivate void textControl_Loaded(object sender, RoutedEventArgs e) { textControl.Focus(); } This file contains bidirectional Unicode text that may be interpreted or compiled differently than what appears below. To review, open the file in an editor that reveals hidden Unicode characters. Learn more about bidirectional Unicode charactersPrivate Sub textControl_Loaded(sender As Object, e As RoutedEventArgs) textControl.Focus() End Sub

