This tutorial shows how to upgrade a .NET Framework ASP.NET MVC Web Application to an ASP.NET Core Web App by using the .NET Upgrade Assistant. In addition, you will learn how to replace the references to the TX Text Control with the corresponding NuGet packages.
The project that is used in this tutorial uses the Server
╰ TXTextControl Namespace
╰ ServerTextControl Class
The ServerTextControl class implements a component that provide high-level text processing features for server-based applications. and Mail
╰ DocumentServer Namespace
╰ MailMerge Class
The MailMerge class is a .NET component that can be used to effortlessly merge template documents with database content in .NET projects, such as ASP.NET web applications, web services or Windows services. classes and the Document Editor 
╰ Web.MVC Namespace
╰ TextControl Class
The TextControl class represents an extension object implementing the Text Control rich text editor functionality. .
.NET Upgrade Assistant
- Install the .NET Upgrade Assistant Visual Studio extension.
- Open your ASP.NET MVC project in Visual Studio.
- In Solution Explorer, right-click the project you want to upgrade and select Upgrade. Select Side-by-side incremental project upgrade, which is the only upgrade option.
- For the upgrade target, select New project and click Next.
- Choose a name for your new project, select ASP.NET Core MVC as the project template and click Next.
- Select your preferred target framework, such as .NET 6. Click Next and Finish to convert the project.
-
The Summary step displays: <Framework ProjectName> is now connected to <Framework ProjectNameCore> via Yarp proxy. Select Upgrade Controller and then select the controllers to upgrade.
TXWebSocketController
Do not convert TXWebSocketController. This controller is no longer needed.
- Select the components to upgrade, then click Upgrade selection.
Adding the NuGet Package
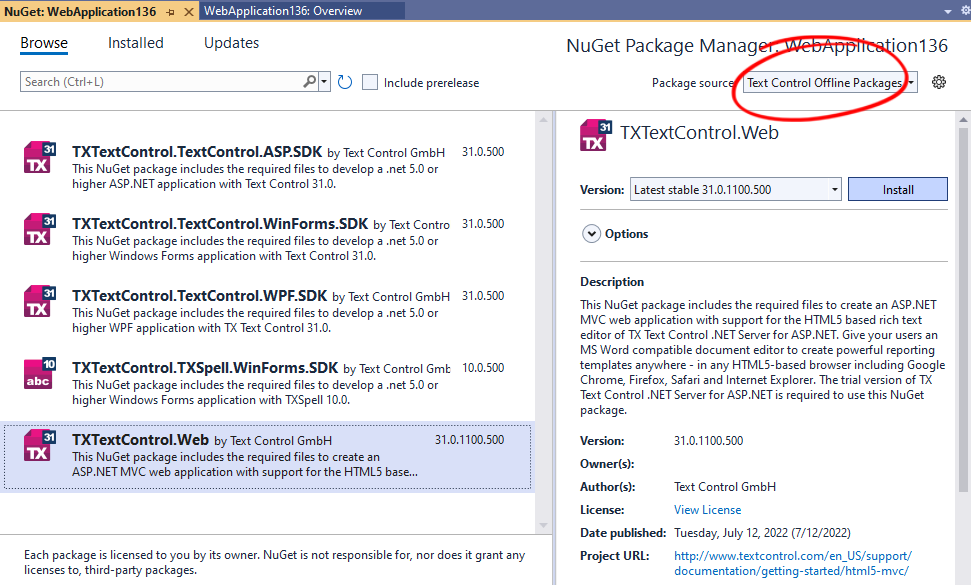
Once all views, controllers, and classes have been updated, the TX Text Control references must be added using NuGet. These references are not converted automatically, but since TX Text Control provides easy-to-install NuGet packages, this step is very easy.
-
In the Solution Explorer, select your created project and choose Manage NuGet Packages... from the Project main menu.
Package Source
Select either Text Control Offline Packages or nuget.org as the Package source. Packages in the official Text Control NuGet profile are frequently updated.
Install the latest versions of the following packages:
- TXTextControl.TextControl.ASP.SDK
- TXTextControl.Web

Configure the Application
-
Open the Program.cs file located in the project's root folder. Add the following code after the entry
app.UseStaticFiles();:This file contains bidirectional Unicode text that may be interpreted or compiled differently than what appears below. To review, open the file in an editor that reveals hidden Unicode characters. Learn more about bidirectional Unicode characters// serve static linked files (JavaScript and CSS for the editor) app.UseStaticFiles(new StaticFileOptions { FileProvider = new Microsoft.Extensions.FileProviders.PhysicalFileProvider( System.IO.Path.Combine(System.IO.Path.GetDirectoryName( System.Reflection.Assembly.GetEntryAssembly().Location), "TXTextControl.Web")), RequestPath = "/TXTextControl.Web" }); // enable Web Sockets app.UseWebSockets(); // attach the Text Control WebSocketHandler middleware app.UseMiddleware<TXTextControl.Web.WebSocketMiddleware>();
That is all. After these steps, you should be able to successfully compile and run your application.

